background image


23 


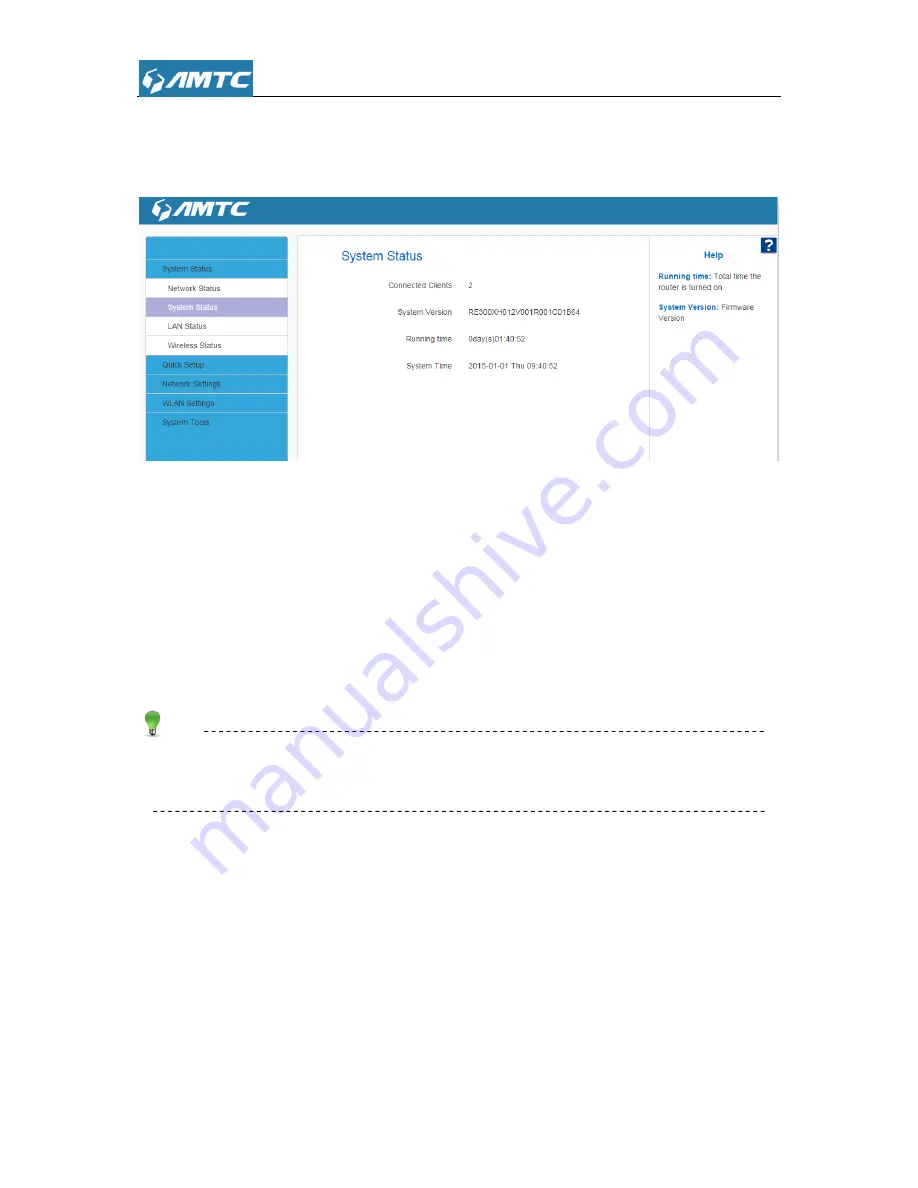
3.2.2 System Status 

This page displays 

―Connected Clients‖, ―System Version‖, ―Running Time‖, ―System Time‖. 


Parameters specification: 


Connection Clients: 

displays the number of connected clients.


System Version:


Firmware Version. 


Running Time:

 Displays the time duration indicating how long the 

device

 has been up since 

startup. Up time is recounted and renewed upon power off. 


System Time:

 Current system time on this device. The device automatically synchronizes the 

system time with Internet time servers. 

Tips


Running time is total time the 

device

 is turned on. 


Summary of Contents for RE3001

Page 1: ...1 RE3001 RE3002 300Mbps Wi Fi Range Extender User Guide ...

Page 2: ...gging this product into a wall socket make sure that the electrical socket is not damaged and that there is no gas leakage 10 Place the connecting cables properly so that people won t stumble or walk on it 11 This product should be operated from the type of power indicated on the marking label If you are not sure of the type of power available consult the qualified technician 12 Unplug this produc...

Page 3: ...t this user guide This user guide uses the following formats to highlight special messages ICON Description Note This format is used to highlight information of importance or special interest Ignoring this type of note may result in ineffective configurations loss of data or damage to device Tip This format is used to highlight a procedure that will save time or resources Knowledge Expansion Descr...

Page 4: ... 1 Log in the Wi Fi Range Extender 17 3 2 System Status 21 3 2 1 Network Status 21 3 2 2 System status 23 3 2 3 LAN Status 24 3 2 4 Wireless Status 25 3 3 Quick Setup 25 3 4 Network Settings 30 3 4 1 LAN Settings 30 3 4 2 DHCP Server 32 3 4 3 DHCP List Binding 34 3 5 WLAN Settings 35 3 5 1 Basic Settings 35 3 5 2 Security Settings 37 3 5 3 Advanced Settings 40 3 5 4 Access Control 41 3 5 5 Connect...

Page 5: ...igure PC TCP IP Settings 50 Windows 7 50 Windows XP 56 2 Troubleshooting 58 3 Factory default settings 59 4 Remove Wireless Network from Your PC 60 Windows 7 60 Windows XP 61 5 Safety and Emission Statement 63 ...

Page 6: ...Extender delivers complete data privacy It is also compatible with all IEEE 802 11n IEEE 802 11b and IEEE 802 11g specification It supports an easy wireless connection to the up level router equipped with WPS QSS button by pressing the RET RE button on the side panel It also supports an easy web based setup for installation and management Even though you may not be familiar with the Wi Fi Range Ex...

Page 7: ...out the Wi Fi Range Extender s status Indicate Status Indication SYS On The Wi Fi Range Extender is on OFF The Wi Fi Range Extender is off RE Fast Flashing WPS connection in progress It may take up to 2 minutes Slow flashing The Wi Fi Range Extender has established a secure connection and the signal strength is adequate ...

Page 8: ... release the button and wait the Wi Fi Range Extender to reboot to its factory default setting You can enter the Wi Fi Range Extender use the default password password admin Under the Universal Repeater mode press the RE RST button on the Wi Fi Range Extender upper panel with the up level router s WPS QSS button at the same time about 1 3s the Wi Fi Range Extender will automatically connect with t...

Page 9: ...ther ISP Information AP mode 1 Internet connection information provided by the up level router 2 Ethernet Cable This can be found in the product package You will need it to connect your PC to this device Universal Repeater mode 1 Up level router s SSID MAC address security mode cipher type and security key 2 Internet connection information provided by the up level router 3 Ethernet Cable This can ...

Page 10: ...ectly into a wall socket but not the multiple sockets 2 To take full advantage of the filter function of the Repeater and to improve data transmission in the network always plug the multiple sockets into the integrated electrical socket of the Repeater ...

Page 11: ... depending on the physical position of the wireless devices The environment Factors such as metal appliances or obstructions and walls can weaken the wireless signal Typical ranges vary based on the types of materials and ambient RF radio frequency noise in your home or office In order to optimize the performance of the Wi Fi Range Extender please follow the instructions below to achieve an ideal ...

Page 12: ...Extender when your home network connection is poor or when you want a larger wireless coverage to eliminate dead zones As in compliance with the wireless transmission protocol all the Wi Fi Range Extender devices are set to work in half duplex instead of full duplex mode In other words the Wi Fi Range Extender has to process one way communication between your up level router or AP and to the termi...

Page 13: ...13 automatically and Obtain DNS server address automatically from the device Click Start Control Panel Click Network and Internet Click Network and Sharing Center ...

Page 14: ...14 Click Change adapter settings Click Local Area Connection and select Properties Select Internet Protocol Version 4 TCP IPv4 and click Properties ...

Page 15: ...15 Select Obtain an IP address automatically and click OK Click OK on the Local Area Connection Properties window to save your settings ...

Page 16: ...ress manually please set the PC s IP address and Wi Fi Range Extender IP address in the same subnet because the Wi Fi Range Extender s default IP is 192 168 1 1 the subnet mask is 255 255 255 0 so your IP should set 192 168 1 XXX XXX cannot be 1 ...

Page 17: ... change its LAN IP automatically For example the up level router s LAN IP is 192 168 1 1 this device s LAN IP will become 192 168 10 1 2 If they are not in the same network segment this device s LAN IP will unchanged After this device connected with up level router this device will get an IP from up level through DHCP but this IP is unknown to the user now this device has two IP addresses 192 168 ...

Page 18: ...p information zone four parts as shown below Note Device does not support web page function display will appear abnormal please refer to the actual situation of equipment software Different browsers and the same browsers but different version the web page may different in display Web page displayed as gray features or parameters display device does not support or immutable under the current config...

Page 19: ...fer the Help information please click the symbol No Name Description 1 Primary User can easily Select functions in the navigation bar menu Select the results displayed in the configuration section 2 Secondary 3 Configuration zone Configure and view area 4 Help information The help information of current page ...

Page 20: ...if you want to refer the navigation bar menu please click the symbol Commonly used web page elements description Common elements Description Goto the configure page directly Enter the next configure page Scan the information automatically Close the scan function Back to previous page Open Scan Close Scan Goto Configure NEXT Back ...

Page 21: ...rent information Reboot the device Clear current page information Allow connection Disallow connection 3 2 System Status Click System Status enter the system status web page in this page you can see the Network Status System Status LAN Status Wireless Status 3 2 1 Network Status In this page displays the Operation Mode and Connection Status Apply Cancel Save Refresh Add Backup Upgrade Reboot Clear...

Page 22: ...d after connected this device send wireless signal you can surf the Internet through connection with the wireless signal Universal Repeater A universal repeater extends the wireless coverage of another wireless AP or router The advantage of the universal repeater is that the up level router does not need to have WDS function and may not need to be the same brand Therefore it can work with almost a...

Page 23: ...cted clients System Version Firmware Version Running Time Displays the time duration indicating how long the device has been up since startup Up time is recounted and renewed upon power off System Time Current system time on this device The device automatically synchronizes the system time with Internet time servers Tips Running time is total time the device is turned on ...

Page 24: ... IP address Subnet Mask The device s LAN subnet mask DHCP Server the status of DHCP server LAN MAC Address The device s physical address Tips The default IP address is 192 168 1 1 The default Subnet Mask value is 255 255 255 0 If the device as a DHCP server here shown as enabled Otherwise disabled ...

Page 25: ...less Channel The Channel of Wireless Security Mode Encryption schemes Tips The default SSID is RE300X_XXXXXX where XXXXXX is the last six characters in the device s MAC address You can find it on the label attached on the bottom of the device 3 3 Quick Setup In this page you can configure the mode of operation ...

Page 26: ... mode configure Set steps Select AP mode and click NEXT button Enter SSID select channel Select Security Mode and WPA Algorithms Enter the Pass Phrase Click NEXT enter the next page Click Save to confirm your settings 2 Universal Repeater mode configure ...

Page 27: ...s SSID select channel Security Mode WPA Algorithms and Pass Phrase all of this accordance with the up level router s wireless settings Or you can click Open Scan search the wireless signal automatically Click NEXT enter the next page Enter the SSID you want to the default is RE300X_XXXXXX ...

Page 28: ...ase Or you can click Support Wireless Roaming button to extend the up level wireless signal Click NEXT enter the next page Click Save to confirm your settings The Universal Repeater Mode Example Up level router s wireless information as shown in the picture below ...

Page 29: ...our settings Use your smart phone or PC with wireless card search the RE300X_123456 signal connect and enter the pass phrase you have configured above to surf the Internet Connect you desktop and this device with cable Make sure your desktop Internet protocol Version4 TCP IP Properties is Obtain an IP address automatically to surf the Internet ...

Page 30: ...cally and reconnect with the up level router again If connect failed please manual change the Wi Fi Range Extender s channel and expended channel same as the up level router 3 4 Network Settings Click Network Settings enter the Network setup web page in this page you can set LAN Settings DHCP Server DHCP List Binding 3 4 1 LAN Settings This page is to configure the basic parameters for LAN port Th...

Page 31: ...are respectively 192 168 1 1 and 255 255 255 0 2 Be sure to make a note of any changes you apply to this page If you change the LAN IP address of the device you have to open a new connection to the new IP address and login again 3 Go to the System Status page to confirm whether it is success of the configuration LAN Setting Example I configured the Wi Fi Range Extender s LAN IP as 192 168 10 1 and...

Page 32: ...le Use your smart phone or PC with wireless card search the RE3002_123456 signal and enter the pass phrase if you have configured 3 4 2 DHCP Server Click DHCP Server enter the DHCP Server page here you can configure DHCP Server Set Steps Click Network Settings Select DHCP Server ...

Page 33: ...ically If you disable this feature you have to manually configure the TCP IP settings for all PCs on your LAN to access Internet Lease Time is the length of the IP address lease before it is refreshed Tips By default the device functions as a DHCP server Do not disable the DHCP server feature unless you want to manually configure the TCP IP settings for all PCs on your LAN 1 Lease time will be ren...

Page 34: ...there are unauthorized accesses by viewing the client list Also you can specify a reserved IP address for a PC in the LAN That PC will always receive the same IP address each time when it accesses the DHCP server Reserved IP addresses could be assigned to servers that require permanent IP settings Static Assignment Application Example To have a PC at the MAC address of 44 37 E6 4F 37 3B always rec...

Page 35: ...e device s DHCP server instead you must manually specify a different IP address for your PC to access Internet 2 For PCs that has already obtained IP addresses you may need to perform the Repair action to activate the configured static IP addresses 3 5 WLAN Settings Click WLAN Settings enter the configure page here you can configure Base Settings Security Settings Advanced Settings Access Control ...

Page 36: ...evice SSID to be scanned by wireless devices The default is enabled If you disable it the wireless devices must know the SSID for communication BSSID This is the MAC address of the device s wireless interface A wireless signal corresponding to one unique BSSID Channel The currently used channel by the device Select an effective channel of the wireless network The default is AutoSelect Channel band...

Page 37: ...elivers wireless speed up to 54Mbps and is compatible with 11b g wireless clients 11b g n mixed This network mode delivers wireless speed up to 300Mbps and is compatible with 11b g n wireless clients AutoSelect Under the AutoSelect mode the wireless signal will choice the user number is the least channel to improve the efficiency of the signal it works for most cases If you choice other channel mo...

Page 38: ...isable Not open this function WPA Personal Support AES and TKIP cipher types WPA2 Personal Support AES TKIP and TKIP AES cipher types Mixed WPA WPA2 Personal Both WPA Personal and WPA2 Personal secured wireless clients can join your wireless network Note WPA WPA2 Personal You can enable personal or mix mode but you must make sure that the wireless client also supports the selected encryption metho...

Page 39: ...3 TKIP Temporal Key Integrity Protocol Responsible for handling the wireless encryption part of security issues TKIP is in WEP password outermost layer of the existing shell If selected wireless speed can reach up to 54Mbps 4 TKIP AES If Selected both AES and TKIP secured wireless clients can join your wireless network 5 Key Renewal Interval Enter a valid time period for the key to be changed Tips...

Page 40: ...r Parameters specification BG Protection Mode To 11b g wireless client under the complex mode can smoothly connected to 11n wireless network The default is Auto Basic Data Rates According to actual needs adjust the wireless basic transmission rate The default value is 1 2 5 5 11 MBPS Suggest not change the default value Beacon Interval Regular broadcasts wireless SSID time interval In general the ...

Page 41: ...er under the condition of long distance connection can promote wireless performance WMM Wi Fi Multimedia when WMM is enabled the wireless multimedia data transmission will be improved greatly APSD it is used for auto power saved service The default is disabled 3 5 4 Access Control Wireless access control is actually based on the MAC address to permit or forbid specified clients to access the wirel...

Page 42: ...s of 00 12 35 EC DF 25 to join your wireless network Set Steps Select Allow Enter the MAC address of the wireless device you want to restrict Here in this example enter 00 12 35 EC DF 25 Click Add to add the MAC address to the MAC address list Click Save to save your settings Tips Up to 10 wireless MAC addresses can be configured If you don t want to configure the complex wireless security setting...

Page 43: ...iewing the wireless client list 3 6 System Tools Click System Tools enter the configure page here you can set Time Settings Backup Restore Restore to Factory Firmware Upgrade Reboot Change Password System Log 3 6 1 Time Settings This section is to select the time zone for your location Tips Configured time and date info will be lost if the device gets disconnected from power supply However it will...

Page 44: ... Time Zone Enable Customized time You can enter the time and date manually or click Sync with your PC synchronize automatically Click Save to save you settings Synchronize with your PC Specify a time interval for periodic update of time and date information from your host Tips If the router connected to the Internet the device s time and network time synchronization by default ...

Page 45: ...tton to restore the device s configurations Set Steps Click System Tools Select Backup Restore Backup to keep parameters Click Browse to add an file Click Save Note The default configuration file name is RouterCfm cfg Do include the file name suffix of cfg when renaming the file name to avoid problem 3 6 3 Restore to Factory Set Steps ...

Page 46: ... enable this option all current settings will be deleted and be restored to factory default values You will have to reconfigure Internet connection settings and wireless settings Do not restore factory default settings unless the following happens 1 You need to join a different network or unfortunately forget the login password 2 You cannot access Internet and your ISP or our technical support ask...

Page 47: ...Tools Select Firmware Upgrade Click Browse select the upgrade file Click Upgrade and wait for it to complete Note 1 Before you upgrade the firmware make sure you are having a correct firmware A wrong firmware may damage the device 2 It is advisable that you upgrade the device s firmware over a wired connection DO NOT interrupt the power to the device when the upgrade is in process otherwise the de...

Page 48: ...the device fails to function correctly try rebooting the device Rebooting the device is to make the settings configured go into effect or to set the device again if setting failure happens 3 6 6 Change Password You can change the password by this function Set Steps ...

Page 49: ...dmin The valid password must be between 3 12 characters and only include letters numbers and underscore 3 6 7 System Log The section is to view the system log Click the Refresh to update the log Click the Clear button to clear the screen Set Steps Click System Tools Select System Log Click Refresh to refresh the information Click Clear to clear the information in the page ...

Page 50: ...50 Appendix 1 Configure PC TCP IP Settings Windows 7 Click Start Control Panel ...

Page 51: ...51 Click Network and Internet Click Network and Sharing Center ...

Page 52: ...52 Click Change adapter settings Click Local Area Connection and select Properties ...

Page 53: ...53 Select Internet Protocol Version 4 TCP IPv4 and click Properties ...

Page 54: ...54 Select Obtain an IP address automatically and click OK ...

Page 55: ...55 Click OK on the Local Area Connection Properties window to save your settings ...

Page 56: ...56 Windows XP Right click My Network Places and select Properties Right click Local Area Connection and select Properties ...

Page 57: ...57 Select Internet Protocol Version 4 TCP IPv4 and click Properties Select Obtain an IP address automatically and click OK ...

Page 58: ...not light up Ans Check the following a Make sure that the Device Adapter is properly plugged into a power outlet b Make sure the power outlet is active working by plugging another electric device into it c Re plug the Device Adapter to the power outlet If the Power LED is still failed to light up contact your local dealer for technical support 2 The Ethernet LED does not light up Ans Check the fol...

Page 59: ...e Device s LED does not light up Ans Check the following a Try to plug a second Device Adapter into a nearby power outlet and check whether the Device LED lights up or not b Contact your local dealer for technical support if the Device LED is still failed to light up after the above procedures 3 Factory default settings The table below lists the factory default settings of your device Item Default...

Page 60: ...bled Wireless Access Control Disabled 4 Remove Wireless Network from Your PC If you change wireless settings on your wireless device you must remove them accordingly from your PC otherwise you may not be able to wirelessly connect to this device Below describes how to remove a wireless network from your PC Windows 7 Right click the Network icon and select Properties Select Manage Wireless Networks...

Page 61: ...61 Select the wireless network and click Remove network Windows XP Right click My Network Places and select Properties ...

Page 62: ...62 Right click Wireless Network Connection and then select Properties Click Wireless Networks select the wireless network name under Preferred networks and then click the Remove button ...

Page 63: ...erference that may cause undesired operation Note This equipment has been tested and found to comply with the limits for a Class B digital device pursuant to part 15 of the FCC Rules These limits are designed to provide reasonable protection against harmful interference in a residential installation This equipment generates uses and can radiate radio frequency energy and if not installed and used ...

Page 64: ...sult the dealer or an experienced radio TV technician for help Caution Any changes or modifications not expressly approved by the party responsible for compliance could void the user s authority to operate this equipment FCC Radiation Exposure Statement This equipment complies with FCC RF radiation exposure limits set forth for an uncontrolled environment This equipment should be installed and ope...

Reviews: