21
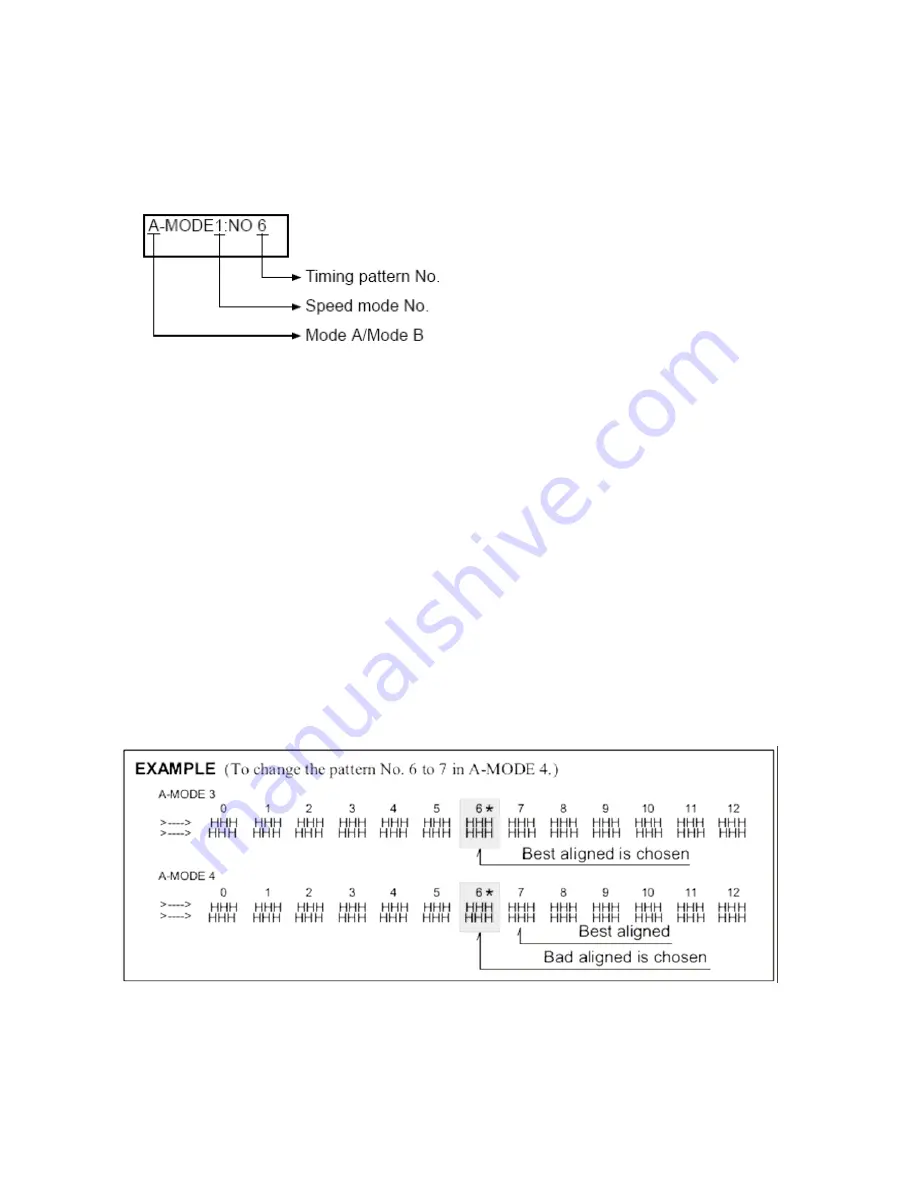
The timing pattern printout shows six speed modes from Mode 1 to Mode 6 in Mode A and seven
Speed modes from Mode 0 to Mode 6 in Mode B, and 13 timing numbers will be printed for each
Speed mode.
The LCD display is as shown below.
(6) While referring to the pattern printout, select the speed mode to adjust using the [
←
] and [
→
]
keys to best align the top and bottom “H” pattern.
(7) Select a timing pattern number in the speed mode number above using the [
↑
] and [
↓
] keys.
(8) After you have selected a speed mode number and a timing pattern number, press the [ENTER]
key. When this key is pressed, the printer simultaneously stores the selected timing temporarily
and starts printing according to that timing.
(9) Edit the speed mode settings by repeating steps (6) to (8) above.
(10) Press the [HIGH IMPACT] key to exit the print position adjustment mode. Be sure to use this
key to exit the mode. When this key is pressed, the temporarily stored timing is written to the
EEPROM.
(11) When the print position adjustment mode is completed using the [HIGH IMPACT] key, the
printer will take one of the following actions depending on the modes.
a. When Mode A is completed, Mode B menu will appear on the LCD. When the [ENTER] key
is pressed after the Mode B menu appears on the LCD, the printer will start printing the
Mode B pattern. Follow the steps from (6) above.
b. When Mode B is completed, the printer will automatically initialize.
Summary of Contents for Accel-7350
Page 1: ...1 Accel 7350 Dot Matrix Printer Service Manual Document 130034 ...
Page 24: ...23 Wiring Diagram ...
Page 25: ...24 Control Diagram ...
Page 36: ...35 Extra Dot Printing Improper character ...
Page 37: ...36 Incorrect Printing Irregular print data ...
Page 38: ...37 No LCD Display Half of the LCD lights up ...
Page 39: ...38 No LCD Display Completely blank ...
Page 40: ...39 Control Keys Not Functioning ...
Page 41: ...40 No Buzzer Abnormal Ribbon Feeding Causing abnormal carriage movement ...
Page 42: ...41 No Line Feed or Inconsistent Line Feeding ...
Page 43: ...42 Carriage Error ...
Page 44: ...43 ...
Page 46: ...45 Cover Open Error Will Not Cancel With Cover Closed ...
Page 47: ...46 No Fanfold Paper Reverse Line Feed ...
Page 48: ...47 Printing Does Not Stop After Paper Is Ejected ...
Page 49: ...48 Not Powering Up ...
Page 94: ...93 Indicator Circuit ...
Page 95: ...94 I F Circuit ...
Page 96: ...95 Slide SW Circuit ...
Page 97: ...96 Power Circuit ...
Page 98: ...97 Exploded View 1 6 Following pages require Legal size paper for printing ...
Page 99: ...98 Exploded View 2 6 ...
Page 100: ...99 Exploded View 3 6 ...
Page 101: ...100 Exploded View 4 6 ...
Page 102: ...101 Exploded View 5 6 ...
Page 103: ...102 Exploded View 6 6 ...
Page 119: ...126 ...


