16
Print Head (HA) Adjust Label
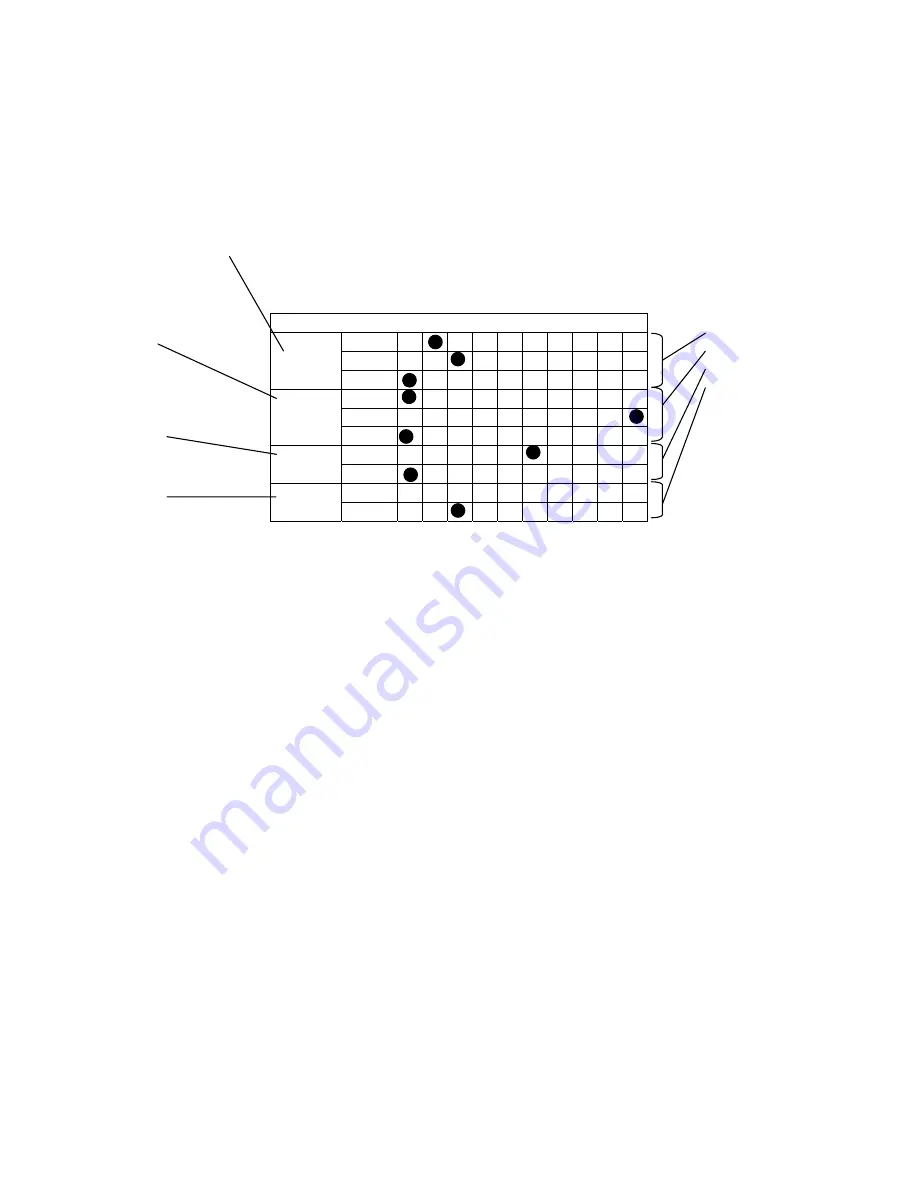
The numbers shown in the table on the HEAD ADJUST label represent the settings made prior to
shipment. These settings will be erased from the EEPROM by initialization routine 3. After
initialization routine 3 is performed, restore the settings shown on the label (settings made prior to
shipment). The following example shows how to read the table.
Example
HA ADJUST
100 0 1 2 3 4 5 6 7 8 9
10 0 1 2 3 4 5 6 7 8 9
FRONT
1 0 1 2 3 4 5 6 7 8 9
100 0 1 2 3 4 5 6 7 8 9
10 0 1 2 3 4 5 6 7 8 9
REAR
1 0 1 2 3 4 5 6 7 8 9
10 0 1 2 3 4 5 6 7 8 9
BACK
1 0 1 2 3 4 5 6 7 8 9
10 0 1 2 3 4 5 6 7 8 9
MULT
-1 0 1 2 3 4 5 6 7 8 9
Note: If a minus sign is shown in the first-digit line of “MULT,” the setting is a negative number.
(1) FRONT (Front Tractor HA ADJUST)
This setting is used for head position adjustment when the Front Tractor is used (Auto 0).
(2) REAR (Rear Tractor HA ADJUST)
This setting is used for head position adjustment when the Rear Tractor is used (Auto 0).
(3) BACK (BACK PULSE: Basic backward travel in the HA auto mode)
This is the BACK PULSE setting. It sets the distance by which the head travels backward
in the auto gap mode. It is set to 50 prior to shipment.
Procedure:
While holding down [ONLINE], turn on the power to the printer.
Press [ALT] then [MENU] to enter menu
Select HA Adjust using [
←
] and [
→
].
Press [
↓
] or [
↑
] until the desired number is displayed, then press [ENTER].
Press [HIGH IMPACT] to save the setting.
FRONT:120
REAR:90
BACK:50
FRONT:-2
(1) Auto 0 adjustment
when the Front
Tractor is used
(2) Auto 0 adjustment
when the Rear Tractor
is used
(3) Backward travel in
the HA auto mode
(4) Printing pressure
adjustment for copy
paper
Summary of Contents for Accel-7350
Page 1: ...1 Accel 7350 Dot Matrix Printer Service Manual Document 130034 ...
Page 24: ...23 Wiring Diagram ...
Page 25: ...24 Control Diagram ...
Page 36: ...35 Extra Dot Printing Improper character ...
Page 37: ...36 Incorrect Printing Irregular print data ...
Page 38: ...37 No LCD Display Half of the LCD lights up ...
Page 39: ...38 No LCD Display Completely blank ...
Page 40: ...39 Control Keys Not Functioning ...
Page 41: ...40 No Buzzer Abnormal Ribbon Feeding Causing abnormal carriage movement ...
Page 42: ...41 No Line Feed or Inconsistent Line Feeding ...
Page 43: ...42 Carriage Error ...
Page 44: ...43 ...
Page 46: ...45 Cover Open Error Will Not Cancel With Cover Closed ...
Page 47: ...46 No Fanfold Paper Reverse Line Feed ...
Page 48: ...47 Printing Does Not Stop After Paper Is Ejected ...
Page 49: ...48 Not Powering Up ...
Page 94: ...93 Indicator Circuit ...
Page 95: ...94 I F Circuit ...
Page 96: ...95 Slide SW Circuit ...
Page 97: ...96 Power Circuit ...
Page 98: ...97 Exploded View 1 6 Following pages require Legal size paper for printing ...
Page 99: ...98 Exploded View 2 6 ...
Page 100: ...99 Exploded View 3 6 ...
Page 101: ...100 Exploded View 4 6 ...
Page 102: ...101 Exploded View 5 6 ...
Page 103: ...102 Exploded View 6 6 ...
Page 119: ...126 ...


