Americana Outdoors, Inc.
12
Cherokee Installation Guide
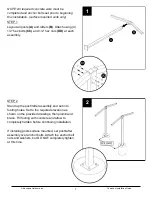
STEP 7
Position the next roof panel
(F)
over the lock of the
panel already installed and snap the locks together.
HINT: Holding a spare board under the locks and
tapping on top with a rubber mallet may help when
joining roof panels.
Fit the panel into ridge cap
(C)
and gutter
(D)
until
the bottom end is flush with the previous panel.
Attach the panel
as shown in Step 6.
Repeat until all roof panels
(F)
are installed in one
section of the roof.
NOTE: To achieve best roof panel installation,
it is very important to hold the
24”
center
-
to
-
center spacing of the roof panel locks at the
top and bottom of the panels.
STEP 8
Attach projection fascia
(E)
at the opposite end of
the shelter as shown in Step 5.
Repeat Steps 5
-
8 to install remaining roof section.
7
8
FRONT VIEW


