background image


Americana Outdoors, Inc.

4

Cherokee Installation Guide


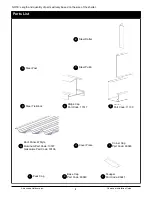
Steel Rafter


B


Ridge Cap


Part Code: 11517


E


Gutter


Part Code: 11139


F


Roof Panel W Style


Aluminum Part Code: 10307


Galvalume Part Code: 30106


G


Corner Cap


Part Code: 60048


I


Peak Cap


J


Scupper


Part Code: 90241


L


Steel Purlin


C


Steel Post


A


Steel Tie Block


D


Parts List


NOTE: Length and quantity of parts will vary based on the size of the shelter.


Cover Plate


H


Base Cap


Part Code: 60063


K


Summary of Contents for CHEROKEE

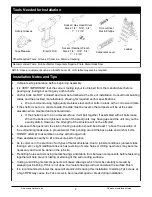
Page 1: ...ratching of painted materials place on a tarp or other protective material Prepare surrounding area Remove any obstructions around shelter location Shelter installation should be scheduled after all concrete and masonry work in the surrounding area is completed Assistance is required during entire assembly CAUTION Proper site preparation is required Standard shade structure design does not include...

Page 2: ...ound the base plate and anchor bolts DO NOT attempt to assemble on a day with strong winds Have assistance nearby to lift and secure parts in place As is common in the erection of all types of metal structures due to job site conditions unlevel slabs footings etc slight modifications such as reaming of some holes or drilling new holes may become necessary and must be done on the job site Predrilli...

Page 3: ...poor caulking job can cause leaks Note These are basic installation guidelines for our standard load units and may not be suitable to your specific installation It is important to follow all local and national building codes when installing any exterior improvement product If you have questions regarding the proper installation of any Americana product please call us toll free at 1 888 442 2928 an...

Page 4: ...39 F Roof Panel W Style Aluminum Part Code 10307 Galvalume Part Code 30106 G Corner Cap Part Code 60048 I Peak Cap J Scupper Part Code 90241 L Steel Purlin C Steel Post A Steel Tie Block D Parts List NOTE Length and quantity of parts will vary based on the size of the shelter Cover Plate H Base Cap Part Code 60063 K ...

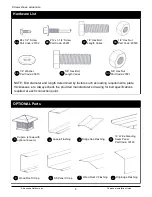
Page 5: ...er and length determined by factors such as loading requirements plate thicknesses etc Always check the provided manufacturer s drawing for bolt specifications required at each connection point 5 8 Hex Bolt Length Varies FF 5 8 Hex Nut Part Code 20531 GG OPTIONAL Parts Cupola shown with optional louvers N Cupola Flashing O Ridge Cap Flashing P 18 Wide Standing Seam Panel Part Code 30120 Q Wood Roo...

Page 6: ... Inc 6 Cherokee Installation Guide OPTIONAL Parts continued SS Panel Clip Part Code 20836 V 10 x 1 Screw Part Code 20650 HH 14 x 2 3 4 Screw Part Code 20663 II Gutter Strap W X 8 Wide Standing Seam Panel Part Code 10214 ...

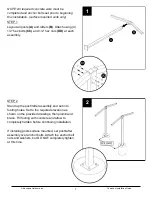
Page 7: ...bolts CC and 1 2 hex nuts DD at each assembly STEP 2 Stand up the post rafter assembly and set into footing holes Set to the required elevation as shown on the provided drawings then plumb and brace Fill footing with concrete and allow to completely harden before continuing installation If installing posts surface mounted set post rafter assembly over anchor bolts Attach the anchor bolt nuts and w...

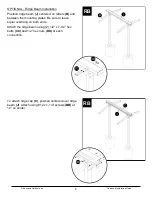
Page 8: ...J centered on rafters B and between the mounting plates Be sure to leave equal overhang on both ends Attach the ridge beam using 2 1 2 x 7 1 2 hex bolts CC and 1 2 hex nuts DD at each connection To attach ridge cap C position centered over ridge beam J Attach using 12 x 1 1 4 screws BB at 12 on center RB RB ...

Page 9: ... Attach the edge beam using 3 12 x 1 1 4 screws BB at each connection Repeat for opposite side Begin roof panel F installation with the side of the first panel approximately 1 from the end of edge beam K Attach to edge beam using 12 x 1 1 4 screws BB at 8 on center Continue attaching roof panels as shown in Step 7 Attach gutter D to roof panels F using 2 8 x 1 2 screws AA at 8 on center Continue i...

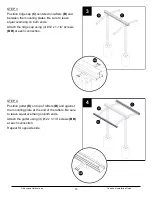
Page 10: ...o leave equal overhang on both ends Attach the ridge cap using 3 12 x 1 1 4 screws BB at each connection STEP 4 Position gutter D on top of rafters B and against the mounting plate at the end of the rafters Be sure to leave equal overhang on both ends Attach the gutter using 3 12 x 1 1 4 screws BB at each connection Repeat for opposite side 3 4 ...

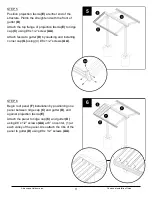
Page 11: ... using 8 x 1 2 screw AA Attach fascia to gutter D by caulking and installing corner cap G using 4 8 x 1 2 screws AA STEP 6 Begin roof panel F installation by positioning one panel between ridge cap C and gutter D and against projection fascia E Attach the panel to ridge cap C and gutter D using 8 x 1 2 screws AA at 8 on center 1 at each valley of the panel Also attach the ribs of the panel to gutt...

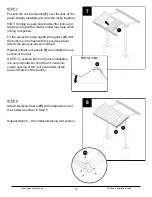
Page 12: ...dge cap C and gutter D until the bottom end is flush with the previous panel Attach the panel as shown in Step 6 Repeat until all roof panels F are installed in one section of the roof NOTE To achieve best roof panel installation it is very important to hold the 24 center to center spacing of the roof panel locks at the top and bottom of the panels STEP 8 Attach projection fascia E at the opposite...

Page 13: ... in the bottom of the gutter Alternatively drill several small holes in a rectangular pattern no bigger than 2 x 3 Apply a generous bead of caulk around the top flange of scupper I Attach the scupper to gutter D using 2 8 x 1 2 screws AA Repeat for any remaining scuppers I 9 10 ASSEMBLY COMPLETED Touch up paint has been supplied with the shelter to cover minor scratches or bolt and screw heads Use...

Page 14: ...y match the colors of original parts and replacement parts Americana will not provide or pay for the installation of such replacement parts Americana shall not be responsible for weather related failures damages due to faulty installation misuse or abuse of the product or for consequential damages including personal injuries or property damages There are no warranties express or implied which exte...

Reviews: