American-Lincoln Technology
FORM NO. 56041667 - 13
7765 / 7760
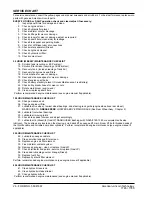
LOWER
RAISE
HOPPER
OPEN
CLOSE
DUMP
DOOR
HIGH
FLOAT
EEP
UP
LOW
OFF
SWEEPING
SOLUTION
CONTROL
HOPPER
LIFT
DUMP DOOR
OPEN
MAIN BROOM
LIFT
SOLUTION
CONTROL
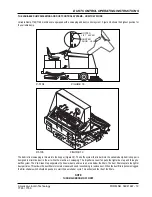
P-4851 FIGURE 7
OPERATIONS OF CONTROLS AND GAUGES
HOPPER LIFT - (Variable Machines Only)
The Hopper Lift Lever is located to the left of the steering wheel on the left side of the driver compartment. This lever, which is marked
“HOPPER”, raises and lowers the debris hopper to ease unloading.
WARNING
The hopper may drop unexpectedly and cause injury, always engage the safety arm before working under the hopper.
HOPPER SAFETY LOCK ARM (Variable Dump Only)
WARNING
When the hopper is raised the safety arm must be engaged before any work is done under the
hopper
The Hopper Safety Lock Arm is located under the hopper assembly. After the work is complete, the safety arm must be disengaged.
HOPPER DUMP DOOR - (Variable Dump Machines Only)
The Hopper Dump Door Lever is located to the left of the steering wheel on the left of the driver compartment. This lever opens and
closes the hopper door. This lever is located below the Hopper Lift Door and is marked “DUMP DOOR”.
MANUAL DUMP HOPPER - (Manual Dump Hopper Only)
The Manual Dump Hopper Lever is located under the front bumper. To dump debris, pull the manual dump lever all the way to the
position marked open. Leave the handle in the dump position and back the machine off the pile of debris. When clear of the debris, pull
the manual dump lever to the position marked closed.
SOLUTION CONTROL
To apply solution to the scrubbing brushes, push the solution control lever forward until the desired setting is reached. The solution
rate is continuously variable from off to approximately 1-3/4 GPM at low and 3-1/2 GPM at high. To stop application of solution, pull
back on the lever until it stops at the “off” position. The solution warning light will illuminate when the solution tank is empty, marking
the end of the scrubbing cycle.
NOTE
For best results, discontinue application of solution 10 feet
before stopping or making a 90° or 180° turn.
SWEEPING BROOM LIFT CONTROL
The main broom lift control is located to the left of the driver seat.
To lower the main broom, grasp the lever and pull back to clear the
locking notch. Move the lever forward to the fi rst or second notch in
the elongated slot. The fi rst notch, “SWEEP”, is for normal sweeping
(2 to 3 inch [5 to 8 cm.] broom pattern). The second notch, “FLOAT”,
is for heavy sweeping (4 to 5 inch [10 to 13 cm.] broom pattern).
To raise the main broom, pull the lever back and slide into the locking
notch. You may operate the main broom in either the “SWEEP” or
“FLOAT” position. However, the “SWEEP” position should be used
for normal sweeping and will result in increased broom life. The
“FLOAT” position should be used only when sweeping extremely
uneven areas.
NOTE - (Variable Dump Machines Only)
A switch triggered by the hopper and dump door position
controls the sweeping functions, main broom, side broom,
dust control, and fi lter shaker. The hopper must be down and
the dump door open before these functions
will work.


