background image

MIC


TRE

MUSIC


TRE

MUSIC


BAS

BBE


SOUND

INPUT


SELECT

VIDEO

Pr

Pb

Y

S

-

Video

COAX

OPTI

VIDEO


OUTPUT

D

-

OUT

VGA


OUT

USB

R

L

R

L

HEADPHONE

AC


IN

POWER

ON

OFF

XLR

-

1

3

2

1

+

-

3

2

1

+

-

GROUND

GROUND

XLR

-

2

MIC

/

LINE


IN

(

BAL

)

IN

OUT

R

L

VIDEO


IN

GO-210 TUTTI

MUSIC


CONTROL

MIC


CONTROL


OUT

IN

AUDIO:EFFECT


AUX:AUDIO

/

VIDEO

MUSIC


VOLUME

DVD

AUX

iPod

Canon input

15

Audio source

or 

microphone

Apply  Canon Cord  to connect XLR-1/XLR-2 jacks on GO-210 TUTTI rear panel with external audio source
or microphone especially for long distance and better effect. 

Canon Cord

DC


12V


IN

Summary of Contents for GO-210 TUTTI

Page 1: ...anual carefully USER S MANUAL GO 210 TUTTI American Audio Lab Audio System Put in Take off Push American Audio Lab Audio System DMOS AMP DIRECT SEARCH SYSTEM MIC 1 VOL MIC 2 VOL ECHO SD Cared reader GO 210 TUTTI MASTER VOL KARAOKE ON OFF L R VOCAL CANCEL 2 3 4 6 7 8 5 9 0 1 MIC 1 MIC 2 ...

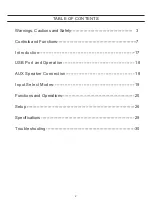
Page 2: ...arnings Cautions and Safety Controls and Functions 3 Input Select Modes Functions and Operations Setup Specifications Trouble shooting 19 20 26 29 30 7 Introduction 17 USB Port and Operation 18 AUX Speaker Connection 18 2 ...

Page 3: ...rent from that to which the receiver is connected Consult the dealer or an experienced radio TV technician for help 2 When connecting this product to accessories and or another product use only high quality shielded cables Cable s supplied with this product MUST be used Follow all installation instructions Failure to follow instructions could void your FCC authorization to use product in the U S A...

Page 4: ...electrode See figure below Outdoor Antenna Grounding 14 PowerSources Product should be operated only from the type of power source indicated on the marking label If you are not sure of the type of power supply to your home consult your product dealer or local power company 1 All the safety and operating instructions should be read before the product is operated Read Instructions 2 The safety and o...

Page 5: ...e product to its normal operation E If the product has been dropped or damaged in any way F When the product exhibits a distinct change in performance this indicates a need for service Damage Requiring Service 23 Do not attempt to service it yourse lf as operating instructions do not attempt to service it yourself as opening or removing covers may expose you to dangerous voltage or other hazards R...

Page 6: ...coming a retailer or distributor of American Audio Lab products Contact our sales department at 1 626 5828098 For general information about American Audio Lab products contact us at 1 626 5828099 For Technical Assistance contact us at 1 626 5828099 Monday to Friday 8 30 am to 5 30 pm PST ...

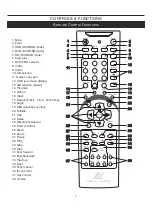
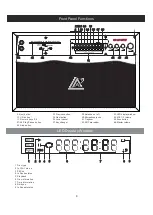
Page 7: ...nctions 1 Mute 2 Eject 3 USB DVD USB mode 4 DVD DVD USB mode 5 SD DVD USB mode 6 Slow play 7 NTSC PAL selector 8 Video 9 Audio 10 L R selector 11 Numeric key pad 12 OSD on screen display 13 A B section repeat 14 Program 15 Return 16 Clear 17 Search 18 Angle 19 PBC playback control 20 Subtitle 21 Title 22 Setup 23 Directional selector 24 Enter confirm 25 Menu 26 Zoom 27 Pause 28 Play 29 Stop 30 Ste...

Page 8: ...n 46 Master volume 39 Karaoke on off 40 Microphone jacks 41 Traydoor 42 SD Card reader 1 Disc type 2 In PLAY status 3 PBC on 4 In Pause status 5 Playback 6 Tray information 7 Time information 8 Dolby on 9 In Repeat status Put in Take off Push American Audio Lab Audio System DMOS AMP DIRECT SEARCH SYSTEM MIC 1 VOL MIC 2 VOL ECHO SD Cared reader GO 210 TUTTI MASTER VOL KARAOKE ON OFF L R VOCAL CANCE...

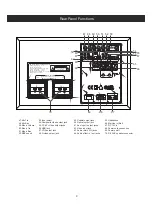
Page 9: ... Audio Lab Audio System MODEL NO GO 210 TUTTI INPUT AC110V 60Hz POWER CONSUMPTION 200W MAX P M P O 2 200W 4 ohms RATED IMPEDANCE 4 ohms FREQUENCY RESPONSE 45Hz 20kHz SENSITIVITY 87 2dB RISK OF ELECTRIC SHOCK DO NOT OPEN W A R N I N G AUDIO OUTPUT SPEAKER IMPEDANCE 4 16 ohms MAX POWER 2 200W Left Right 70 68 69 67 47 48 49 50 51 52 54 55 56 57 58 59 60 61 62 63 64 65 66 MIC TRE MIC BAS MUSIC VOLUME...

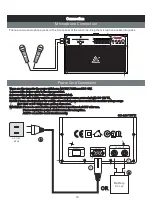
Page 10: ...re getting connected WARNING Please be sure that the power button is positioned at OFF after use Please unplug the power cord if nonuse for a long time AC DC can not be used simultaneously 10 AC110V 60Hz 2 1 Battery DC 12V OR 2 Connection Microphone Connection There are two microphone jacks in the front panel of the machine Plug the microphone cable into jacks 1 GO 210 TUTTI DC 12V IN Put in Take ...

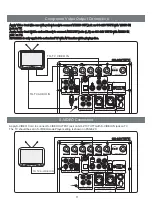
Page 11: ... VIDEO IN jack on TV Apply Audio Cord white and red head to connect AUX OUT jacks L R on GO 210 TUTTI with AUDIO IN jack on TV NOTE This is only applied to a standard TV with AV function while playing disc 11 Composite Video Output Connection S VIDEO Connection Apply S VIDEO Cord to connect S VIDEO OUTPUT jack on GO 210 TUTTI with S VIDEO IN jack on TV The TV should be set in S VIDEO mode Player s...

Page 12: ...nect Y Pb Pr jacks on GO 210 TUTTI with Y Pb Pr IN jacks on the TV TV should be set in Y Pb Pr mode For player setting please see PAGE 20 VGA Connection Apply VGA cord to connect VGA jack on GO 210 TUTTI with TV MONITOR You will get a better picture from this progressive scan function Player setting is shown on PAGE 20 GO 210 TUTTI VIDEO TO PC VGA IN TV MONITOR 12 TO TV Y Pb Pr IN GO 210 TUTTI ...

Page 13: ...ial output Optical output Apply a Coaxial cord to connect the digital amplifier decoder with GO 210 TUTTI on COAXIAL jacks Apply an Optical cord to connect digital amplifier decoder with GO 210 TUTTI on OPTICAL jacks 13 5 1 channel digital amplifier CEN FL SL FR SR SW DVD CD SW CEN SL SR FL FR CD DVD L R L R 100V 240V 50 60Hz COAXIAL OPTICAL GO 210 TUTTI 5 1 channel digital amplifier CEN FL SL FR ...

Page 14: ...nal audio source etc MP3 14 MUSIC VOLUME MUSIC CONTROL MIC CONTROL OUT IN AUDIO EFFECT AUX AUDIO VIDEO GO 210 TUTTI Stereo HIFI amplifier CEN FL SL FR SR SW DVD CD SW CEN SL SR FL FR CD DVD L R L R 100V 240V 50 60Hz COAXIAL OPTICAL Apply Audio Cord white and red head to connect AUX OUT L R jacks on the back of GO 210 TUTTI with DVD jacks on HiFi amplifier Mixed music with vocal will be output when...

Page 15: ... GROUND XLR 2 MIC LINE IN BAL IN OUT R L VIDEO IN GO 210 TUTTI MUSIC CONTROL MIC CONTROL OUT IN AUDIO EFFECT AUX AUDIO VIDEO MUSIC VOLUME DVD AUX iPod Canon input 15 Audio source or microphone Apply Canon Cord to connect XLR 1 XLR 2 jacks on GO 210 TUTTI rear panel with external audio source or microphone especially for long distance and better effect Canon Cord DC 12V IN ...

Page 16: ...RE MUSICBAS BBE SOUND INPUT SELECT VIDEO Pr Pb Y S Video COAX OPTI VIDEO OUTPUT D OUT VGA OUT USB R L R L HEADPHONE AC IN POWER ON OFF XLR 1 3 2 1 3 2 1 GROUND GROUND XLR 2 MIC LINE IN BAL IN OUT R L VIDEO IN GO 210 TUTTI MUSIC CONTROL MIC CONTROL OUT IN AUDIO EFFECT AUX AUDIO VIDEO MUSIC VOLUME DVD AUX iPod Effect AUX IN OUT DC 12V IN ...

Page 17: ...an electrical outlet as previously described GO 210 TUTTI to 2 Connect the video output on your your television as previously described GO 210 TUTTI to 3 Press the POWER button on the GO 210 TUTTI 4 Use numeric keypad to access directly tracks or chapters 5 Adjust the volume by the volume control on the front of the GO 210 TUTTI or using the Vol and Vol buttons 39 pg 7 on your remote control 17 Pu...

Page 18: ...ecorded on a USB flash drive in MP3 WMA JPEG AVI and VCD formats when the Input Select was set in DVD mode If no disc in the disc tray the GO 210 TUTTI automatically loads data from the USB device If the player is playing a disc press the STOP 29 pg 7 to stop playing before connecting a USB flash drive or hard drive Once the USB flash drive or hard drive is connected press the DVD USB button The r...

Page 19: ...source by the INPUT SELECT knob 53 pg9 iPod MODE Press Aux button 5 pg 7 on the remote control or turn Input Select knob 53 pg 9 to AUX on the back of the unit to enter this mode Audio can only be input and output through AUX IN and AUX OUT jacks And video could only be input and output by the VIDEO IN and VIDEO jacks when connected to such as portable DVD With the player stopped turn Input Select...

Page 20: ...his process allows the user to choose between MUL TI SYSTEM NTSC and PAL Settings for 480P 576P and 720P HDTV only should be selected in the SETUP menu described later NOTE Occasionally when adjusting the GO 210TUTTI s settings the user may create ituation where the system needs to be reset to factory defaults because the user may no longer be able to view system information on the video monitor T...

Page 21: ...uttons both shown as 13 pg 7 the Repeat and t heA B buttons When playing a disc press the Repeat button once and the connected monitor will display Rept1 indicting that the current song or chapter will repeat until the Stop button 29 pg 7 is pressed Pressing the Repeat button again will cause the entire disc to repeat until the Stop button is pressed Pressing Repeat again returns the mode to full ...

Page 22: ... the Musicarrier stopped and a USB device connected the Search button may be pressed to display the root directory of the USB device This function is in applicable to CD G discs Note As to CD disc the Search is used to select specific track time and disc time 1 Insert a CD MP3 or CD G disc into the player Wait a few seconds for the player to read the contents of the disc 2 Press the STOP button 3 ...

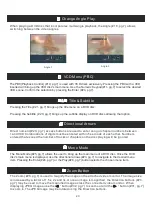
Page 23: ... ignored 23 Change Angle Play 18 Angle 1 Angle 3 When playing a DVD disc that incorporates multi angle playback the Angle 18 pg 7 allows switching between the video angles VCD Menu PBC 19 The PBC Playback Control is used with VCD discs exclusively Pressing the PBC inserted will bring up the VCD disc s main menu Use the Numeric Keypad 11 pg 7 to select the desired VCD scene Confirm the selection by...

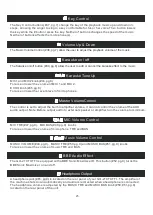
Page 24: ...to normal play NOTE This function is disabled when playing CD G karaoke discs Vocal Cancel 35 pg 7 is used to change the mode between stereo and vocal cancel Press once for VOCAL CANCEL select to cancel the vocal coming from discs iPod or Aux in etc Press again to return to the stereo mode Vocal Cancel 35 Pressing the Play 28 pg 7 starts playback of the currently playing disc Pressing the Pause 27...

Page 25: ...e volume of MIC 1 and MIC 2 ECHO knob 45 pg 8 To raise or lower the reverb level of microphones The GO 210 TUTTI is equipped with a BBE Sonic Maximizer This button 52 pg 9 turns the BBE Sonic Maximizer on and off BBE Audio Effect 52 MIC TRE 47 pg 9 MIC BAS 48 pg 9 knobs To raise or lower the volume of microphone TRE and BAS MIC Volume Control 48 47 MUSIC VOLUME 49 pg 9 MUSIC TRE 50 pg 9 and MUSIC ...

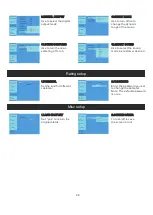
Page 26: ...tached video display 1 OSD L ANGUAGE Use to select your screen display language 2 SUBTITLE LANGUAGE Use to select your preferred subtitle language 3 DIVX SUBTITLE LANGUAGE Use to select your divx subtitle language 4 AUDIO LANGUAGE Use to select language for discs with multi language capabilities Use to select the DVD menu language 1 TV DISPLAY Use the TV DISPLAY to choose the TV display mode for v...

Page 27: ...OUND SPEAKERS 5 SUBWOOFER 6 TEST TONES 7 CENTER DELAY 8 SURR DELAY Turn off to disable the bass management Turn on to enable the bass management Use to select the mode to match the front speakers type Use to select the mode to match the center speaker type Use to select the mode to match the surround speakers type Use to strengthen the effect of subwoofer or not Use to select the tones to test Use...

Page 28: ...WN SAMPLING Use to turn the down sampling off or on 12 SMART SOUND Use to select the sound mode as customer desired 1 PARENTAL Set the kind for different customer 2 PASSWORD Enter the password you set to change the parental Note The default password is none 1 LOAD FACTORY Set yes to return the original status 2 SCREEN SAVER Turn on off to save the screen or not ...

Page 29: ... format Stereo optical coaxial DVD frequency response 20Hz 20KHz DVD S N ratio DVD harmonic distortion Microphone frequency response 0 3 20 20KHz Microphone S N ratio 70dB Video format Video output type VIDEO S VIDE0 VGA Y Pb Pr Video output level CVBS 1Vp p75ohm Remote distance Max 7meters 30 angle Echo level Total harmonic distortion Weight 15kg 33lbs Dimensions L W H 512mm 330mm 320mm 20 x13 x1...

Page 30: ...DVD video format or television format do not match in Setup S Video is not set as the Video output format in Setup VGA is not set as the Video output format in Setup Check the audio setting in Setup Batteries are dead Solution Make sure the power cord is plugged into an outlet Make sure the power the outlet is switched on Try correct disc format Try another disc Switch to the same format Please re...

Page 31: ... El Monte CA 91733 Tel 6265828099 Fax 6265828908 Toll free 1 877 566 8246 BBE and its designs are the registered trade marks of BBE Sound Incorporated registered in the Note U S and other countries American Audio Laboratory Inc ...

Reviews: