Timekeeper™
Users Manual
01/11/20
Two units are connected to the same serial port. One unit is configured for address '0', and the other is configured as
address '1'. The first unit ('0)' responds to a "
L0Hello
command, but not the second unit ('1'). The second unit ('1')
responds to a "
L1World
command, but the first unit does not.
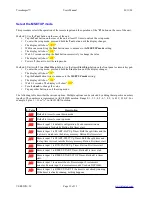
Method 1: Use the
Test
button on the rear of the unit.
•
Tap the
Test
button on the rear of the unit at least 15 times to unlock the setup mode.
•
To enter the setup mode, press and hold the
Test
button until the display changes.
•
The display will show "
uuu
".
•
Within one second, tap the
Test
button 4 times to advance to the
unit address setup
setting.
•
The display will show "
AAA
".
•
Wait 2-3 seconds and tap the
Test
button successively to change the value.
•
The display will show "
A00
".
•
Power off the unit to exit the setup mode.
Method 2: Units with Timer
Start/Stop
button. Use the timer
Start/Stop
button on the front panel or remote keypad.
•
To enter the setup mode, press and hold the
Start
button until the display changes.
•
The display will show "
FF
".
•
Tap the
Select
button 5 times to advance to the
unit address setup
setting.
•
The display will show "
AAA
".
•
Wait 2-3 seconds. The display will show "
A00
".
•
Turn the
knob
to change the value.
•
Tap any other button to exit the setup mode.
Extended
Unit Address setup
The display can be set up to respond to an address-specific command. The address-specific commands provide the
same functionality as the general commands, but allow control of which display unit will respond when several
displays are connected together. A unit can be set to one address within the range 0 through 9, and A through F. The
address range is 000 to FFF in ASCII HEX notation for a total of 4096 possible addresses.
Example corresponding commands are "A000 through "AFFF. The address range is 000 to FFF in ASCII HEX
notation. See the programming manual for more details on using this address command.
Example:
Two units are connected to the same serial port. One unit is configured for address '0', and the other is configured as
address '1'. The first unit ('0)' responds to a "A000 command, but not the second unit ('1'). The second unit ('1')
responds to a "A001 command, but the first unit does not.
Method 1: Use the
Test
button on the rear of the unit.
•
Tap the
Test
button on the rear of the unit at least 15 times to unlock the setup mode.
•
To enter the setup mode, press and hold the
Test
button until the display changes.
•
The display will show "
uuu
".
•
Within one second, tap the
Test
button several times to advance to the
extended unit address setup
setting.
•
The display will show "
HH
".
•
Wait 2-3 seconds and tap the
Test
button successively to change the value.
•
The display will show "
H0
".
•
Power off the unit to exit the setup mode.
Method 2: Units with Timer
Start/Stop
button. Use the timer
Start/Stop
button on the front panel or remote keypad.
•
To enter the setup mode, press and hold the
Start
button until the display changes.
•
The display will show "
FF
".
•
Tap the
Select
button several times to advance to the
extended
unit address setup
setting.
VERSION=5C
Page 22 of 33


