Operating
127
0000010040-002- GB
Operating
6.4.4
Motor driven rip fence (option)
•
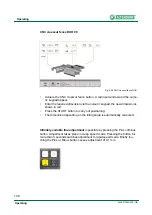
Touch the
Rip fence
button, the numeric keypad and a separate input win-
dow appear next to the axis in the RH section of the screen.
•
Enter the required dimension and confirm it with Enter
•
Press the START button for positioning
•
You can also use the + / - buttons (above the START button) to make fine
adjustments
Fig. 6-43
Rip fence adjustment
i
Note!
The low guide surface of the fence is used when sawing thin and narrow
workpieces.
In the case of cuts less than 120 mm wide, the material must be fed with
a push stick and the low guide surface of the fence must be used.
For work cycles in which cut-offs can get jammed between the saw blade
and the fence, the stop fence must be adjusted so that the rear end is in
front of the saw blade
Summary of Contents for ElmoDrive F45
Page 8: ...Identification 8 Identification 0000010040 002 GB EC prototype testing certificate ...
Page 9: ...Identification 9 0000010040 002 GB Identification ...
Page 10: ...Identification 10 Identification 0000010040 002 GB GS test certificate ...
Page 11: ...Identification 11 0000010040 002 GB Identification ...
Page 12: ...Identification 12 Identification 0000010040 002 GB DGUV Test Certificate ...
Page 13: ...Identification 13 0000010040 002 GB Identification ...
Page 14: ...Identification 14 Identification 0000010040 002 GB C US Certificate ...
Page 39: ...Definitions 39 0000010040 002 GB Definitions ...
Page 116: ...Operating 116 Operating 0000010040 002 GB Fig 6 32 ELMO II start screen ...
Page 147: ...Operating 147 0000010040 002 GB Operating Fig 6 68 Switches for saw drives ...
Page 152: ...Operating 152 Operating 0000010040 002 GB 6 4 10 Menu Fig 6 72 Main menu ...


