80
-EN
01GB06INE-W940E.fm
ALPINE INE-W940E 68-25285Z52-A (EN)
5
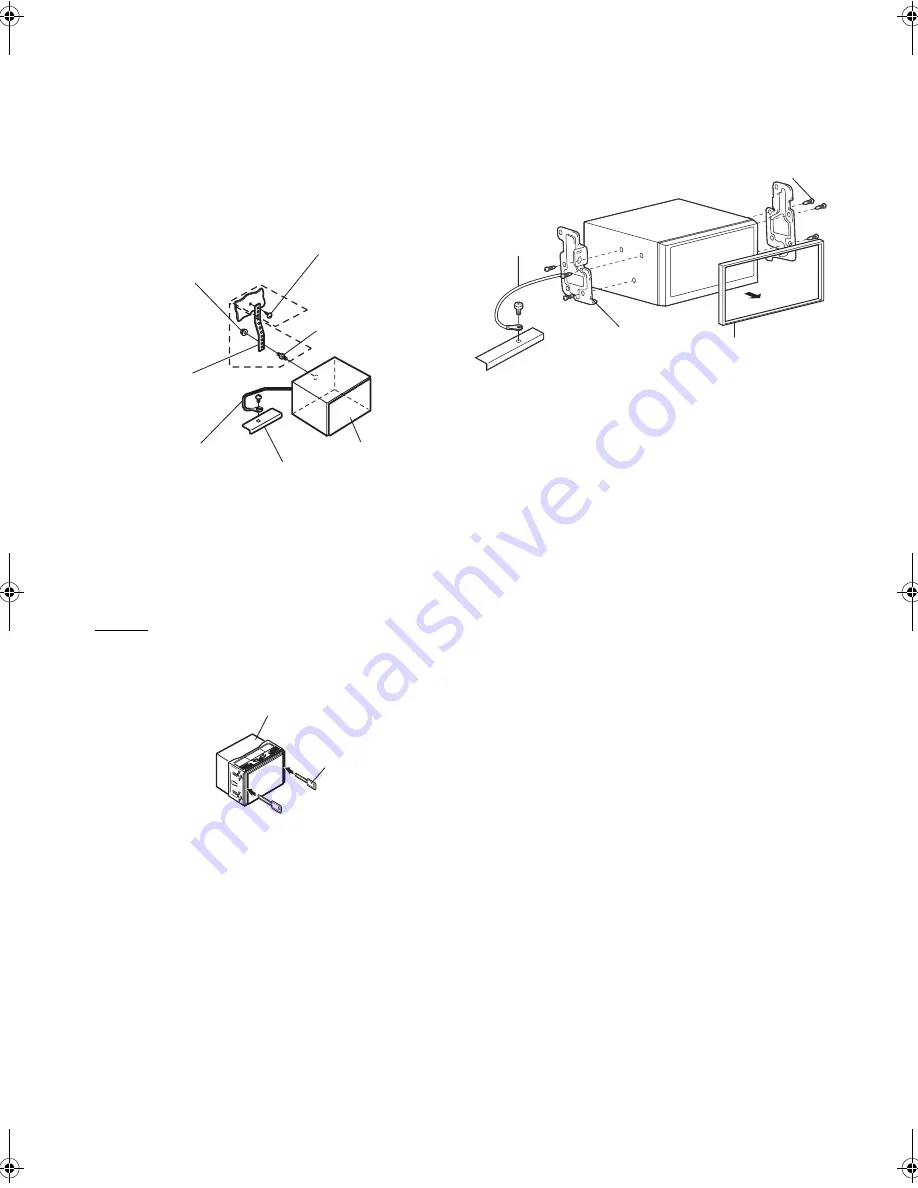
When your vehicle has the Bracket, mount the long
hex bolt onto the rear panel of the INE-W940E and
put the Rubber Cap on the hex bolt. If your vehicle
does not have the Mounting Support, reinforce the
head unit with the metal mounting strap (not
supplied). Secure the ground lead of the unit to a
clean metal spot using a screw (
*
1
) already attached
to the vehicle’s chassis. Connect all the leads of the
INE-W940E according to details described in the
CONNECTION section.
•
For the screw marked “*2,” use an appropriate screw for the chosen
mounting location.
6
Slide the INE-W940E into the dashboard until it
clicks. This ensures that the unit is properly locked
and will not accidentally come out from the
dashboard.
Removal
1. Insert the bracket keys into the unit, along the guides
on either side. The unit can now be removed from the
mounting sleeve.
2. Pull the unit out, keeping it unlocked as you do so.
Installation using the Mounting Bracket
Take the face plate off, and secure the ground lead of the unit to a
clean metal spot using a screw (
*
) already attached to the car’s
chassis.
Attach the Original Mounting Bracket to each side of the INE-W940E,
using the screws supplied with INE-W940E.
Hex Nut (M5)
Screw
Bolt Stud
This unit
Chassis
Ground Lead
Metal
Mounting
Strap
*
2
*
1
This unit
Bracket keys
(Included)
Screws (M5 × 8) (Included)
Ground Lead
Chassis
Mounting
Bracket
Face Plate (Included)
01GB00INE-W940E.book Page 80 Monday, July 8, 2013 5:14 PM
Summary of Contents for INE-W940E
Page 93: ...5 5 3 8 Trip monitor settings 81 5 4 Trip monitor 81 6 Glossary 82 7 Copyright note 84...
Page 150: ...62 2 Tap to stop the simulation...
Page 174: ......
Page 175: ......
Page 176: ......


