22
WARNING - PREVENT DAMAGE. Do not over tighten – the cylinder should be able to spin
freely.
•
If you are still unable to cleanly cut the paper, inspect the bottom blade and cylinder. If they
appear rounded or damaged they may need to be sharpened.
WARNING - PREVENT DAMAGE. Before starting the engine after having tilted the mower,
allow it to sit level for a short time to allow the engine oil to settle.
WARNING - PREVENT DAMAGE.
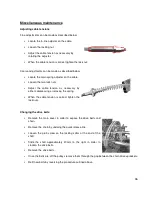
The adjusters can sometimes become very tight and may be hard to turn, if this is the case:
•
Slacken off the grub screw on the collar
behind the adjuster as shown.
•
rotate the adjuster anti-clockwise 1/8
th
of a
turn
•
Tighten the grub screw.
•
Check the adjuster – it should now be
easier to turn.
•
Carry out blade adjustment as described
above.
Summary of Contents for C 34
Page 2: ...2 ...
Page 27: ...27 ...
Page 42: ...42 ...
Page 43: ...43 C34 PARTS SECTION ...
Page 44: ...44 ...
Page 49: ...49 MODEL C34 Countershaft Assembly Engine Side FIG 3A ...
Page 51: ...51 MODEL C34 Counter Assembly Brake Side FIG 3B ...
Page 53: ...53 MODEL C34 Kickstand Assembly FIG 4 ...
Page 55: ...55 MODEL C34 Handle Bar Assembly FIG 5 ...
Page 57: ...57 MODEL C34 Lower Handle Bar Assembly FIG 6 ...
Page 59: ...59 MODEL C34 REAR ROLLER ASSEMBLY FIG 7 ...
Page 61: ...61 MODEL C34 Main Frame Assembly FIG 8 ...
Page 63: ...63 MODEL C34 BRUSH CARTRIDGE FIG 9 ...
Page 65: ...65 MODEL C34 VERTICUTTER CARTRIDGE FIG 10 ...
Page 67: ...67 MODEL C34 SCARIFIER CARTRIDGE FIG 11 ...
Page 69: ...69 MODEL C34 SORREL ROLLER CARTRIDGE FIG 12 ...
Page 71: ...71 MODEL C34 CUTTING CYLINDER 6 BL CARTRIDGE FIG 13 ...
Page 73: ...73 MODEL C34 CUTTING CYLINDER 6 BL CARTRIDGE FIG 14 ...
Page 74: ...74 Notes ...


