background image

SFBTT20-IT BOBTAIL® Hydraulic Tool

(HK1121)

Alcoa Fastening Systems

6

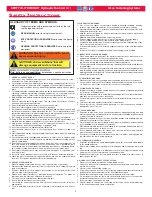
POWER SOURCE CONNECTIONS

Coat hose fitting threads with a non-hardening

Teflon

TM

thread compound such as Slic-tite.

TM

(Slic-tite is available from Huck as part number

503237.) 

2. Use only a Huck POWERIG 918, 940, or equiva-

lent that has been prepared for operation per

applicable instruction manual. Cheek both PULL

and RETURN pressures and adjust as necessary

to match installation tool. Gage part number T-

124833(new), for checking POWERIG pressures

is available from Huck.

3. Turn POWERIG to “OFF” and couple tool hoses

to POWERIG hoses. 

5. Turn POWERIG to “ON” and depress and release

trigger a few times to circulate hydraulic fluid.

Observe action of tool. Check for fluid leaks.

6. Attach the proper Nose Assembly to the tool.

P

P

REPARATION

REPARATION


FOR

FOR

 U

 U

SE

SE

CAUTION: Do not let disconnected hoses
and couplers contact a dirty floor. Keep
harmful material out of hydraulic fluid. Dirt
in hydraulic fluid causes valve failure In Tool
and In POWERIG Hydraulic Unit.

WARNINGS: 
Read full manual before using tool.

A half-hour training session with qualified
personnel is recommended before using
Huck equipment.

When operating Huck installation equip-
ment, always wear approved eye protection.

Be sure there is adequate clearance for the
operator’s hands before proceeding.

CAUTION: Do not use TEFLON

®

* tape on pipe

threads. Pipe threads may cause tape to shred
resulting in tool malfunction. (Slic-Tite is avail-
able in stick form as Huck P/N 503237.)

WARNING: Correct PULL and RETURN pres-
sures are required for operator’s safety and
for Installation TooI’s function. Gauge Set-Up,
T-124833 and T-124833CE, Is available for
checking pressures. See Tool S

PECIFICATIONS

and Gauge Instruction Manual. Failure to ver-
ify pressures may result in severe personal
injury.

WARNING: Be sure to connect Tool’s
hydraulic hoses to POWERIG Hydraulic Unit
before connecting Tool’s switch control cord
to unit. If not connected in this order, severe
personal Injury may occur.

CAUTION: Hose couplers must be completely
screwed together to insure that ball checks
in both nipple and body are completely open.
Improperly assembled couplers will cause
overheating and malfunctions in both tool
and Powerig. Hand tighten couplers. Do NOT
use a pipe wrench.

Summary of Contents for SFBTT20-IT SFBTT20-IT

Page 1: ...12 05 2013 HK1121 INSTRUCTION MANUAL BOBTAIL INSTALLATION SYSTEM SFBTT20 IT SFBTT20 IT...

Page 2: ...SFBTT20 IT BOBTAIL Hydraulic Tool HK1121 Alcoa Fastening Systems 2...

Page 3: ...ON FOR USE 6 TOOL TO POWERIG SET UP 7 8 CONTROLLER 9 OPERATING INSTRUCTIONS 10 WRENCHING UP OF PIPE THREADS 10 LIMIT SWITCH ADJUSTMENT 10 MAINTENANCE 11 TOOL ASSEMBLY PARTS LIST 12 TOOL ASSEMBLY DRAWI...

Page 4: ...s it is likely for these not to allow counteracting of nor mal or unexpected tool movement 8 If the assembly power tool is fixed to a suspension device make sure that fixation is secure 9 Beware of th...

Page 5: ...LE OF OF O OPERATION PERATION S SPECIFICATIONS PECIFICATIONS Power Source Huck POWERIG Hydraulic Unit Hose Kits Use only genuine HUCK Hose Kits rated 10 000 psi working pressure Hydraulic Fluid ATF me...

Page 6: ...ead full manual before using tool A half hour training session with qualified personnel is recommended before using Huck equipment When operating Huck installation equip ment always wear approved eye...

Page 7: ...ve handle gradually counterclock wise turn clockwise to increase pressure 1 With the Nose Assembly in place on the Installation Tool begin setup 2 Connect the Hydraulic Hoses to the Powerig 3 Connect...

Page 8: ...E and Table 1 12 Using a load cell see PHOTO A or a skid more and a test fastener in the tool energize the Powerig using a trigger switch Adjust the Relief Valve see PHOTO B so the tool gen erates the...

Page 9: ...s again to enter the new value Press ENT when finished 7 Press the ESC Command Button 5 times to exit 8 Move the Mode Switch back to RUN left most position 9 Check the continuously scrolling display f...

Page 10: ...res 5 and 6 on pages 13 and 14 for identification of Components NOTE It is important to ensure that the face of the micrometer is firmly against the Puller Head and the micrometer depth pin is in cont...

Page 11: ...em to detect and correct minor troubles At the beginning of each shift day Inspect tool and nose assembly for external dam age Verify that hydraulic hose fittings couplings and electrical connections...

Page 12: ...03431 2 15 Female Coupler 110439 1 16 Male Coupler 110438 1 17 Switch Housing Assy 129300 1 17a Switch Housing 128980 1 17b Limit Switch Lever 128823 1 17c Compression Spring 508368 1 17d Set Screw 50...

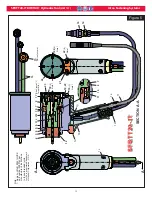
Page 13: ...4 not shown 16 14 SECTION A A 17 See Figure CC for details 18 4 18 2 22 4 22 8 19 20 21 23 24 Note 1 Apply Loctite 242 HUCK part number 505016 per manufacturer s instructions to these threaded joints...

Page 14: ...turer s instructions to these threaded joints Vibra TITE is a registered trademark of ND Industries 2 Tighten Setscrew 17h against Setscrew 17d until Setscrew 17d turns with difficulty Notes 1 2 D D C...

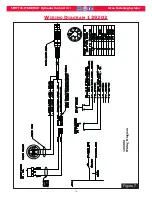
Page 15: ...SFBTT20 IT BOBTAIL Hydraulic Tool HK1121 Alcoa Fastening Systems 15 W WIRING IRING D DIAGRAM IAGRAM 129202 129202 129202 Wiring Diagram Figure 7...

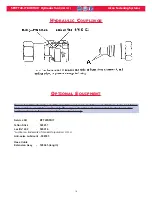
Page 16: ...rk of Henkel Corporation U S A Anti seize Lubricant 508183 Hose Cable Extension Assy 128461 length To maintain CE conformity only CE compatible equipment should be used with these tools Installation t...

Page 17: ...nety 90 day warranty period for tooling other items nonstandard or custom products described above and Huck shall inspect products for which such claim is made TOOLING PART S AND OTHER ITEMS NOT MANU...

Page 18: ...nization Alcoa Fastening Systems AFS maintains company offices throughout the United States and Canada with subsidiary offices in many other countries Authorized AFS distributors are also located in m...

Reviews: