2600 series Hydraulic Tooling
(HK914)
Alcoa Fastening Systems
8
TO INSTALL A HUCKBOLT
®
FASTENER
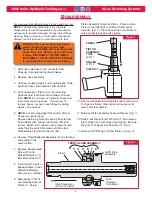
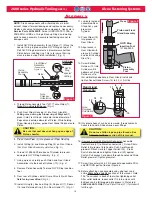
1. Check work and remove excessive gap in the
space between sheets. Gap is excessive if not
enough pintail sticks through the collar for the
nose assembly jaws to grab onto.
2. Put fastener into hole.
3. Slide collar over fastener. (The beveled end of the
collar must be towards the nose assembly and
tool.)
4. Push nose assembly onto the fastener until the
nose assembly anvil stops against the collar. Tool
and nose assembly must be held at right angles
(90°) to the work.
5. Depress tool switch to start installation cycle.
6. When forward motion of nose assembly anvil
stops and pintail breaks off, release switch. Tool
will go into its return stroke, push off the installed
fastener and eject the pintail.
7. The tool and nose assembly is ready for the next
installation cycle.
O
O
PERATING
PERATING
I
I
NSTRUCTIONS
NSTRUCTIONS
WARNING: Reasonable care of installation
tools by operators is an important factor in
maintaining tool effeciency and in reducing
repair downtime. Do not abuse the tool by
dropping it, using it as a hammer, or
otherwise, causing unnecessary wear and
tear. Be sure there is adequate clearance
for the tool and operator’s hands before
proceeding. Do not connect tool’s hoses to
each other or use hoses as a handle for
carrying.
WARNING: Do not pull on a fastener
without a collar. If a fastener is pulled
without a collar, the fastener will eject
forcibly when the pintail breaks off.
S
S
ERVICING
ERVICING
THE
THE
T
T
OOL
OOL
See
S
S
PECIFICATIONS
PECIFICATIONS
for fluid type. Dispose of fluid in
accordance with local environmental regulations. Recycle
steel, aluminum, and plastic parts in accordance with local
lawful and safe practices.
PREVENTIVE MAINTENANCE
NOTE: For supplementary information refer to
T
T
ROUBLESHOOTING
ROUBLESHOOTING
, Parts Lists, and
D
D
ISASSEMBLY
ISASSEMBLY
AND
AND
A
A
SSEMBLY
SSEMBLY
procedures in this manual.
SYSTEM INSPECTION
Operating efficiency of the installation tool is directly related to
performance of the complete system, including the tool with
nose assembly, hydraulic hoses, trigger and control cord, and
POWERIG. Therefore, an effective preventive maintenance
program includes scheduled inspections of the system to
detect and correct minor troubles.
1. Inspect tool and nose for external damage.
2. Verify that hydraulic hose fittings and couplings and
electrical connections are secure.
3. Inspect hydraulic hose for signs of damage or aging.
Replace hoses if damaged.
4. Inspect tool, hose, and POWERIG during operation to
detect abnormal heating, leaks, or vibration.
POWERIG MAINTENANCE
Maintenance instructions and repair procedures are in the
appropriate POWERIG Instruction Manual.
TOOL MAINTENANCE
At regular intervals, depending on use, replace all O-rings and
back-up rings in the tool. Spare Parts Kit
2600KIT
should be
kept on hand. Inspect cylinder bore, piston and piston rod and
unloading valve for scored surfaces, excessive wear or
damage, and replace as necessary.
NOSE ASSEMBLY MAINTENANCE
Daily cleaning of the nose assembly is recommended. This
can usually he accomplished by dipping nose assembly in
mineral spirits, or other suitable solvent, to clean jaws and
wash away metal chips and dirt. If more thorough cleaning or
maintenance is necessary, disassemble the nose assembly.
Use a sharp pointed “pick” to remove imbedded particles from
the pull grooves of the jaws.
CAUTIONS:
- Consult MSDS before servicing tool.
- Keep dirt and other material out of
hydraulic system.
- Separated parts most be kept away
from dirty work surfaces.
- Dirt/debris in hydraulic fluid causes
Dump Valve failure in Tool and in
POWERIG® Hydraulic Unit’s valves.
- Always check tool assembly drawing
for the proper direction of the flats on
the Dump Valve.
CAUTION: Do not use TEFLON
®
* tape on
pipe threads. Pipe threads may cause tape
to shred resulting in tool malfunction.
(Slic-Tite is available in stick form as
Huck P/N 503237.)
CAUTION: Always replace seals, wipers,
and back-up rings when tool is
disassembled for any reason.

