


............................................................................................................................................................................................................................................................
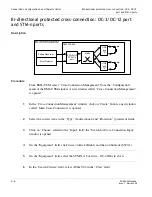
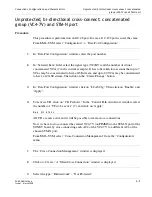
Cross-connection between a local and a remote data port
Connections, Configurations, and Characteristics
4-12
PN 8DG08136CAAA
Issue 1 March 2008
............................................................................................................................................................................................................................................................
Cross-connection between a local and a remote data port
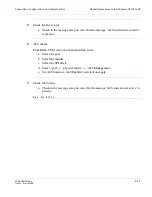
Procedure
ON the equipment view, select the board.
From EML-USM, select “Equipment” -> “Data board Navigation.” then insert login and
password. The Data CT starts.
........................................................................................................................................................................................................................
1
To add a card, select the equipment (the first row). From the pop-up menu (click on the
right button of the mouse), select “Add Data Board.” Choose the board from the list and
click on “OK.”
........................................................................................................................................................................................................................
2
In the “1850 TSS-320 User Service Management..” window, double-click on the board
(i.e., r1sr1/board#2). The local and remote data ports are displayed.
........................................................................................................................................................................................................................
3
Select a local port. From the pop-up menu (click on the right button of the mouse), select
“Configure Ethernet port.”
........................................................................................................................................................................................................................
4
In the “Ethernet port Configuration” window, select the “Configuration” tag and set “Up”
in “Admin. Status” field. Click on “OK.”
........................................................................................................................................................................................................................
5
In the “Ethernet port Configuration” window, for GbE ports only; select the “MAU” tag
and set “Admin. Status” = “Enabled” in “Auto negotiation” field. Click on “OK.” Don't
perform any setting in case of 10 GbE ports.
........................................................................................................................................................................................................................
6
Select a remote port. From the pop-up menu (click on the right button of the mouse),
select “Configure Ethernet port.”
........................................................................................................................................................................................................................
7
In the “Ethernet port Configuration” window, select the “Configuration” tag and set “Up”
in “Admin. Status” field. Click on “OK.”
........................................................................................................................................................................................................................
8
Click on “Connection” tag and select the local port. Open the pop-up menu and select
“Create ETS XC one step.”
Summary of Contents for 1850 TSS-320
Page 6: ... List of figures v i PN 8DG08136CAAA Issue 1 March 2008 ...
Page 8: ... List of tables v i i i PN 8DG08136CAAA Issue 1 March 2008 ...
Page 16: ... Safety rules Safety 1 4 PN 8DG08136CAAA Issue 1 March 2008 ...
Page 138: ... Other technical support services Technical Support A 14 PN 8DG08136CAAA Issue 1 March 2008 ...
Page 140: ... Glossary GL 2 PN 8DG08136CAAA Issue 1 March 2008 ...