background image


10 


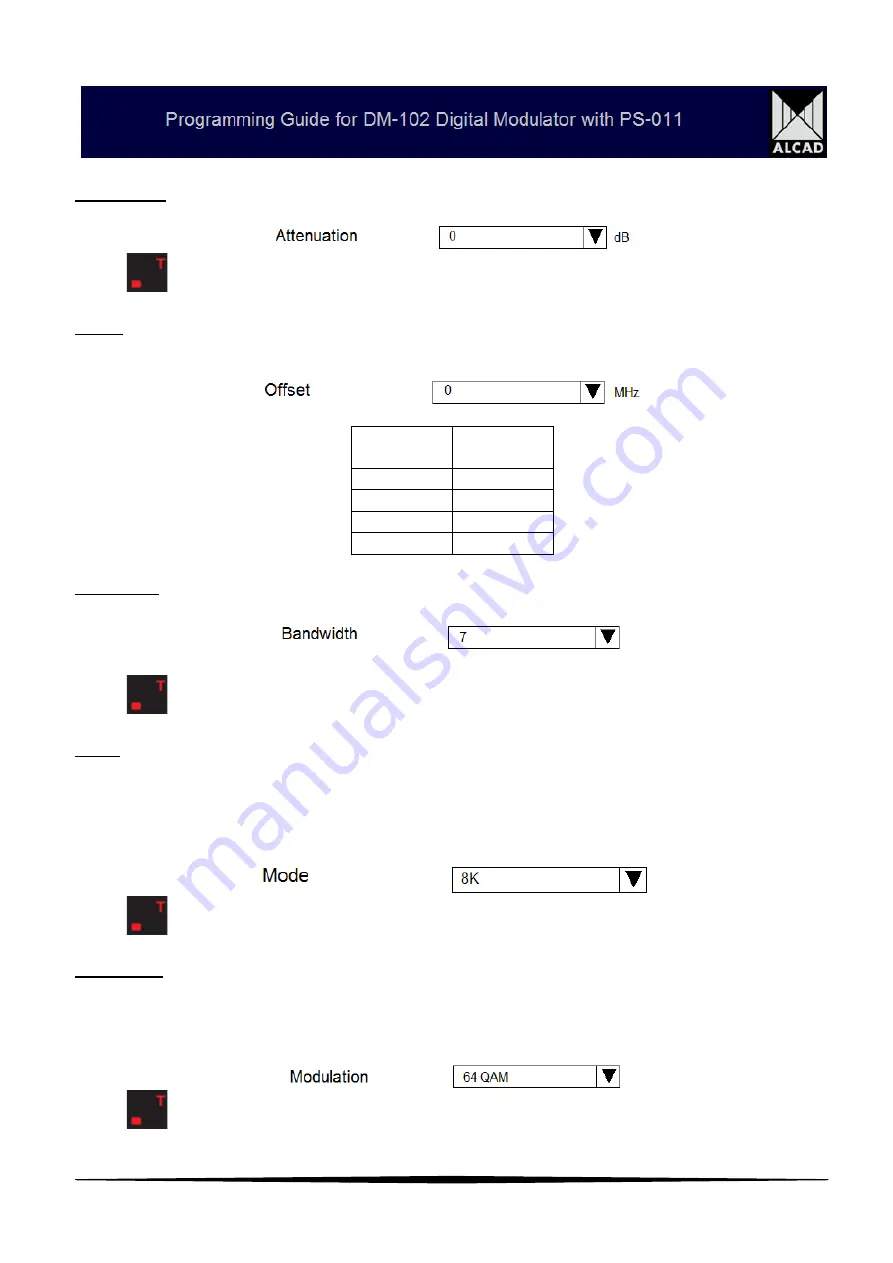
Attenuation  is the dropdown  box that allows you to adjust the power level output of the 
modulator. 


Press 

 transmit button on the programmer to send the change through to module.


Offset  is the dropdown  box that  gives you the option to add or subtract either 0.166 or 
0.125MHz of the output digital  RF frequency.  Look at table to give you the decimal 
conversion. 


Fraction 
Offset 

Decimal 
Offsets 

+ 1 / 6 

+0.166 

 - 1 / 6 

-0.166 

+ 1 / 8 

+0.125 

-  1 / 8 

- 0.125 

 
Bandwidth in Australia must 

‘ALWAYS’

 be set to 

7 MHz

 . 


Press 

 transmit button on the programmer to send the change through to module.


Mode can be set to either 2K or 8K. DVB-T offers a choice of two options for the number of 
carriers, each with the same fundamental data capacity. In 

"2K" mode

, 1705 carriers are used 

to carry symbols with a useful duration of 224m s, whereas in 

"8K" mode

  there are 6817 

carriers with a useful symbol duration of 896m s. The reason for having two modes is to allow 
a trade-off to be made between receiver complexity and the ability to withstand long echoes.  


Press 

 transmit button on the programmer to send the change through to module.


Modulation has 3 modulation options QPSK, 16QAM, 64QAM. There is a balance between the 
amount rate at which data can be transmitted and the signal to noise ratio that can be 
tolerated. The lower order modulation formats like QPSK do not transmit data as fast as the 
higher modulation formats such as 64QAM, but they can be received when signal strengths 
are lower. 


Press 

 transmit button on the programmer to send the change through to module.


Summary of Contents for DM-102

Page 1: ...SENSOR LOCATED ON EACH DIGITAL MODULATOR WHEN PROGRAMMING Programming of Modules Ensure the following prior to programming It is necessary to connect all the modules to the support frame SP 226 code 9...

Page 2: ...2 OPERATION OF PS 011 PROGRAMMER...

Page 3: ...3...

Page 4: ...4...

Page 5: ...5...

Page 6: ...rammed programming mode should be deactivated by placing the switch in the OFF position The programming indicator light will go out To start programming the DM 102 module you desire to programme pleas...

Page 7: ...ou have scrolled the selection bar to the modulator press the button to take you to another window which can be seen below Press the button to take you to Output configuration screen which can be view...

Page 8: ...50 Channel meaning that the output of the modulator is done so by channel number You should always select to Program by FREQUENCY as this stops confusion of any changes made to country channel plans...

Page 9: ...9 DIGITAL FREQUENCIES FOR AUSTRALIA ARE HIGHLIGHTED IN YELLOW Press transmit button on the programmer to send the change through to module...

Page 10: ...ach with the same fundamental data capacity In 2K mode 1705 carriers are used to carry symbols with a useful duration of 224m s whereas in 8K mode there are 6817 carriers with a useful symbol duration...

Page 11: ...1 2 2 3 3 4 5 6 and 7 8 dependent upon the requirements Press transmit button on the programmer to send the change through to module Guard Interval has 4 different interval rates 1 32 1 16 1 8 and 1 4...

Page 12: ...be unique and never repeated with any other modulator on the same network Thus on the next modulator service ID must be 3 and 4 and so on Press transmit button on the programmer to send the change th...

Page 13: ...ervices Press transmit button on the programmer to send the change through to module Video PID This number needs to be unique and should never be repeated on any other modulator within the same networ...

Page 14: ...displayed below this setting Press transmit button on the programmer to send the change through to module The Service bandwidth is indication information and should never exceed 45 If the Service BW...

Page 15: ...hanged You now need to save the settings To do this you need to press the MENU button on the programmer Pressing the Menu button will bring up Configuration File window This window enables you to eith...

Page 16: ...ess ESC button 3 times to take you back to the Main Menu window You then need to highlight NIT Table and press OK You will then be taken to a screen where you need to select the configuration file of...

Page 17: ...ed enter the desired LCN number with the Program name and the press down arrow so that the blue highlight block is on the next LCN Once you have entered the desired LCN channel numbers press the OK bu...

Page 18: ...utton to send the NIT to the modulator Successful completion of the NIT transmission is confirmed by the programmer with the green tick on the window You have now successfully programmed the DM 102 mo...

Reviews: