background image

32

PVR and Time Shift Operation

USB Device Setup

Before use the Recording and Time shift functions, you 

should insert a USB device and format it in the USB Host 

port at the connection panel of the TV set. 

Press 

 / 

  navigation button to select Format.

IMPORTANT: 

The setup will format the USB device, 

therefore all the data stored in the device will be lost. We 

strongly recommend to save the content of your USB 

device to your PC before starting configuration. 

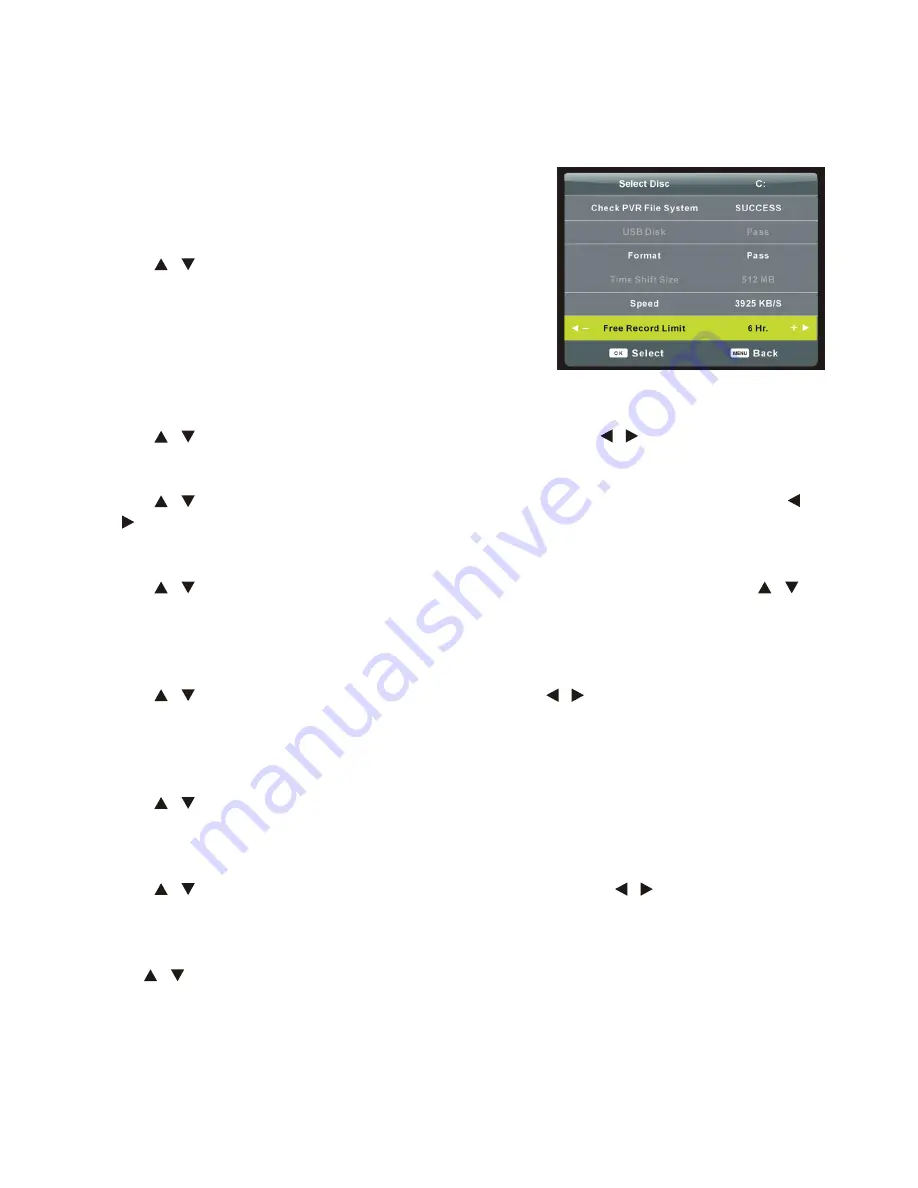
PVR File System

Highlight this item and press OK button to enter it.

Press 

 / 

  navigation button to select desired option, and press

   /   

button to adjust it.

Free Record Limit Time

Press 

 / 

 navigation button to select Free Record Limit. Press OK button to enter it. Press 


/   

button to adjust recording time limit.

Aspect Ratio

Press 

 / 

  navigation button to select Aspect Radio. Press Ok button to enter it. Press 

 / 

button to select available options: Auto, 4:3, 16:9, Zoom1, Zoom2. Press Ok button to confirm 

selection.

Blue Screen

Press 

 / 

  navigation button to select Blue Screen, press 

 /   

button to select ON or OFF. 

The screen background will turn blue at very weak or no signal condition, if BLUE SCREEN is 

ON. 

First Time Installation

Press 

 / 

 button to select First Time Setup, then press Ok button to enter. This item is used 

to select desired OSD language, country and do auto tuning when first time installing.

Reset

Press 

 / 

 button to select Reset. Press OK button to enter it. Press 

 /   

button to restore 

factory default settings.

Software Update (USB)

Use 

 / 

  the button to select Software Update, then press OK button to update software 

using USB.

NOTE:

 To avoid any malfunctions, we strongly recommend a professional or technician to 

update the software.    

Menu Operations in DTV Mode (Cont.) 


PVR File System 

● 

Insert your USB memory device into USB port before entering PVR file system. 

● 

Press 

▲/▼

 button to select this item and press OK button to enter it. 


● 

Press 

▲/▼

 button to select desired option and press 

/

 button to adjust it. 

● 

Press OK button to enter submenu or confirm setting. 

● 

In this part, you can select desired disk, check PVR File System, format your USB memory device 
and set desired Free Record Limit time. 


Aspect Ratio 

Press 

▲/▼ 

button to select this item and press OK button to enter it. Then use

 ▲/▼

 button to 

select desired option: Auto, 4:3, 16:9, ZOOM1, ZOOM2. Press OK button to confirm it.   
 

Blue Screen 

Press 

▲/▼

 button to select this item and press

/

 button to turn on/off it. 


First Time Installation 

Press 

▲/▼ 

button to select this item and press OK button to call out First Time Installation menu. 


Reset 

Press 

▲/▼ 

button to select this item and press OK button to enter it. Then use 

 or 

 button to 

restore factory default settings or not. 
 

Software Update (USB) 

Press 

▲/▼ 

button to select this item and press OK button to detect new software from your USB 

device. 

NOTE:

 To avoid any malfunctions, we strongly recommend a professional or technician to update 

the software. 


30

Summary of Contents for AK22FLEDCG

Page 1: ...21 5 54 6cm FHD LED LCD TV with Built in DVD Player AK22FLEDCG Instruction Manual AFTER SALES SUPPORT NZ 0800 883 301 N13275...

Page 2: ...es 17 Remote Control Operation 17 First Time Installation 18 Selecting an Input Source 19 Menu Operation in DTV Mode 20 Channel Menu 20 Picture Mode 24 Sound Mode 25 Time Settings 26 Lock Menu 27 Hote...

Page 3: ...3 Contents Specifications 49 Care and Maintenance 50 Responsible Disposal 50 FAQs 51...

Page 4: ...the obsolete outlet Protect the power cord from being walked on or pinched particularly at plugs convenience receptacles and the point where they exit from the TV Only use the attachments accessories...

Page 5: ...ated Away from damp and cold Protected from overheating and away from direct sunlight Away from moisture drips or splashes Protected from excessive dust Do not install this equipment in a confined spa...

Page 6: ...tion WARNING TO PREVENT DAMAGEWHICH MAY RESULT IN FIRE OR AN ELECTRIC SHOCK HAZARD DO NOT EXPOSETHIS APPLIANCETO RAIN OR MOISTURE CAUTIONS These servicing instructions are for use by qualified service...

Page 7: ...r adaptor first when installing or removing the TV stand To avoid any damage to the TV ask one or more people for assistance when installing or removing the TV stand Assembly Assembly Contents of cart...

Page 8: ...s 100 x 100mm in width and height Note The screws in the package are for securing theTV stand only If you are wall mounting theTV consult a qualified installer for further instructions on brackets sup...

Page 9: ...to the silk screen on the side of this slot 6 To play or pause playing DVD 7 To open or close the disc compartment 8 VOLUME button To increase decrease the volume level or move left right 9 CHANNEL b...

Page 10: ...ge device 12 Earphone Connect the earphone 13 Built in Speaker Controls and Connections Cont 1 Power input Connect the included power adaptor 2 HDMI 1 Connect the HDMI output jack of DVD 3 PC AUDIO Co...

Page 11: ...el lights up in blue Antenna Connection To ensure good picture and sound a TV antenna system needs to be connected The antenna system as shown can be sourced from TV equipment stores which will provid...

Page 12: ...or VCR to the YPbPr input on the set The picture quality is improved compared to connecting a regular VCR to the AV input Connect the Audio output of the DVD or VCR to the Audio input jacks on the set...

Page 13: ...control HDMI Connection HDMI is a digital connection for sending both Video Sound signals through the one cable HDMI supports 1080p Video and Multi channel Digital Audio Connect HDMI out of DVD or VC...

Page 14: ...COAXIAL OUT Connection Earphone cable Not included Basic Installation Cont USB Media Connection Connect portable USB storage device for multimedia files playback Select USB input source using the SOUR...

Page 15: ...formation D MENU DVD Display the main disc menu 10 HOLD To hold the teletext FREEZE To hold the picture 11 SUBTITLE To switch on subtitle press it again to turn off subtitle 12 SIZE To switch the tele...

Page 16: ...el number 34 Press this button to enter a program number for multiple program channel such as 2 1 etc 35 Return to the previous channel viewed 36 SOURCE To select desired input source 37 P MODE To swi...

Page 17: ...he TV NOTES The operating distance may vary according to the brightness of the room Do not point bright light at remote control sensor Do not place objects between the remote control and the remote co...

Page 18: ...lect this option and press button to select your country NOTE If you select other than New Zealand the unit will not operate correctly for New Zealand TV signals Tuning Setup Press button to select th...

Page 19: ...e and the country to search all the available programs in your area Press SOURCE button to display the input source list Press button to select the input source you want to watch Press OK button to en...

Page 20: ...utton to enter adjusting page 5 Use button to adjust an option and press OK button to confirm it 6 After finishing your adjustment press MENU button to save it and go back to previous menu page Channe...

Page 21: ...em and press OK button to enter it Press button to select the channel and then press Ok button to search program Menu Operations in DTV Mode Cont Press button to select desired tune type DTV ATV ATV D...

Page 22: ...mal channel Schedule List Press button to select this item and press OK button to enter it 1 Press button to switch between Schedule List and Recorded List 2 Press RED button to delete highlighted opt...

Page 23: ...o select this item and press OK button to display signal details including Channel Quality and Strength Menu Operations in DTV Mode Cont Channel Press button to highlight it and press button to select...

Page 24: ...tem is used to adjust the optimum colour temperature for suitable viewing Press button to select Color Temperature then press OK button to enter sub menu Press button to select available options Norma...

Page 25: ...kers Auto Volume Press button to select Auto Volume then press Press button to select On or Off SPDIF Mode Press button to select SPDIF then press Press button to select available options Off Auto PCM...

Page 26: ...his item is used to set the auto standby duration OSD Timer Press button to select OSD Timer then press button to select available options 5S 10S 15S 20S 25S 30S This item is used to set the OSD on sc...

Page 27: ...select Parental Guide then press button to select available options BLOCK ALL G AND ABOVE PGR AND ABOVE AO AND ABOVE NO BLOCK Key Lock Press button to select Key Lock then press button to select On or...

Page 28: ...ss button to select Clear Lock and clear above settings Press Ok to confirm clear lock Menu Operation in DTV Mode Cont Menu Operations in DTV Mode Cont Hotel Mode Press button to select this item and...

Page 29: ...n scene or action through the caption instead of hearing it NOTE Hearing Impaired works only when you are viewing programs that contain related caption information 29 OSD Language Press button to sele...

Page 30: ...refer to the operations of DTV mode Menu Operations in PC Mode 1 Connect your computer to this unit using a VGA cable 2 Power on this unit and your computer 3 Press SOURCE button on the unit or remot...

Page 31: ...tion are the same as DTV mode SOUND menu and description are the same as DTV mode LOCK menu and description are the same as DTV mode AV HDMI Component mode has no CHANNEL menu TIME menu has no clock o...

Page 32: ...ed OSD language country and do auto tuning when first time installing Reset Press button to select Reset Press OK button to enter it Press button to restore factory default settings Software Update US...

Page 33: ...button on remote control to start recording directly 2 Press button to select desired option in the tool bar and press OK button to confirm it If above tool bar has disappeared press button to display...

Page 34: ...r 3 Press button to select Play in the tool bar and press OK button to watch the program in TIME SHIFT mode 4 To stop TIME SHIFT press on remote control to call out a dialog box Select Yes to exit TIM...

Page 35: ...out removing the USB recording device You will need to remove the USB device as it is required to reset after each recording to protect the device from damage You may also see the message DISK NOT REA...

Page 36: ...in PHOTO menu music in MUSIC menu moves in MOVIE menu and text in TEXT menu Media Multimedia Playback 1 Plug in a USB device with FAT32 format then press SOURCE button to switch this unit to Media Mo...

Page 37: ...file or not Press OK button to play highlighted file Press RED button to enter a dialog box and press button to select delete option Press OK button to play highlighted file During PHOTO slide show p...

Page 38: ...ress button to select desired option and press OK button to confirm it Press button to pause start playing Press button to play fast backward fast forward Press button to play previous next file Press...

Page 39: ...ct desired folder or file Press RED button to enter a dialog box and press or button to delete highlighted file or not Press OK button to play highlighted file Press RED button to enter a dialog box a...

Page 40: ...nd press OK button to confirm it Press button to pause start playing Press button to play fast backward fast forward Press button to play previous next file Press button to stop playing 4 Text playbac...

Page 41: ...MP2 Max Date Rate 40 Mbps Music mp3 MP3 Sample Rate 8K 48KHz Bit Rate 32K 320Kbps Channel Mono Stereo wma WMA m4a aac AAC Sample Rate 16K 48KHz Bit Rate 32K 442Kbps Channel Mono Stereo Photo jpg jpeg...

Page 42: ...watching a channel which contains many programs you may need to press and hold EPG button for about 2 seconds to display program guide EPG Electronic Program Guide EPG stands for Digital Electronic Pr...

Page 43: ...cs they are explained below Audio CD discs Audio CD discs are divided into tracks 40Built in DVD Player Operations If Fitted Some points about discs The following types of disc can be played on this u...

Page 44: ...e of the disc Never use chemical cleaning spray liquids or solvents to clean discs These chemicals will permanently damage the plastic surface of the disc To remove a disc from its storage case press...

Page 45: ...mode you have selected when you insert a playable disc into the disc slot the TV will switch to DVD mode and start playback automatically 3 To temporarily stop playback of a CD press button to stop pl...

Page 46: ...itch to DVD mode and start playback automatically 3 To temporarily stop playback of a CD press to stop playback press it again to resume playback To temporarily stop playback of a DVD press once to st...

Page 47: ...at the beginning of the section you want to repeat Point A A appears on the TV screen 2 Press A B again at the end of the section you want to repeat Point B AB appears briefly on the TV screen 3 To re...

Page 48: ...n you turn off the power or change the disc you have to select your desired language again On Screen Information Press DISPLAY button on your remote control to show the disc available information Titl...

Page 49: ...0 V Lift Time 30 000 Hrs Inputs Outputs HDMI input 2 USB input 1 VGA 1 CVBS 1 AUDIO R L 1 RF Antenna 1 Component YPbPr 1 3 RCA terminals Earphone input 1 Coaxial input 1 Power Supply Adaptor DC 12V Ra...

Page 50: ...soft dry lint free cloth Do not use a wet cloth If you are going to be away for a while If you are not going to use your TV for a while such as when you go on holiday you should unplug the power cord...

Page 51: ...your TV such as a piece of furniture that could block the remote control from connecting with the sensor on your TV 2 Have you put the batteries into the remote control the right way to and to 3 Chec...

Page 52: ...in operation 2 Turn on the auto configure or change the horizontal or vertical frequency position Poor reception 1 The TV channel you re watching may be having problems Change to another channel and s...

Page 53: ...53 Notes...

Page 54: ...54 Notes...

Page 55: ...55 Notes...

Page 56: ...packed with features and completely reliable We are so confident in our products we back them up with a full 2 year warranty Now you too can relax knowing that you are covered Customer Helpline NZ 080...

Reviews: