


7
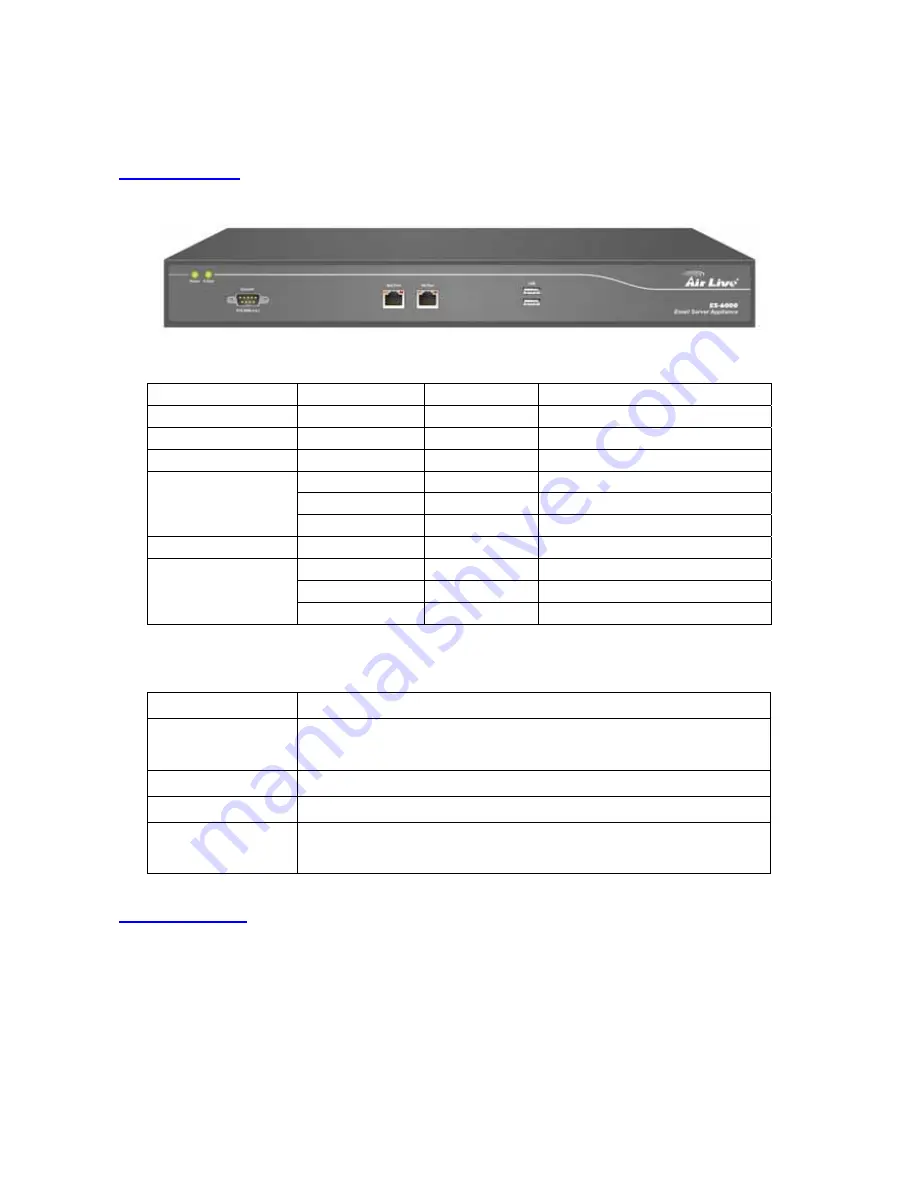
1.2 Front Panel
Figure 1-1 Front Panel
LED Color
Status
Description
POWER
Green
On
Power on the device
Hard Disk
Green
Blinking
Data reading / accessing
Mail Port (Right Led)
Orange
Blinking
Sending / Receiving
Deep Orange
On
1000 Mbps
Green On
100
Mbps
Mail Port (Left Led)
Off
10
Mbps
HA Port (Right Led)
Orange
Blinking
Sending / Receiving
Deep Orange
On
1000 Mbps
Green On
100
Mbps
HA Port (Left Led)
Off
10
Mbps
Ports:
Port Description
AC Power
Input voltages ranging from 100 ~ 240 VAC, and with a maximum power
output of 85 watts.
Mail Port
Use this port to connect to a router, DSL modem, Cable modem, or Switch.
HA Port
Use this port to connect another ES-6000 device for HA function
Console Port
9-pin serial port connector for checking setting and restore to the factory
setting
1.3 Packing List
z
ES-6000 Mail Server Appliance
z
CD-ROM with Quick Installation Guide and User’s Manual
z
CAT-6 UTP Fast Ethernet cable x 2
z
RS-232
cable
z
Power
code
z
Accessories
Summary of Contents for ES-6000
Page 1: ...ES 6000 Email Server Appliance User s Manual ...
Page 53: ...52 Figure 4 46 Adding a Contact Figure 4 47 New Contact Added ...
Page 57: ...56 Figure 4 52 Create new Internet Account Figure 4 53 Define LDAP server IP address ...
Page 60: ...59 Figure 4 58 Configure LDAP server Advanced setting ...
Page 72: ...71 Step3 Web based mail for easy mail access Figure 5 5 Figure 5 5 Web Mail Interface ...
Page 74: ...73 Figure 5 9 Editing Personal Information ...
Page 77: ...76 Figure 5 13 Selecting the Desired Fields to Export Figure 5 14 Export Process Completed ...
Page 79: ...78 Figure 5 17 Clicking into Import Screen Figure 5 18 Address Book Successfully Imported ...
Page 81: ...80 Figure 5 20 Uploading a File to ES 6000 s Built in Web Disk Figure 5 21 File Uploaded ...
Page 96: ...95 Figure 6 12 Check all mails to retrieve Figure 6 13 Check all mails to resend ...
Page 127: ...126 Figure 6 56 Selecting Spam E Mails Figure 6 57 Forwarding Spam E Mails as Attachment ...
Page 134: ...133 Figure 6 65 Receive the periodic report ...
Page 135: ...134 Figure 6 66 The first page in periodic report ...
Page 136: ...135 Figure 6 67 The second page in periodic report ...
Page 137: ...136 Figure 6 68 The third page in periodic report ...
Page 138: ...137 Figure 6 69 The fourth page in periodic report ...
Page 139: ...138 Figure 6 70 The history report setting Figure 6 71 Receive the history report ...
Page 140: ...139 Figure 6 72 The first page in history report ...
Page 141: ...140 Figure 6 73 The second page in history report ...
Page 142: ...141 Figure 6 74 The third page in history report ...
Page 170: ...169 Figure 8 13 An E Mails Shown on a Smartphone Figure 8 14 Reading an E Mail ...
Page 179: ...178 Figure 9 4 The setting of backup immediately ...
Page 208: ...207 Figure 12 14 Adding a New Folder Figure 12 15 The Related Settings of a Folder ...
Page 209: ...208 Figure 12 16 Opening a Folder Figure 12 17 Uploading a File ...
Page 212: ...211 Figure 12 23 Downloading the Desirable File ...
Page 215: ...214 Figure 14 1 Display system info ...
Page 217: ...216 Figure 14 3 Search results ...
Page 218: ...217 Figure 14 4 Event log details ...


