119
Step5.
Select
Mail Security
Æ
Anti-Spam
Æ
Training
, and then set as below:
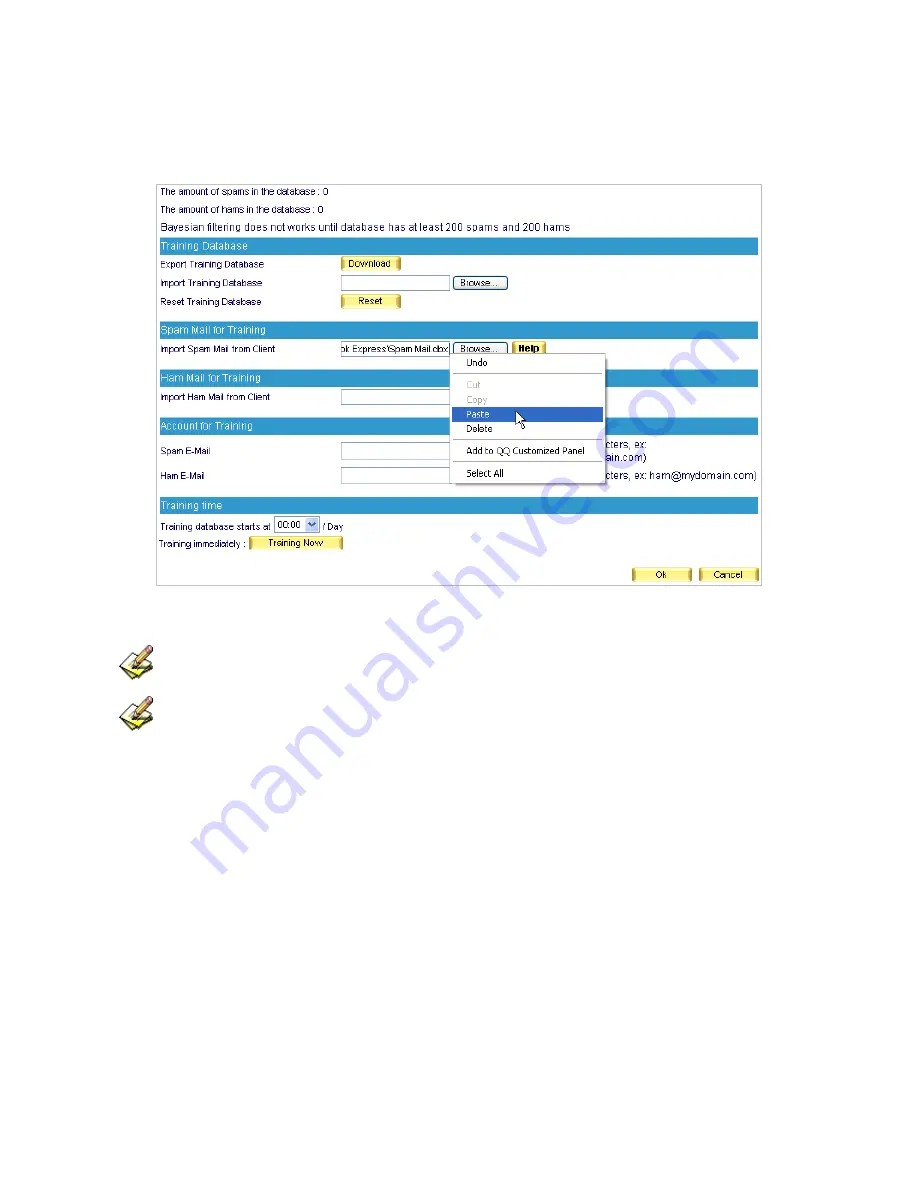
Paste the storage path of “Spam Mail” folder in the
Import Spam Mail from Client
field.
Click
OK
to start importing. ES-6000 will start training on scheduled time. (Figure 6-46)
Figure 6-46 Pasting the Storage Path of Compressed Spam E-Mails
The file for training can be any database file. However, it has to be in ASCII format.
If the file for training has an extension file name of “.pst” (generated by Microsoft Office Outlook), then
Outlook must be closed before starting import.
Step6.
Since current spam e-mails have been compressed and uploaded to ES-6000, e-mails in this
folder are of no use any longer. Therefore, delete all spam e-mails so that no old spam e-mails
will be imported onto ES-6000 next time.
Select all e-mails in “Spam Mail” folder, then right-click them and move to
Delete
on the
pop-up menu and click it.
Summary of Contents for ES-6000
Page 1: ...ES 6000 Email Server Appliance User s Manual ...
Page 53: ...52 Figure 4 46 Adding a Contact Figure 4 47 New Contact Added ...
Page 57: ...56 Figure 4 52 Create new Internet Account Figure 4 53 Define LDAP server IP address ...
Page 60: ...59 Figure 4 58 Configure LDAP server Advanced setting ...
Page 72: ...71 Step3 Web based mail for easy mail access Figure 5 5 Figure 5 5 Web Mail Interface ...
Page 74: ...73 Figure 5 9 Editing Personal Information ...
Page 77: ...76 Figure 5 13 Selecting the Desired Fields to Export Figure 5 14 Export Process Completed ...
Page 79: ...78 Figure 5 17 Clicking into Import Screen Figure 5 18 Address Book Successfully Imported ...
Page 81: ...80 Figure 5 20 Uploading a File to ES 6000 s Built in Web Disk Figure 5 21 File Uploaded ...
Page 96: ...95 Figure 6 12 Check all mails to retrieve Figure 6 13 Check all mails to resend ...
Page 127: ...126 Figure 6 56 Selecting Spam E Mails Figure 6 57 Forwarding Spam E Mails as Attachment ...
Page 134: ...133 Figure 6 65 Receive the periodic report ...
Page 135: ...134 Figure 6 66 The first page in periodic report ...
Page 136: ...135 Figure 6 67 The second page in periodic report ...
Page 137: ...136 Figure 6 68 The third page in periodic report ...
Page 138: ...137 Figure 6 69 The fourth page in periodic report ...
Page 139: ...138 Figure 6 70 The history report setting Figure 6 71 Receive the history report ...
Page 140: ...139 Figure 6 72 The first page in history report ...
Page 141: ...140 Figure 6 73 The second page in history report ...
Page 142: ...141 Figure 6 74 The third page in history report ...
Page 170: ...169 Figure 8 13 An E Mails Shown on a Smartphone Figure 8 14 Reading an E Mail ...
Page 179: ...178 Figure 9 4 The setting of backup immediately ...
Page 208: ...207 Figure 12 14 Adding a New Folder Figure 12 15 The Related Settings of a Folder ...
Page 209: ...208 Figure 12 16 Opening a Folder Figure 12 17 Uploading a File ...
Page 212: ...211 Figure 12 23 Downloading the Desirable File ...
Page 215: ...214 Figure 14 1 Display system info ...
Page 217: ...216 Figure 14 3 Search results ...
Page 218: ...217 Figure 14 4 Event log details ...


