background image

Air Techniques, Inc.

Page 22

THIRD PARTY IMAGING APPLICATION SETUP

6.6. 

Tigerview

 Setup for ProVecta Version 7.3.5.

6.6a.

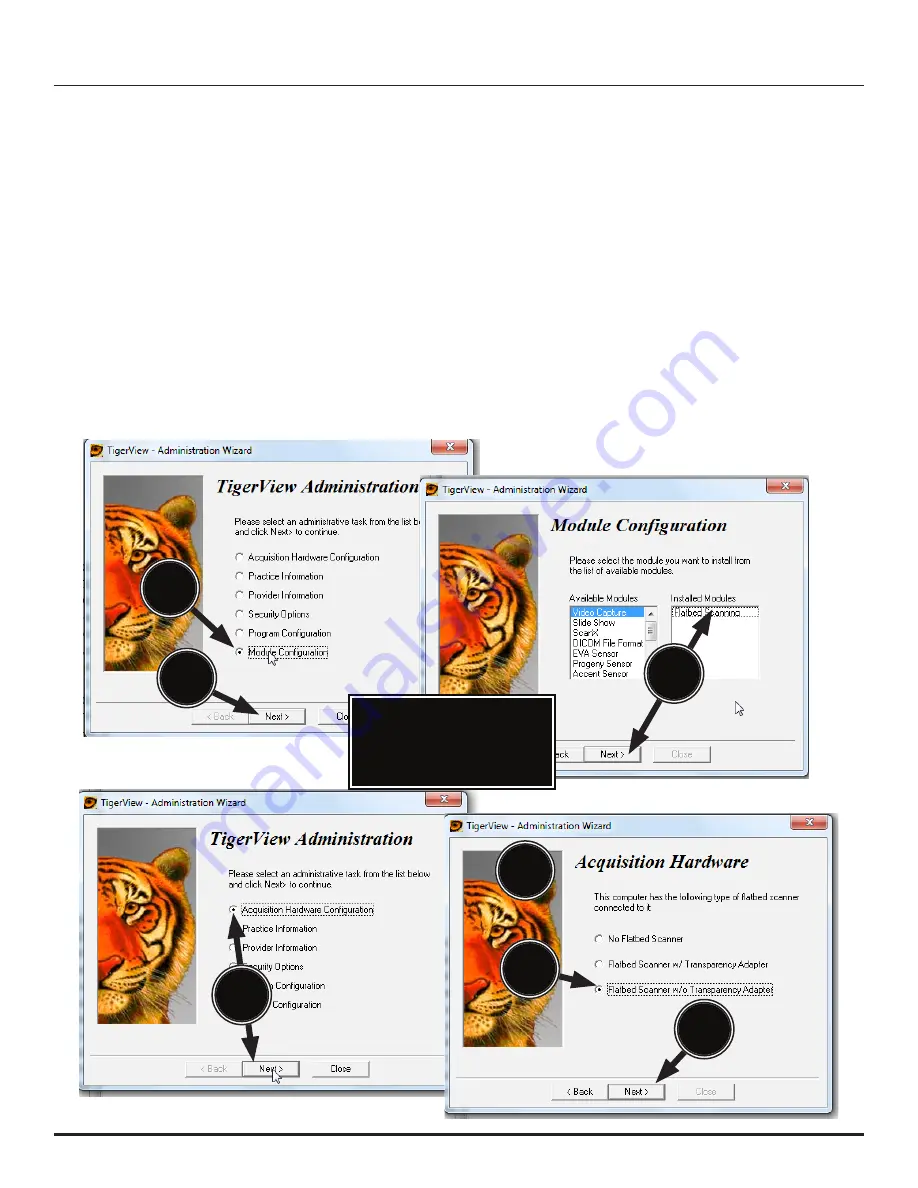
  Start the application and observe that the 

Tigerview - Administration Wizard


window


opens. Select 

Module Configuration

 radio button from the list.

6.6b.

 Click 

Next

 and observe that the 

Module Configuration

 window


opens.

6.6c.

  Install the 

Flatbed Scanner 

module


and click 

Next

. Observe that the 

Activation Code


window displays.  At this point, you must call for a module activation code and input 

the code to continue setup via 

Tigerview - Administration 

window as shown.

6.6d.

  With the 

Tigerview - Administration

 window


displayed, select the 

Acquisition Hard-

ware Configuration

 radio button from the list and click 

Next

.

6.6e.

  Observe that the 

Acquisition Hardware 

window


opens.

6.6f.

  Select the 

Flatbed Scanner w/o Transparency Adapter

 radio button from the list.

6.6g.

 Click 

Next

 and observe that the 

Acquisition Hardware 

window


changes to display video 

camera hardware configuration options.

6.6a

6.6b

6.6c

6.6d

6.6e

6.6g

7.6f

Important:

Call For A Module 

Activation Code.

Summary of Contents for ProVecta S-Pan

Page 1: ...Software Installation Configuration Instructions Panoramic X ray System Panoramic Cephalometric X Ray System S Pan with Optional Stand Assembly Shown S Pan CEPH with Optional Stand Assembly Shown...

Page 2: ......

Page 3: ...card still provides the connection to the office network 1 Setting up the ProVecta network Data transmission between ProVecta and PC is accom plished over a separate network connection made via a addi...

Page 4: ...s 5 From the Network Adapter group double click the Gigabit network connection for ProVecta Observe that the properties window for the network adapter opens 6 Select Power Management tab 7 Un check th...

Page 5: ...un the Setup program located in the root directory of the CD typically D AutoRun exe and select Install Software from the menu a Follow the on screen instructions to complete the software installation...

Page 6: ...he CrongIPC item from the Air Techniques ProVecta S Pan submenu 3 b With the Gigabit Ethernet card installed only for ProVecta S Pan operation selected Click the Set to CRONG client IP button and perf...

Page 7: ...If the Warning message displays click OK close the CRONGIPC application make sure the network adapter is properly seated and drivers loaded Also make sure that S Pan is turned on and physically conne...

Page 8: ...for the ProVecta S Pan without Ceph 4 c ProVecta S Pan with Ceph file download 1 Keep all six file check boxes selected 2 Click Download 3 Observe the successful download progress of all six selected...

Page 9: ...the Activate VistaEasyView check box is unchecked as shown 5 e Click the Configuration ScanX Ray icon 5 f If any device is checked uncheck it and click the indicated Refresh symbol Then check only th...

Page 10: ...Air Techniques Inc Page 10 NOTES...

Page 11: ...on The imaging management software covered includes the following manufacturers Item Application Page 1 Apteryx XrayVision Version 3 12 12 2 Apteryx XrayVision Lite Version 3 12 14 3 Dexis 9 16 4 Dexi...

Page 12: ...t Patient from the top tool bar 6 1c Select Capture Single Image through either the File tab or the capture icon located on the top tool bar 6 1d Observe that the Image Capture window opens Choose the...

Page 13: ...OK tab Observe that a splash screen flashes briefly and the ProVecta S Pan image acquire window opens 6 1j Refer to the ProVecta S Pan Operating Instructions as necessary and acquire an im age 6 1k O...

Page 14: ...s 6 2b Select a patient an exiting one or newly created as necessary 6 2c Observe that the commands on the side bar are active Click the Take X ray command 6 2d Observe that the Take images for what t...

Page 15: ...TION SETUP 6 2g Select the ProVecta S Pan 8 Bit from the drop down menu and choose OK tab 6 2h Observe that the ProVecta S Pan image acquire window opens Refer to the ProVecta S Pan Operating Instruct...

Page 16: ...am Information window opens Click OK and observe that the Preferences window opens 6 3b Select the DEXray tab Select the ProVecta S Pan 16 Bit from the scanner drop down menu 6 3c Click Done and obser...

Page 17: ...ormation window opens Click OK and observe that the Preferences window opens 6 4b Select X ray Acquisition from the list on the left Select the ProVecta S Pan 16 Bit from the scanner drop down menu 6...

Page 18: ...ferences from the list which opens a new window as shown Select the following 1 Select X ray tab 2 Check use scanner default interface check box 3 Select Scanner tab 6 5c Observe that the Select Sourc...

Page 19: ...indow displays altering the user to restart the computer so the selected preferences will be incorporated Click the OK button to return to the main program window 6 5f From the main program window sel...

Page 20: ...window open a task list by selecting New Exam Select other Tem plate from the list and observe that an Image Template List pop up window displays 6 5j Scroll down the list to Panoramic and select the...

Page 21: ...6 5k Verify that Scanner is the default source selected on the Edit Image Template pop up window Click the OK button to return to the exam window 6 5l Select Panoramic as a template 6 5m Select Acquir...

Page 22: ...s At this point you must call for a module activation code and input the code to continue setup via Tigerview Administration window as shown 6 6d With the Tigerview Administration window displayed sel...

Page 23: ...s JPEG A new window opens for default acquisition mode options 6 6l Select the Photo Slide Scanning radio button 6 6m Clicking Finish to accept the selection opens a pop up query window 6 6n Click Yes...

Page 24: ...dule Configuration radio button from the list 6 7b Click Next and observe that the Module Configuration window opens 6 7c Install the Flatbed Scanner module and Click Next 6 7d Observe that the Visix...

Page 25: ...rop down list of operational functions 6 8b Select Optical Scanner Select from the list and observe that the Select Source window opens 6 8c Highlight ProVecta S Pan 16 Bit 1 40 32 32 from the source...

Page 26: ...sed in ProVecta S Pan image processing 7 1a Open the start menu and select the DDIPS item from the Air Techniques ProVecta S Pan menu 7 1b Observe that the DDIPS window opens 7 1c Press the Search but...

Page 27: ...pop up message appears and the software automatically generates the various preview levels 7 1g Observe that the preview of the generated levels of the selected RAW file displays There are 1 to 5 lev...

Page 28: ...the brightness control left brighter right darker as desired 7 1j Now click on the Simulation button to simulate the image with the new settings 7 1k Observe that the image is processed and another le...

Page 29: ...If the level S image is unsatisfactory click on the Initialization button and select YES from the pop up message window to delete the image 7 1n Once a desired level is found Level 1 5 or Level S it...

Page 30: ...to ZeusPano2_old ini 7 1r Then save the new file ZeusPano2 ini in the same folder All future ProVecta S Pan images will be processed using the filter settings of this new ZeusPano2 ini file 7 1p 7 1q...

Page 31: ...r image via the TWAIN third party application 7 2a Open the control window shown below by selecting image acquisition via the TWAIN third party application and select the Tools button 7 2b Select Tran...

Page 32: ...MicroDicom item from the Air Techniques ProVecta S Pan menu 7 3b On the MicroDicom window select Open from the from the FILE drop down menu 7 3c Navigate to C ProgramData Air Techniques Images and se...

Page 33: ...ect Export To picture file from the from the FILE drop down menu 7 3f Observe that the Export to Images pop up window opens Input the destination path where the recovered file will be saved or parked...

Page 34: ...s window opens Click the appropriate Local Area Connection and select Properties from the resulting pop up window 7 4d From the Local Area Connection Properties window select the Internet Protocol TCP...

Page 35: ...Page 35 Air Techniques Inc Properties Internet Protocol OK Button Properties Button IP address 10 42 43 15 Subnet 255 255 255 0 ADVANCED PROCEDURES 7 4c 7 4d 7 4e...

Page 36: ...ake their practices to the next level Air Techniques family of quality products for the dental professional include Air Techniques Inc Copyright 2015 P N A7371 Rev E December 2017 Corporate Headquarte...

Reviews: