


11
Menu items in Playback mode
Power-on → Press the
MODE
button → Use the Joystick to switch to
My Works
mode
→ Select
Video, Picture
or
Voice
folder→ Press the
OK
button → Press the
MENU
button.
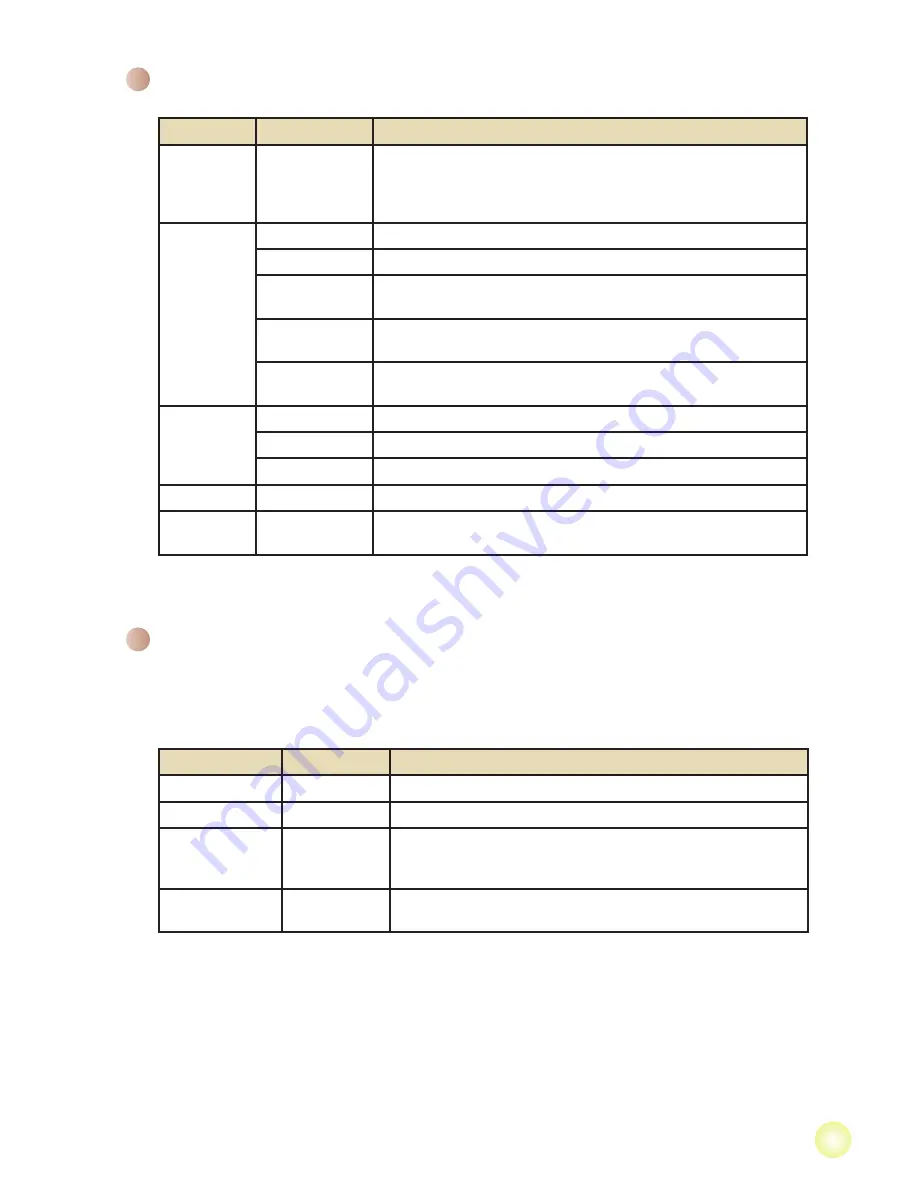
Item
Option
Description
Delete One
Yes/No
Delete current file.
Delete All
Yes/No
Delete all pictures and video/audio files stored in the memory.
Lock
Yes/No
Single, multiple, or all files can be locked. A locked file cannot
be erased by a delete function. While the formatting function will
erase all locked/unlocked files.
Repeat All
All
The camera displays images/video clips in sequence. You can
press the OK key to stop the slide show/video play.
* If there are no files in the camera, no items will be seen.
Menu items in Camera mode (continued)
Item
Option
Description
Continuous
Shot
(at video
resolution)
On/Off
Enable/Disable continuous shot function.
White
Balance
Auto
The camera automatically adjusts white balance.
Sunny
This setting is suitable for outdoor recording in sunny weather.
Cloudy
This setting is suitable for recording in cloudy weather or shady
environments.
Fluorescent
This setting is suitable for indoor recording with fluorescent lamp
lighting, or environments with high color temperature.
Tungsten
This setting is suitable for indoor recording with incandescent lamp
lighting, or environments with low color temperature.
Effect
Normal
Make recordings in natural color.
Black & White Make recordings in black and white.
Classic
Make recordings in sepia-toned color.
AF Lock
On/Off
Enable/Disable auto focus function.
Stabilizer
On/Off
Enable/Disable stabilizer function. Stabilizer function can prevent
the image from blurring causing by hand shake.
Summary of Contents for Action A-V5Z5S
Page 1: ......


