background image

39

Ve

ntin

g

OPTIONS 8 & 9:  2

(

& 3

(

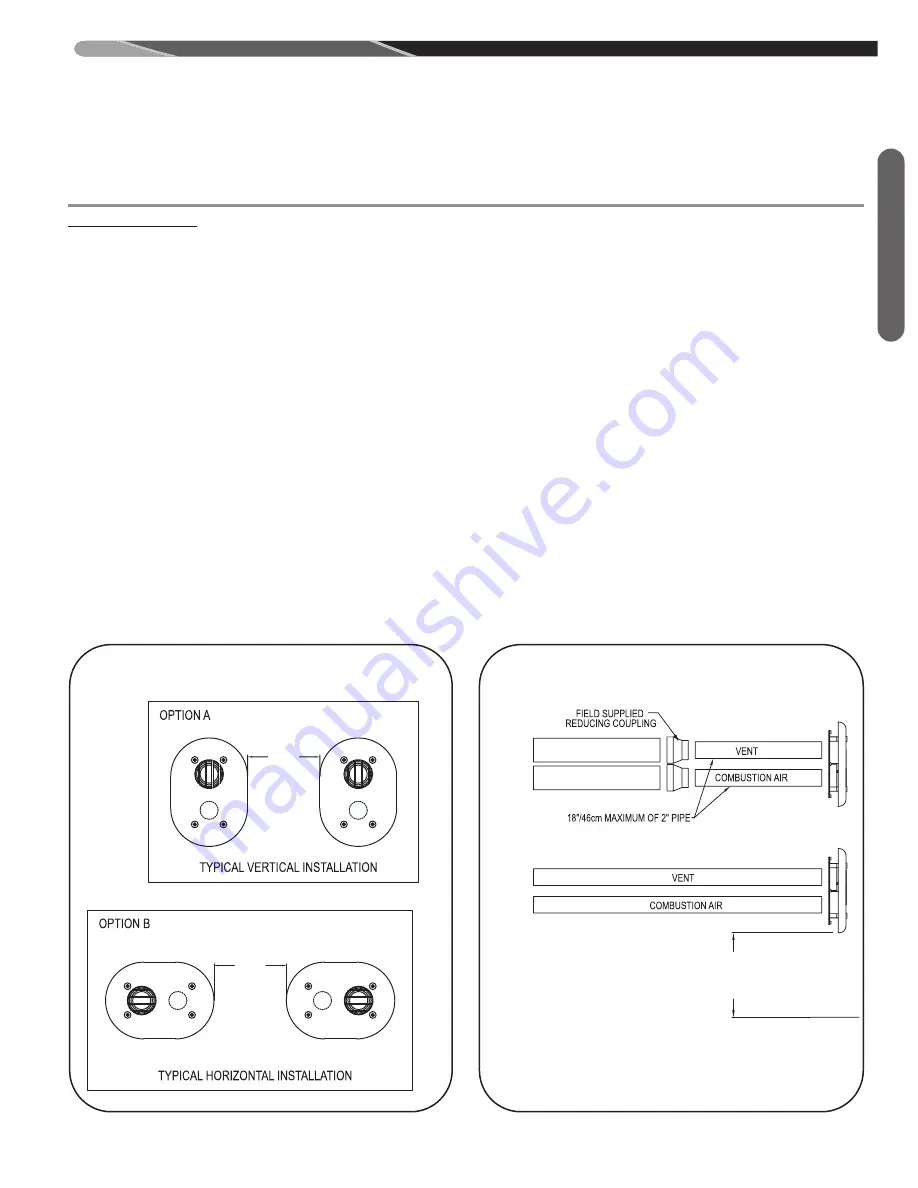
SIDE WALL VENT TERMINATIONS (Figures 24 & 25)

FOR 2

(

PIPE: RxGy-G02

FOR 3

(

PIPE: RxGy-G01

DIRECT VENT (cont.)

GENERAL VENTING REqUIREMENTS AND

GUIDELINES


MAINTAIN 12”/31cm FOR THE U.S. AS THE

MINIMUM CLEARANCE ABOVE THE HIGHEST

ANTICIPATED SNOW LEVEL OR GRADE WHICHEVER

IS GREATER. IN CANADA TERMINATIONS MUST CONFORM

TO CSA B149.1-10, SECT. 8.14.

3” PIPE
WITH
OPTIONAL
2” TERMINATION

2” PIPE
(RXGY-G02)
OR
3” PIPE
(RXGY-G01)

This termination is for horizontal venting only.  This termi-

nation may be installed with either a non-direct-vent or a

direct-vent system.  When installed as non-direct vent,

only one wall penetration is necessary for the exhaust

vent.

IMPORTANT:

Do not install on the prevailing winter wind

side of the structure.

IMPORTANT:

Maintain a minimum of 12 inches (U.S.)

above grade or the highest anticipated average snow level

(whichever is greater) to the bottom of the vent cover or, in

Canada, terminations must conform with CSA B149.1-10,

Sect. 8.14, Canadian Natural Gas and Propane Installa-

tion Code.

NOTE:

Dimensions between the inlet and outlet pipes (di-

rect-vent only) are fixed by the sidewall termination. Other

drawings in this manual which specify minimum and/or

maximum distances (vertical and horizontal) between

pipes do not apply to the sidewall termination kit.

NOTE:

Multiventing – NO COMMON VENTING IS PER-

MITTED WITH THIS KIT.

NOTE:  With this option a trap on the inlet combustion

air pipe is NOT required.

NOTE:

Install the vent and air intake piping into the vent

plate openings.  Seal all gaps between the pipes and wall. 

BE SURE TO USE SILICONE SEALANT

to seal the vent

pipe to the vent cap to permit field disassembly for annual

inspection and cleaning.  Also seal all pipe penetrations in

the wall.  

DO NOT INSTALL VENT kITS ONE ABOVE

THE OTHER

to prevent the possibility of condensate

freeze-up or recirculation.

NOTE: 

Vent should protrude a maximum of 2-1/4 inches

beyond the vent plate.  Air intake should protrude a maxi-

mum of 1 inch beyond the vent plate.

NOTE:

The RXGY-G02 termination can be used with 3”

vent pipe. A maximum of 18” of 2” 

B

pipe can be used be-

fore penetrating the wall.
Complete installation instructions are included with these

kits.

ST-A1194-46

ST-A1194-46

8” 

MIN.


8” 

MIN.


FIGURE 25

TyPICAL INSTALLATION – DIRECT VENT

FIGURE 24

VENT kIT INSTALLATION OPTIONS

Summary of Contents for (-)98VA060M317USA

Page 1: ...NING THIS PRODUCT CONTAINS CHEMICALS KNOWN TO THE STATE OF CALIFORNIA TO CAUSE CANCER BIRTH DEFECTS OR OTHER REPRODUCTIVE HARM Do not store or use gasoline or other flammable vapors and liquids or other combustible materials in the vicinity of this or any other appliance WHAT TO DO IF YOU SMELL GAS Do not try to light any appliance Do not touch any electrical switch do not use any phone in your bu...

Page 2: ...Horizontal and Variant of Alt Horizontal Direct Vent Terminations Options 4 and 5 37 Option 6 7 Vertical and Horizontal Concentric Vent Termination RXGY E02A and RXGY E03A 38 Options 8 9 Sidewall Vent Kit for Direct Vent Termination RXGY G02 RXGY G01 39 Direct Venting Termination Clearances 40 Multiventing of Direct Vent Furnaces 41 8 CONDENSATE DRAIN AND DRAIN NEUTRALIzER 42 9 GAS SUPPLy AND PIPI...

Page 3: ...rom the distributor and are correct for the installation If not return the unit without open ing the carton If the model number is correct open the carton and verify that the furnace rating label specifies the same furnace model number that is specified on the carton label If the model numbers do not match return the furnace to the distributor IMPORTANT Proper application installation and mainte n...

Page 4: ...f warm air heating and air con ditioning systems In Canada CSA 22 2 Canadian Electrical Code In Canada CSA B149 1 Canadian Natural Gas and Propane Installation Code CALIFORNIA RESIDENTS ONLy IMPORTANT All manufacturer products meet current Federal OSHA Guidelines for safety California Proposition 65 warnings are required for certain products which are not covered by the OSHA standards California s...

Page 5: ...bows ______ Exhaust Vent Temperature record temperature TERMINATIONS DIRECT VENT VERTICAL ______ Intake 12 305mm min above roof snow level record height above anticipated snow level or in Canada intake and exhaust vents conform with CSA B149 1 Canadian Natural Gas and Propane Installation Code ______ Correct relationship exhaust to intake HORIZONTAL VERTICAL CONCENTRIC RXGY E03A ______ Intake 12 3...

Page 6: ...INSTRUC TIONS WARNING COMBUSTION AND VENTILATION AIR MUST BE PRO VIDED TO THE FURNACE AS REqUIRED By THE NA TIONAL FUEL GAS CODE U S AND CSA B149 1 CANADA AND THE COMBUSTION AND VENTILATION AIR SECTION OF THESE INSTRUCTIONS WARNING COMBUSTION PRODUCTS MUST BE DISCHARGED OUT DOORS CONNECT THIS FURNACE TO AN APPROVED VENT SySTEM ONLy AS SPECIFIED IN THE VENT PIPE INSTALLATION SECTION OF THESE INSTRU...

Page 7: ...RATING UNDER THERMOSTAT CONTROL RETURN AIR DUCT SEALED TO THE FURNACE AIR FILTERS IN PLACE SET FURNACE INPUT RATE AND TEMPERA TURE RISE PER RATING PLATE MARkINGS MEANS FOR PROVIDING OUTDOOR AIR RE qUIRED FOR COMBUSTION RETURN AIR TEMPERATURE MAINTAINED BE TWEEN 55 F 13 C AND 80 F 27 C AND CLEAN FURNACE DUCT WORk AND COMPO NENTS UPON SUBSTANTIAL COMPLETION OF THE CONSTRUCTION PROCESS AND VERIFy THA...

Page 8: ...um height of eight 8 feet above grade directly in line with the exhaust vent terminal for the horizontally vented gas fueled heating appliance or equipment The sign shall read in print size no less than one half 1 2 inch in size GAS VENT DIRECTLy BELOW kEEP CLEAR OF ALL OBSTRUCTIONS 4 INSPECTION The state or local gas inspector of the side wall horizontally vented gas fueled equipment shall not ap...

Page 9: ...om freezing as required by local practices or codes A UL or CSA listed heat tape or UL or CSA approved heating cable with a rating of 3 6 watts per foot is acceptable pro tection when installed and maintained in accordance with the manufacturer s instructions Good installation practices necessitate that the installer verify heat tape operation in accordance with the manufacturer s instructions at ...

Page 10: ...tection clear ances GENERAL INFORMATION cont FIGURE 4 6 8 OPTION A 2 PIPE OPTION B 2 3 PIPE C ST A1194 86 00 CLEARANCE FLUE VENT TO WALL WARNING DO NOT LIFT THE UNIT By THE HEAT Ex CHANGER TUBES DOING SO CAN DAMAGE THE HEAT ExCHANGER ASSEMBLy WARNING COMBUSTIBLE MATERIAL MUST NOT BE PLACED ON OR AGAINST THE FURNACE JACkET THE AREA AROUND THE FURNACE MUST BE kEPT CLEAR AND FREE OF ALL COM BUSTIBLE ...

Page 11: ... DRAIN UPFLOW ELECTRICAL CONNECTION LINE VOLTAGE ELECTRICAL CONNECTION LOW VOLTAGE 22 96 23 80 8 00 11 00 17 44 29 05 26 17 32 88 23 00 14 00 28 06 1 12 29 62 62 19 83 OPTIONAL LINE VOLTAGE WIRING OPTIONAL LOW VOLTAGE WIRING OPTIONAL CONDENSATE DRAIN UPFLOW TRAP LOCATION HORIZONTAL OPTIONAL GAS CONNECTION OPTIONAL CONDENSATE DRAIN DOWNFLOW 1 76 1 66 24 86 26 26 B 19 83 SUPPLY AIR 23 21 1 62 1 67 2...

Page 12: ...Field Conversions FIELD CONVERSIONS 12 ...

Page 13: ...FIELD CONVERSIONS Field Conversions 13 SEE NExT PAGE FOR APPLICABLE CONFIGURATIONS ...

Page 14: ...16 UPFLOW WITH LEFT SIDE VENT Pg 17 18 DOWNFLOW WITH RIGHT VENT NON ZERO CLEARANCE Pg 19 22 DOWNFLOW ZERO CLEARANCE Pg 23 27 HORIZONTAL RIGHT WITH RIGHT VENT Pg 28 30 HORIZONTAL RIGHT WITH VERTICAL VENT Pg 31 33 HORIZONTAL LEFT WITH RIGHT VENT Pg 34 38 HORIZONTAL LEFT WITH LEFT VENT Pg 39 41 AIRFLOW AIRFLOW AIRFLOW AIRFLOW REQUIRES CONVERSION KIT RXGY CK REQUIRES CONVERSION KIT RXGY CK REQUIRES CO...

Page 15: ...Field Conversions 15 ...

Page 16: ...Field Conversions ST A1194 68 00 16 ...

Page 17: ...Field Conversions 17 ...

Page 18: ...Field Conversions 18 ...

Page 19: ... living space RXGF CA External Side Filter Rack Kit RXGF CB External Bottom Filter Rack Kit DUCTING WARNING SOME HEATING AIRFLOW VALUES MAy BE HIGHER THAN THOSE REqUIRED FOR COOLING BE SURE TO SIzE DUCT FOR THE MAxIMUM POSSIBLE AIRFLOW VALUE SIzE AIRFLOW DISTRIBUTION SySTEM TO ACCEPT ABLE INDUSTRy STANDARDS AND METHODS TOTAL STATIC PRESSURE DROP OF THE AIR DISTRIBUTION SySTEM SHOULD NOT ExCEED 1 0...

Page 20: ...E FURNACE BOTTOM WHEN USING SIDE AIR RETURN FAILURE TO INSTALL A BASE PLATE COULD CAUSE THE PRODUCTS OF COMBUSTION TO CIRCULATE INTO THE LIVING SPACE AND CREATE POTENTIALLy HAzARDOUS CONDITIONS INCLUDING CARBON MONOxIDE POI SONING OR DEATH FOR BOTTOM RETURN A SOLID METAL BASE PAN MUST NOT BE IN STALLED FIGURE 7 1 REMOVE BLOWER DOOR AS SHOWN RETAINING TAB DETAIL INSTALLATION OF SOLID METAL BASE FOR...

Page 21: ...LAT INSTALLER BENT UP ALTERNATE BENT DOWN NOTES THIS VIEW IS REPRESENTATIVE OF BOTH SUPPLY AND RETURN OPEN INGS DUCT FLANGES MUST BE FIELD BENT ALONG PERFORATIONS EITHER INTO OR OUT OF THE FURNACE AS NECESSARY FOR INSTALLATIONS BUT NEITHER FLANGE CAN REMAIN FLAT INSTALLER SHOULD USE DUCK BILLED PLIERS AKA FOLDING PLIERS TO BEND THE FLANGE ALONG THE PERFORATIONS ...

Page 22: ... Water softening chemicals De icing salts or chemicals Carbon tetrachloride Halogen type refrigerants Printing inks paint removers varnishes etc Cleaning solvents such as perchloroethyl ene Hydrochloric acid Cements and glues Antistatic fabric softeners for clothes dryers Masonry curing and acid washing materials Combustion air requirements are determined by whether the furnace is in an open uncon...

Page 23: ... plastic pipe from another gas or fuel burning appliance unless the re quired minimum clearances to combustibles are main tained between the plastic pipe and other pipes For Canada PVC CPVC and polypropylene can be used as long as they conform with ULCS 636C require ments 4 All vent installed through unconditioned spaces where below freezing temperatures are expected must be in sulated with an app...

Page 24: ...reduction in pressure drop throughout the system 1 Cut pipe end square Chamfer edge of pipe Clean fitting socket and pipe joint area of all dirt grease and moisture 2 After checking pipe and socket for proper fit wipe socket and pipe with cleaner primer Apply a liberal coat of primer to inside surface of socket and outside of pipe Read instructions included with the primer for proper application 3...

Page 25: ...t the outside of the structure such as in areas with large accu mulations of snow in winter Table 2 shows the equivalent lengths of different types of elbows Table 3 specifies the equivalent maximum vent lengths specified by the manufacturer for each furnace Listed table maximums have been qualified by the manufacturer Dependant on individual installation specifics installations beyond the table r...

Page 26: ...or 3 inch pipe Combinations of long sweep 90s standard 90s or 45s may be used but the manufacturer recommends the use of long sweep 90s whenever possible because the use of the maximum number of standard 90 and 45 elbows only may result in nuisance furnace outages due to individual installation specifics Exceeding the recommended maximum number of elbows may cause nuisance operation of the pressure...

Page 27: ... Lengths section Table 3 Application of these products is limited to the terminations listed in Ta bles 4 and 5 below These manufacturers have provisions for B vent liners and chimney liners which can be used with this furnace with non direct venting applications only Refer to the manufacturer s installation instructions for proper installation Contact the manufacturer for all instal lation and ap...

Page 28: ...o be governed by the following guidelines 1 Avoid terminating under any kind of patio or deck How ever if necessary vent piping may be installed under a deck as long as the termination s is are not under the deck 2 If installing the vent under a deck insulate it to insure that no condensate freezes and blocks the pipes 3 Do not terminate in any area or behind any obstruction that may allow the flu...

Page 29: ... less than that specified in this table the space is defined as confined If the space is small enough to be designated as confined it must have openings into the space which are located in accor dance with the requirements set forth in the following subsec tions A and B Size connected to the heated area or to the outside and by the input of ALL appliances in the space If the confined space is with...

Page 30: ...ct diameter for direct openings and vertical ducting only B Where communicating with the outdoors through horizontal ducts each opening shall have a minimum free area of 1 square inch for each 2 000 BTUH of total appliance input rat ing of all equipment in the enclosure see Figure 13 Table 9 specifies the minimum area for each of the 2 combustion air openings and minimum round duct diameter for ho...

Page 31: ...the out doors and shall have a minimum of A 1 Square inch for each 3 000 BTUH of the total input rat ing of all equipment located in the enclosure and NON DIRECT VENT cont GENERAL VENTING REqUIREMENTS AND GUIDELINES OPTIONAL INLET AIR 1 SQ IN 6 5 SQ CM PER 4000 BTUH ST A1194 19 FIG D ST A1194 82 00 OUTLET AIR 1 SQ IN 6 5 SQ CM PER 2000 BTUH INLET AIR 1 SQ IN 6 5 SQ CM PER 2000 BTUH ST A1194 19 FIG...

Page 32: ...L VENTING REqUIREMENTS AND GUIDELINES ST A1194 19 FIG B WARNING DO NOT USE VENT TERMINATIONS WHICH ARE NOT SPECIFIED IN THESE INSTRUCTIONS USING VENT TERMINATIONS OTHER THAN THOSE SPECI FIED HERE CAN RESULT IN ERRATIC OPERATION EqUIPMENT FAILURE OR PERSONAL INJURy OR DEATH FROM CARBON MONOxIDE POISONING CAUTION ALL VENTS INSTALLED THROUGH UNCONDI TIONED SPACE WHERE BELOW FREEzING TEM PERATURES ARE...

Page 33: ...y WITH THE NATIONAL FUEL GAS CODE OR IN CANADA CSA B149 1 NATURAL GAS AND PROPANE INSTALLATION CODE AND LOCAL CODES TO PROVIDE ADEqUATE COMBUSTION AND VENTILATION AIR FOR THE FURNACE FAIL URE TO DO SO CAN RESULT IN ExPLOSION FIRE PROPERTy DAMAGE CARBON MONOxIDE POI SONING PERSONAL INJURy OR DEATH WARNING READ AND FOLLOW THE GENERAL VENTING RE QUIREMENTS AND GUIDELINES OF THIS MANUAL FOR ADDITIONAL...

Page 34: ...imum only if no snow accumulation is anticipated Venting Terminations more than 24 above roof penetration re quire additional support 12 31cm U S CANADA TERMINATIONS MUST CONFORM TO CSA B149 1 10 SECT 8 14 48 MAX 122 cm 45 MAX 114 cm 36 MAX 91 cm 3 MIN 8 cm NOTE IF 3 Ø VENTING IS USED BOTH PIPES INTAKE AND EXHAUST MUST BE RE DUCED TO 2 Ø BEFORE PENETRATING ROOF FIGURE 17 DIRECT VENT VERTICAL TERMI...

Page 35: ...RESSURE ZONE AS THE EXHAUST TERMINATION 7 NO SCREENS MAY BE USED TO COVER COMBUSTION AIR OR EXHAUST 8 NO T S CAN BE INSTALLED AT THE TERMINATION 9 WALL PENETRATION AND VENT TERMINATIONS MUST BE WITH 2 Ø PIPE SEE DETAIL A COUPLINGS REQUIRED ON EXTERIOR OPTIONAL ON INTERIOR SEE DETAIL B FOR DIMENSION BETWEEN INTAKE AND EXHAUST 9 ST A1194 18 XO FIGURE K DETAILS B C U S MIN 12 31cm ABOVE GRADE OR ANTI...

Page 36: ...AL TO THE STRUCTURE MUST BE INSULATED AS REQUIRED FOR LOCAL CLIMATE 10 WALL PENETRATION AND VENT TERMINATION MUST BE WITH 2 B PIPE OPTION B ONLy NOTE 1 A TRAP IN THE COMBUSTION AIR PIPE IS NOT REQUIRED FOR THIS OPTION 2 PIPING EXTERNAL TO THE STRUCTURE MUST BE INSULATED FOR LOCAL CLIMATES 3 WALL PENETRATION AND VENT TERMINATIONS MUST BE WITH 2 B IPIE A MAXI MUM OF 18 OF 2 B PIPE IS PERMITTED INSID...

Page 37: ...termination elbows must be at the same angle and face the same direction left or right 2 A wind vane must be installed in the combustion air inlet pipe as shown in the diagram 3 Number and distance between recommended sup port straps must provide rigid support 4 Mark the final 22 or 45 angles on the top of the ver tical risers and final elbows before gluing into place to ensure that the final angl...

Page 38: ...through roofs or sidewalls One 5 inch diameter hole RXGY E03 RXGY E03A or 3 5 8 inch diameter hole RXGY E02 RXGY E02A is required for the installation See Figure 23 for the general layout Complete instructions are included with each kit NOTE The following IPEX brand concentric vent termina tion System 636 may be purchased in the field and used in place of the kits offered by the furnace manufactur...

Page 39: ...e inlet and outlet pipes di rect vent only are fixed by the sidewall termination Other drawings in this manual which specify minimum and or maximum distances vertical and horizontal between pipes do not apply to the sidewall termination kit NOTE Multiventing NO COMMON VENTING IS PER MITTED WITH THIS KIT NOTE With this option a trap on the inlet combustion air pipe is NOT required NOTE Install the ...

Page 40: ...INATION CLEARANCES GENERAL VENTING REqUIREMENTS AND GUIDELINES Figure 26 shows minimum clearances that must be used for direct venting terminations FIGURE 26 DIRECT VENT TERMINAL CLEARANCES ST A1194 18 01 FIGURE A Venting ...

Page 41: ...ING ROOF FIGURE 27 TWO FURNACE VENTING FIGURE 28 TWO FURNACE VENTING WITH CONCENTRIC VENTING TWO PIPE VENTING THROUGH WALL CONCENTRIC VENTING THROUGH WALL 3 8cm MIN 12 32cm MAX B SEE DETAIL A 36 36 12 31cm MIN ABOVE GRADE OR HIGHEST ANTICIPATED SNOW LEVEL CANADA TERMINATION MUST CONFORM TO CSA B149 1 10 SECT 8 14 B 6 1 8m MINIMUM 10 3m RECOMMENDED CANADA Termination must conform to CSA B149 1 10 s...

Page 42: ...w it but the furnace will con tinue to run and heat will be provided If the installer uses this approach he must make sure that there is a mecha nism for handling the possibility of water overflow onto the floor in the event of a blocked drain B FURNACE SHUTOFF When the top of the vent tube is above the elevation of the LOWER condensate water level sensor aka electronic water level sensor the furn...

Page 43: ...43 CONDENSATE DRAIN CONDENSATE DRAIN DRAIN NEUTRALIzER cont Condensate Drain FIGURE 29 ST A1194 70 00 ...

Page 44: ...AN AIR AND TENDS TO COLLECT AT LOWER LEVELS MAkING IT MORE DIFFICULT TO SMELL AT NOSE LEVEL NATURAL GAS IS LIGHTER THAN AIR AND WILL RISE POSSIBLy ACCUMULATING IN HIGHER PORTIONS OF THE STRUCTURE IF A GAS LEAk IS PRESENT OR SUSPECTED DO NOT ATTEMPT TO FIND THE CAUSE yOUR SELF NEVER USE AN OPEN FLAME TO TEST FOR GAS LEAkS THE GAS CAN IGNITE RESULTING IN DEATH PERSONAL INJURy OR PROPERTy DAMAGE DO N...

Page 45: ...ipe passes through the grommet and the grommet seats prop erly in the cabinet side for proper furnace operation Con sult the local gas company for the location of the manual main shut off valve The gas line and manual gas stop must be adequate in size to prevent undue pressure drop and never smaller than the pipe size to the gas valve on the furnace Refer to Table 11 for natural gas Table 12 for L...

Page 46: ...intained with all other gas fired appliances in operation The minimum gas supply pressure to the gas valve for proper furnace input adjustments is 5 w c for natural gas GAS SUPPLy GAS PRESSURE TABLE 11 NATURAL GAS PIPE CAPACITy TABLE CU FT HR Capacity of gas pipe of different diameters and lengths in cu ft per hr with pressure drop of 0 3 in and specific gravity of 0 60 natural gas Nominal Length ...

Page 47: ...al wiring must comply with the latest NFPA 70 National Electrical Code and all state and local codes Be sure to check the fuel code of your furnace The fuel code is adjacent to the serial number See the LP conversion kit index that came with your furnace to determine the correct LP conversion kit 4 All altitudes use a 1 10mm orifice The unique 2 de rate requirement per 1000 ft allows the lower bar...

Page 48: ...nnect the pins together inside the jumper well This can be confirmed by visual inspection and by verifying proper manifold pressure at high fire 100 after the jumper is installed Manifold pressure should always be checked when converting the furnace for LP operation Figures 33 and 34 below show the cor rect way and the incorrect way to install the jumper The jumper well is located next to the adju...

Page 49: ...t the remaining male terminal on the white wire to the Inlet Pressure Switch See Figure 37 12 Reconnect the supply gas line to the furnace 13 Turn on gas supply and electrical supply 14 Check unit thoroughly for gas leaks with soap and water not with a flame 15 Follow lighting instructions to put furnace into operation 16 Operate thermostat to check unit operation for ignition and extinction chara...

Page 50: ...re changing orifices and possibly input rate A Gas requirements LP or Natural The furnace is supplied configured for Natural Gas If installation will require LP gas then an LP conversion kit is required See Section of this manual titled LP Conversion for more details B Obtain the average annual sea level corrected heating value for orifice calculations and average annual alti tude adjusted heating...

Page 51: ... pressure measurements If the supply gas line pressure is above these ranges in stall an in line gas regulator to the furnace for natural gas units With LP gas have the LP supplier reduce the line pressure at the regulator If supply gas line pressure is below these ranges either remove any restrictions in the gas supply piping or enlarge the gas pipe See Tables 11 and 12 in Gas Supply section of t...

Page 52: ...E 1 Disconnect electrical power to the furnace 2 Remove all thermostat connections and jumper R to W1 3 Turn gas manual shut off valve located outside the furnace to the CLOSED position 4 IMPORTANT Be sure that the gas manual shut off valve located outside the furnace has been in the CLOSED position for at least five minutes Remove the outlet manifold pressure tap plug in the gas valve See Figure ...

Page 53: ... to furnace Remove blower door 15 Slide the gas valve ON OFF switch to the ON position ADJUST MANIFOLD PRESSURE AT MINIMUM FIRING RATE 1 Set dip switch SW10 to the ON position and dip switch SW11 to the OFF position this will force the furnace to operate at the minimum firing rate 40 only 2 Replace the blower compartment door 3 Connect furnace electrical power supply 4 After ignition allow furnace...

Page 54: ...ft3 Hour x Altitude Adjusted Gas Heating Value BTU s ft3 Note the units which cancel Input Rate Gas Rate ft3 Hour x Altitude Adjusted Gas Heating Value BTU s ft3 Example The following information is determined 1 Altitude Adjusted Gas Heating Value 975 BTU ft3 given from gas supplier 2 Meter used is 1 revolution per ft3 3 Time per revolution at high fire 36 seconds this is measured by the installer...

Page 55: ... are NOT set to OFF OFF SW13 and SW14 will select the method of temperature rise ad justment as follows SW15 is mapped as follows SW15 OFF Positive Temperature Rise Adjustment Air flow is Reduced Factory Default SW15 ON Negative Temperature Rise Adjustment Air flow is Increased SW16 2F 4F is mapped as follows SW16 OFF 2 Deg F Temperature Rise Adjustment Fac tory Default SW16 ON 4 Deg F Temperature...

Page 56: ... the return air temperature from the supply air temperature The dif ference is the temperature rise 5 Compare the measured temperature rise to the ap proved temperature rise range listed on the furnace nameplate See Figure 43 6 If the measured temperature rise is above the ap proved range the airflow is too low Airflow must be increased by speeding up the blower by removing re strictions in the du...

Page 57: ...DEVICE ___AMPERES DISPOSITIF DE PROTECTION CONTRE UNE SURINTENSITE DE ___A AU MAXIMUM NOx EMISSION LIMIT NANOGRAMS JOULE ___ LIMITE D ÉMISSION D OXYDES D AZOTE NOx EN NANORAMMES PAR JOULE ___ HOURLY INPUT RATING DEBIT CALORIFQUE MAXIMUM Btu hr Kw 75 000 21 98 HOURLY INPUT RATING DEBIT CALORIFQUE MINIMUM Btu hr Kw FACTORY EQUIPPED FOR AGENCE A L USINE POUR FOR GAS GAZ NATURAL NATUREL ORIFICE INJECT...

Page 58: ...ections to the furnace The ignition control may not sense flame if L1 and L2 are re versed Make all electrical connections in accordance with the latest edition of the National Electrical Codes If the line voltage electrical needs to be moved to the op posite side of the furnace the following steps should be taken 1 The furnace must NOT be electrically connected to line voltage prior to reversing ...

Page 59: ...ved in Step 2 to the door switch To mate wire terminal to spade terminal grasp the ter minal from the housing with fingers and push straight against spade terminal This low insertion force flag terminal will deliver an audible click when en gaged Failure to engage will cause defective contact THERMOSTAT The room thermostat must be compatible with the furnace See manufacturer s thermostat spec shee...

Page 60: ... Maximum current is 1 0 amps for the electronic air cleaner output HUMIDIFIER Humidifier output is a set of dry contacts The logic control ling these contacts and the necessary wire diagrams for in stalling a humidifier are detailed in the section of this manual titled Humidification Dehumidification FILTERS See Figure 46 Keep filters clean at all times A filter is not provided with the furnace bu...

Page 61: ...SCREWS TO THE REAR OF THE FURNCE AT THE LOCATIONS PROVIDED UPFLOW HORIzONTAL SIDE RETURN ST A1194 10 X0 ST A1194 11 X0 FIGURE 46 FILTER LOCATIONS ACCESSORIES FIELD INSTALLED OPTION ACCESSORIES cont RXGF CB ACCESSORY FILTER RACK RXGF CD ACCESSORY FILTER RACK FIELD SUPPLIED FILTER FLANGE WRAPS AROUND BACK AND SCREWS TO THE REAR OF THE FURNACE AT THE LOCATIONS PROVIDED Accessories ...

Page 62: ... and saves the result in memory Cold Calibration High Pressure Switch The furnace IFC will continue increasing the inducer RPM until the high pressure switch closes At this point the IFC notes the inducer RPM when the high pressure switch closes and adds this value to a predetermined value and saves the result in memory Immediately following cold calibration the furnace IFC be gins a 30 second pre...

Page 63: ...ower output to the greater of the cool call and heat call CFM until the end of the blower off delay At the end of the blower off delay the blower CFM shall be set to the cool or HP CFM Blower Off Delay The blower off delay is to always begin after the gas valve is de energized or when detected error conditions that have been cleared require blower to be energized and then de energized It is user s...

Page 64: ...64 Integrated Furnace Control INTEGRATED FURNACE CONTROL FIGURE 47 FURNACE CONTROL BOARD OR IFC INTEGRATED FURNACE CONTROL ST A1194 73 00 ...

Page 65: ...and some lower fan speeds may not deliver enough airflow to operate an electronic air cleaner The IFC determines the minimum airflow necessary to operate an electronic aircleaner and will not turn on the electronic air cleaner unless the airflow is high enough for the EAC 10 HUMIDIFICATION T3 AND DEHUMIDIFICATION HUMIDIFIER The humidifier contacts labeled HUM 2 are dry contacts on the I F C This m...

Page 66: ...he thermostat input T2 labeled HUM STAT on the furnace To determine which wiring diagram and method to use select from the following configurations A HUMIDIFICATION CONTROL ONLy WITH NO DEHUMIDIFICATION REqUIRES OPTIONAL HUMIDIFIER A1 WITH COMMUNICATING THERMOSTAT Humidifier control is included with EcoNet control center To wire the furnace for humidification control using an EcoNet communicating ...

Page 67: ...MMUNICATING THERMOSTAT Humidifier control is included with EcoNet communicating thermostats To wire the furnace for humidification and de humidification control using an EcoNet communicating thermostat refer to the wiring diagram in Figure 49 Option A Be sure not to install the jumper between R and HUM STAT on the furnace control for thermostat controlled op tion Without the jumper a humidificatio...

Page 68: ...al block T2 is on the left side Cool Blower Off Delay SW2 SW3 A means of selecting the cooling speed blower off delay time is provided In legacy mode dipswitches are required to select the delay time These dipswitches are labeled SW2 and SW3 The following table defines the settings Selection SW2 SW3 Selection A OFF OFF 30 seconds B ON OFF 45 seconds C OFF ON 60 seconds D ON ON 0 seconds Note Facto...

Page 69: ...nable the dehumidifi cation feature in legacy mode Selections are as follows SW8 OFF ODD not enabled Factory Setting SW8 ON ODD enabled 0VAC on HUM STAT will decrease airflow in cooling Tandem Airflow Select SW9 One dipswitch SW9 is provided to select the percentage of airflow for the base first stage cooling airflow in legacy mode Note that further adjustments may also be applied e g for active d...

Page 70: ...ED FURNACE CONTROL DIPSWITCHES FIGURE 53 DIPSWITCH MAP NOTE The ECM motor used in a modulating furnace is designed to deliver constant CFM regardless of system static pressure Design system static pressure should never exceed 1 0 inches w c ...

Page 71: ... more than 3 seconds ON OFF LOW HEAT SINGLE RATE MODE For the single rate mode when SW10 is ON and SW11 is OFF the furnace will operate in the 40 heat mode with any legacy call for heat first stage second stage or modulating A legacy heat call will cause the furnace to go through a normal heating cycle with heating fire rate fixed at 40 The voltage at the terminal labeled V W2 will be ignored OFF ...

Page 72: ... during replacement of the card itself MODEL CARD A model data card is defined as an electronic card that carries a copy of the furnace model data The furnace control receives model specific data from the model data card Replacement model data cards with the appropriate furnace model data for any given model can be ordered from the Replacement Parts division In the event that the original model da...

Page 73: ... the control enters one hour lockout and fault codes 10 and 11 will be displayed alternately as described above A D 3 When flame is lost five times in a row the control enters one hour lockout and fault codes 10 and 13 will be displayed alternately as described above A D 4 When both the high pressure switch and low pressure switch are closed and both should be open as in during the pressure switch...

Page 74: ...ious fault and level are replaced with the new fault and level The time stamp will also be updated This way the existing fault will be updated but a new fault will not be added Note In case of active dual faults e g typical for pres sure switch faults where fault 57 and 45 can be active and become promoted at the same time the mechanism from the previous paragraph can be omitted IFC can add new re...

Page 75: ...le the Fault History Display FL menu is active by holding down the pushbutton for 5 seconds or more For indication that the fault buffer is clear the IFC will flash segments A and D of the right most seven segment displays one sec ond on and one second off three times after the fault clear command has been recognized 16 SUPPLy AND OUTDOOR AIR TEMPERATURE SENSOR INPUTS T4 see Figure 54 Optional fie...

Page 76: ...all only be present for three minutes after the fault is detected After three minutes has expired the fault will no longer be set even if the condition creating the fault is still present These faults are also only logged into the fault buffer one time Should the sensor error later clear and then appear again the same sequence as noted previously will be repeated 17 AUxILIARy INPUTS COMMUNICATING ...

Page 77: ... across all devices and all wire segments This should be done by twisting the shielding wires from adjacent segments together Further the shielding for the entire system must be grounded in a single location Multiple grounds on the shielding system are NOT permitted The shield wire should be connected to the C terminal or ground at the indoor unit The shield wire should NOT be connected to any ter...

Page 78: ...78 Integrated Furnace Control INTEGRATED FURNACE CONTROL THERMOSTAT INPUTS FIGURE 55 WIRING OF AUxILIARy INPUTS USE WITH COMMUNICATING SySTEMS ONLy ST A1194 63 TOP ...

Page 79: ...figuration is to install dedicated wires directly from the furnace to the thermostat and a separate set of dedicated wires directly from the furnace to the condenser Additional EcoNet devices can be added to the system as shown in Figure 56 The approved wiring configuration is the daisy chain configuration shown in Figure 56 A star wiring configuration is not approved and should not be used Note T...

Page 80: ...ATING CONDENSER SINGLE STAGE ONLY CONDENSER B WIRING DIAGRAM SPECIAL CONFIGURATION COMMUNICATING THERMOSTAT AND FURNACE WITH NON COMMUNICATING CONDENSER TWO STAGE ONLY CONDENSER EcoNet COMMUNICATING THERMOSTAT CONTROL CENTER NON COMMUNICATING CONDENSER UNIT E1 E2 R C Y1 C Y2 SA1 SA2 OAT1 OAT2 S1 S2 S3 HUM HUM EAC L1 NEUTRAL 1 2 R C HUM STAT W1 W2 G Y1 Y2 B O SA1 SA2 OAT1 OAT2 S1 S2 S3 HUM HUM EAC ...

Page 81: ...INTEGRATED FURNACE CONTROL C CONDENSING SySTEMS W LEGACy THERMOSTAT C1 WIRING OF A 1 STAGE LEGACY THERMOSTAT C1 WITH AUTOSTAGING SELECTED SEE FIGURE C1 58 C2 WIRING OF A 2 STAGE LEGACY THERMOSTAT SEE FIGURE 59 THERMOSTAT WIRING DIAGRAMS CONDENSING UNIT NON COMMUNICATING Integrated Furnace Control ...

Page 82: ...2 B TWO STAGE THERMOSTAT NON COMMUNICATING TWO STAGE MODULATING GAS FURNACE CONTROL CONDENSER UNIT FIGURE 59 WIRING DIAGRAM FOR A LEGACy TWO STAGE THERMOSTAT ST A1194 62 04 Integrated Furnace Control THERMOSTAT WIRING DIAGRAMS CONDENSING UNIT NON COMMUNICATING ...

Page 83: ...TING FURNACE AND THERMOSTAT ST A1194 87 01 INTEGRATED FURNACE CONTROL THERMOSTAT WIRING DIAGRAMS CONDENSING UNIT NON COMMUNICATING Integrated Furnace Control D SPECIAL CONFIGURATION WIRING OF NON COMMUNICATING HEAT PUMPS WITH COMMUNICATING FURNACE AND THERMOSTAT SEE FIGURE 60 ...

Page 84: ...H AUTOSTAGING ST A1194 92 01 INTEGRATED FURNACE CONTROL THERMOSTAT WIRING DIAGRAMS CONDENSING UNIT NON COMMUNICATING Integrated Furnace Control E HEAT PUMP SySTEMS W LEGACy THERMOSTATS E1 WIRING OF A SINGLE STAGE LEGACY THERMOSTAT WITH AUTOSTAGING SELECTED SEE FIGURE 61 ...

Page 85: ...ween 24VAC and Ground or Common A fault code 30 is displayed at the furnace control when the fuse has been opened D 1 2 R C HUM STAT W1 W2 G Y1 Y2 B TWO STAGE MODULATING GAS FURNACE CONTROL FIGURE 62 WIRING DIAGRAM FOR A LEGACy 2 STAGE THERMOSTAT ST A1194 93 01 INTEGRATED FURNACE CONTROL THERMOSTAT WIRING DIAGRAMS CONDENSING UNIT NON COMMUNICATING Integrated Furnace Control E2 WIRING OF A TWO STAG...

Page 86: ...86 Timing Diagram TIMING DIAGRAM TABLE 16 TIMING DIAGRAM FOR A CALIBRATION GAS HEAT SEqUENCE ST A1240 03 00 ...

Page 87: ...87 TIMING DIAGRAM TABLE 17 TIMING DIAGRAM FOR NON CALIBRATION GAS HEAT SEqUENCE Timing Diagram ST A1240 04 00 ...

Page 88: ...nd through it to keep from overheating CAUTION DO NOT OPERATE THE SySTEM FOR ExTENDED PERIODS WITHOUT FILTERS A PORTION OF THE DUST ENTRAINED IN THE AIR MAy TEMPORARILy LODGE IN THE AIR DUCT RUNS AND AT THE SUPPLy REGISTERS ANy RECIRCULATED DUST PARTICLES WILL BE HEATED AND CHARRED By CONTACT WITH THE FURNACE HEAT ExCHANGER THIS RESIDUE WILL SOIL CEILINGS WALLS DRAPES CARPETS AND OTHER HOUSEHOLD A...

Page 89: ...tches IMPORTANT It is recommended that at the beginning of the heating season the condensate neutralizer if used be replaced by a qualified installer service agency or the gas supplier IMPORTANT It is recommended that an annual inspec tion and cleaning of all furnace markings be made to as sure legibility Attach a replacement marking which can be obtained through the distributor if any are found t...

Page 90: ... IGNI TOR ELECTRODE RELATIONSHIP MODULATING FURNACE ONLy The tip of the positive electrode must be inside the hatched area 201 dimension from electrode to burner face must be maintained Delayed ignitioin can result if these dimensions are not observed FIGURE 63 FIGURE 64 ...

Page 91: ...ting information to help determine the problem and fix it Standard operating codes are not fault codes and the presence of a standard operating code indi cates a no fault condition NOTE Verify display orientation is correct before inter preting fault codes Otherwise the fault codes may be up side down If a fault code or operating code is not on these lists the display may be upside down ...

Page 92: ...92 Diagnostics TABLE 19 R98V FAULT CODES WITH DESCRIPTIONS AND SOLUTIONS ...

Page 93: ...93 TABLE 19 continued R98V FAULT CODES WITH DESCRIPTIONS AND SOLUTIONS Diagnostics ...

Page 94: ...94 Diagnostics TABLE 19 continued R98V FAULT CODES WITH DESCRIPTIONS AND SOLUTIONS ...

Page 95: ...95 TABLE 19 continued R98V FAULT CODES WITH DESCRIPTIONS AND SOLUTIONS Diagnostics ...

Page 96: ...96 Diagnostics TABLE 19 continued R98V FAULT CODES WITH DESCRIPTIONS AND SOLUTIONS ...

Page 97: ...97 TABLE 19 continued R98V FAULT CODES WITH DESCRIPTIONS AND SOLUTIONS Diagnostics ...

Page 98: ...98 Diagnostics TABLE 19 continued R98V FAULT CODES WITH DESCRIPTIONS AND SOLUTIONS ...

Page 99: ...99 TABLE 19 continued R98V FAULT CODES WITH DESCRIPTIONS AND SOLUTIONS Diagnostics ...

Page 100: ...100 Diagnostics TABLE 19 continued R98V FAULT CODES WITH DESCRIPTIONS AND SOLUTIONS ...

Page 101: ...101 TABLE 19 continued R98V FAULT CODES WITH DESCRIPTIONS AND SOLUTIONS Diagnostics ...

Page 102: ...the gas valve con tacts welded relay and will not clear by cycling the in ducer Fault code 93 is set and displayed This lockout condition cannot be reset by cycling the heat call 3 The furnace control will declare that the blower motor is inoperable dead if the main limit control has been open for more than 150 seconds Gas heating is terminated However the control continues to try to operate heati...

Page 103: ...f the connector are fully seated in the housing to ensure good contact with the connection at the motor When voltage is confirmed at these pins replace the connector on the motor B Remove the motor control connector from the fur nace control at P5 and apply 24VAC to pins 3 4 see photo With the door switch closed motor powered and 24VAC on pins 3 4 the motor should start operating at 75 of capacity...

Page 104: ...ode 61 will be dis played Internal overloading may reset once the con dition causing the problem has been removed However it is likely that the motor will need to be re placed A Is the motor wheel blocked by an obstruction If so the motor may be in locked rotor state and the furnace control will report fault code 61 Remove the obstruction and try to operate the motor again If the motor continues t...

Page 105: ...105 FIGURE 67 MODULATING ECM FURNACE WIRING DIAGRAM Troubleshooting ...

Page 106: ...106 ...

Page 107: ...107 ...

Page 108: ...108 CM 0717 ...

Reviews: