


K65C/K75C/K95C
8-3
K65C/K75C/K95C
8-3
2
3
1
2
2
1
2
2
3
1
2
2
1
2
(1)
Open the engine hood.
(2)
Loosen the two clamps in front
of and behind the prefilter (8-1/2).
(3)
Bend the fuel line (8-1/1) on
one side of the prefilter to prevent
the fuel from escaping, pull the line
off the old prefilter and immediately
push it onto the new prefilter.
Then pull off the fuel line (8-1/3) on
the other side of the prefilter and
push it onto the new prefilter.
NOTE
- Collect any fuel that escapes.
- When installing the new prefilter,
heed the flow direction.
(4)
Fasten both clamps.
(5)
Check for leaks.
8.2.4
Maintaining/
replacing the air filter
NOTE
Maintenance of the filter cartridge is
necessary when the red range is
visible in the maintenance indicator
(8-2/1) or after 12 months have
elapsed, whichever is sooner.
(1)
Open the engine cover.
(2)
Loosen the three retaining
clamps of the air filter lid (8-2/2) and
remove the air filter lid.
(3)
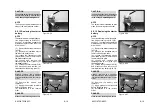
Pull out the filter cartridge (8-3/
arrow) by carefully turning it back
and forth.
(4)
Clean the filter cartridge.
Figure 8-1
Figure 8-3
Figure 8-2
(1)
Open the engine hood.
(2)
Loosen the two clamps in front
of and behind the prefilter (8-1/2).
(3)
Bend the fuel line (8-1/1) on
one side of the prefilter to prevent
the fuel from escaping, pull the line
off the old prefilter and immediately
push it onto the new prefilter.
Then pull off the fuel line (8-1/3) on
the other side of the prefilter and
push it onto the new prefilter.
NOTE
- Collect any fuel that escapes.
- When installing the new prefilter,
heed the flow direction.
(4)
Fasten both clamps.
(5)
Check for leaks.
8.2.4
Maintaining/
replacing the air filter
NOTE
Maintenance of the filter cartridge is
necessary when the red range is
visible in the maintenance indicator
(8-2/1) or after 12 months have
elapsed, whichever is sooner.
(1)
Open the engine cover.
(2)
Loosen the three retaining
clamps of the air filter lid (8-2/2) and
remove the air filter lid.
(3)
Pull out the filter cartridge (8-3/
arrow) by carefully turning it back
and forth.
(4)
Clean the filter cartridge.
Figure 8-1
Figure 8-3
Figure 8-2
Summary of Contents for AL 65
Page 8: ...Safety regulations...
Page 29: ...Signs...
Page 38: ...Technical data...
Page 60: ...Description...
Page 72: ...Operation...
Page 83: ...Attachments...
Page 91: ...Rescue towing lashing lifting by crane...
Page 100: ...Maintenance...
Page 120: ...Malfunctions causes and remedies...
Page 123: ...Protection against theft...
Page 126: ...Appendices...
Page 127: ......
Page 128: ......
Page 131: ......
Page 134: ...K65C K75C K95C K65C K75C K95C B B...
Page 135: ...K65C K75C K95C K65C K75C K95C C C...
Page 136: ...K65C K75C K95C K65C K75C K95C D D...
Page 137: ...K65C K75C K95C K65C K75C K95C E E...
Page 138: ...K65C K75C K95C K65C K75C K95C F F...


