8
A
B
ON
OFF
OFF
ON
1
4
6
7
8
9
10
ENGLISH
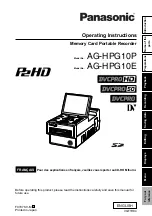
Calibrate the flow control setting. (See figure 17)
•
Move the control lever (A) to the "OFF" position.
•
Slide the control bracket along the control tube until the
shut-off plate in the bottom of the hopper is closed.
•
Lightly tighten the hex nuts that fasten the flow control
bracket to the control tube.
•
Set the adjustable stop (B) at "5". Pull the control lever (A)
against the stop (B) and verify that the shut-off plate has
opened about half way.
•
If the shut-off plate does not open half way, adjust the
position of the control bracket until the shut-off plate opens
about half way and closes completely.
•
Tighten the hex nuts.
DEUTSCH
Kalibrierung der Flusssteuerung. (siehe Abb. 17)
•
Den Steuerhebel (A) in Stellung "OFF" (AUS) bringen.
•
Den Steuerbügel entlang des Steuerrohrs verschieben, bis
die Absperrplatte im Unterteil des Trichters geschlossen ist.
•
Die Sechskantmuttern, die den Flusssteuerungsbügel am
Steuerrohr befestigen, leicht anziehen.
•
Den verstellbaren Anschlag (B) auf "5" stellen. Den
Steuerhebel (A) gegen den Anschlag (B) ziehen und prüfen,
ob sich die Absperrplatte in etwas zur Hälfte geöffnet hat.
•
Falls sich die Absperrplatte nicht zur Hälfte öffnet,
die Stellung des Steuerbügels justieren, bis sich die
Absperrplatte etwa zur Hälfte öffnen und komplett schließen
lässt.
•
Die Sechskantmuttern anziehen.
FRANÇAIS
Réglage initial de la commande de débit. (Voir la figure 17)
•
Mettre le levier de commande (A) en position arrêt (« OFF »).
•
Faire coulisser la platine support sur le tube de commande
jusqu'à ce que le clapet du fond de la trémie soit fermé.
•
Serrer légèrement les écrous 6 pans de fixation de la
platine sur le tube commande.
•
Mettre la butée réglable (B) sur « 5 ». Mettre le levier de
commande (A) contre la butée (B) et vérifier que le clapet
est ouvert environ à moitié.
•
Si le clapet ne s’ouvre pas à moitié, régler la position de la
platine jusqu'à ce que le clapet s'ouvre environ à moitié et
se ferme complètement.
•
Bloquer les écrous.
ITALIANO
Calibrare l'impostazione del comando della portata.
(Vedere la figura 17.)
•
Spostare la leva di comando (A) nella posizione "OFF".
•
Far scorrere la staffa sul tubo del comando finché non
si chiude la piastra di arresto sulla parte inferiore della
tramoggia.
•
Serrare appena i dadi esagonali che fissano la staffa contro
il tubo del comando.
•
Impostare l'arresto regolabile (B) su "5". Tirare la leva di
comando (A) contro l'arresto (B) e verificare che la piastra
di arresto sia aperta a metà circa.
•
Se la piastra non si apre a metà, regolare la posizione della
staffa finché la piastra di arresto non si apre a metà e si
chiude completamente.
•
Serrare i dadi esagonali.
NEDERLANDS
De standen van de toevoerregeling afstellen.
(Zie figuur 17)
•
Plaats de toevoerhendel (A) in stand OFF.
•
Verschuif de standenbeugel op de buis voor de
toevoerregeling tot de toevoerplaat onderin de trechter
gesloten is.
•
Draai de zeskantmoeren handvast waarmee de
standenbeugel aan de buis voor de toevoerregeling wordt
vastgezet.
•
Plaats de vleugelmoer (B) in stand 5. Trek de
toevoerhendel (A) tegen de vleugelmoer (B) en controleer
of de afsluitplaat half open is.
•
Als de afsluitplaat niet half open is, blijft u de
standenbeugel verschuiven tot de afsluitplaat nagenoeg
half open is en daarna helemaal sluit.
•
Draai de zeskantmoeren goed vast.
ESPAÑOL
Calibre el régimen de control de flujo.
(Ver Figura 17)
•
Mueva la palanca de control (A) a la posición "OFF".
•
Deslice el brazo de control a lo largo del tubo de control
hasta que se cierre la placa de regulación que se
encuentra en la base de la tolva.
•
Ajuste levemente las tuercas hexagonales que fijan el
brazo de control del flujo al tubo de control.
•
Fije la detención ajustable (B) en "5". Lleve la palanca de
control (A) hacia la detención (B) y luego verifique que se
haya abierto la placa de regulación hasta la mitad.
•
Si la placa de regulación no abre hasta la mitad, ajuste
la posición del brazo de control hasta que la placa de
regulación se abra hasta la mitad y cierre por completo.
•
Ajuste las tuercas hexagonales.
17