background image

3

Column  Modules


User Guide

47

CAUTION

When securing the module from inside the oven do not over tighten. Finger tight is too tight!

7

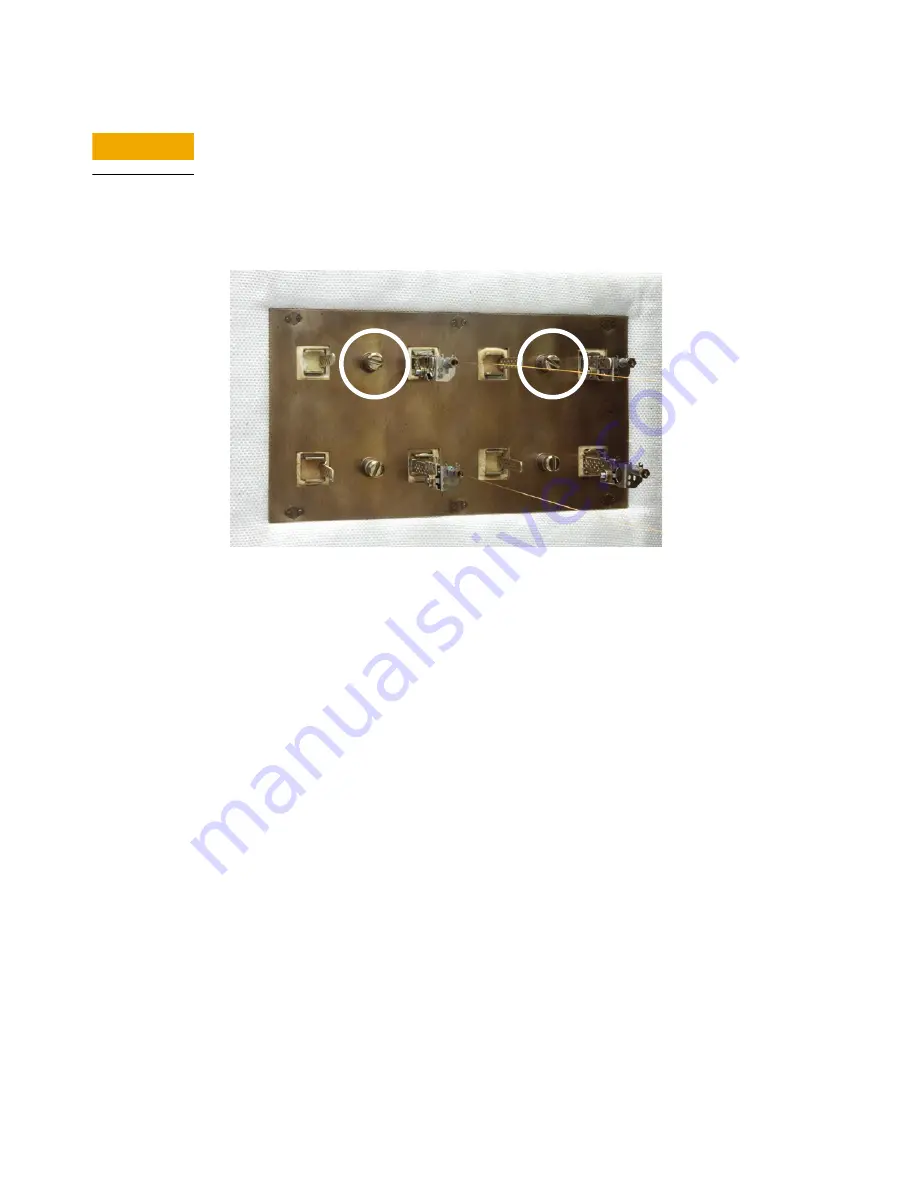
Secure the module with the captive screw(s) from the inside of the LTM oven door. Tighten 
enough to establish a reasonable seat against the highly compressible ceramic paper 
gasket. 

Figure 31.

Two column modules installed in LTM oven door (shown after installation of unions)

8

Unplug the power supply (or supplies) from mains voltage.

9

Open the electronics enclosure by gently turning the small knob counterclockwise as 
described in 

“Connect the power supply and communications cables”

.

10

Route the transfer line and column module connections (total of three cables and 
connections per module) down and through the large slot on the top left of the electronics 
housing. 

Summary of Contents for LTM II Series

Page 1: ...Agilent LTM Series II Rapid Heating Cooling System for Agilent 8890 GCs User Guide ...

Page 2: ...mplied warranties of merchantability and fit ness for a particular purpose Agilent shall not be liable for errors or for incidental or consequential damages in connection with the furnishing use or performance of this document or of any information contained herein Should Agilent and the user have a separate written agreement with warranty terms covering the material in this document that conflict...

Page 3: ...Safety and Regulatory Certifications 18 Information 18 Symbols 18 Cleaning 20 3 Column Modules Overview 22 To Attach a CFT Nut and Ferrule to a Capillary Column 23 Available ferrules 23 Tools Required 23 Swage the ferrule onto the column 24 Swaging Quality Inspection 28 To Disconnect Fused Silica Tubing From a CFT Fitting 29 To Select In and Out Column Segments 30 To Install an LTM Column Module o...

Page 4: ...g and total run time 63 5 Troubleshooting Accessing LTM Diagnostic Information at the GC 66 Error Messages 67 Fan LEDs 69 Checking for Leaks 70 Column Configuration Problems 71 6 Consumable and Replacement Parts Consumables and Replacement Parts 74 7 Site Preparation Environmental Conditions 78 Benchtop Space Requirements 78 Electrical Requirements 78 8 Installation Overview 80 Tools and Materials...

Page 5: ...les 86 Install the fan module 89 Install the LTM column modules 91 Install the In and Out segments for each column module 91 Check the cable routing 91 Install the GC covers 91 Configure the column modules 91 Check for leaks 93 Prepare the LTM system for use 94 ...

Page 6: ...6 User Guide ...

Page 7: ...User Guide 7 1 Introduction Overview 8 LTM System Components 9 This section introduces the Agilent LTM Series II Rapid Heating Cooling System for 8890 GCs ...

Page 8: ...stem achieves its ramp rates by packaging a capillary GC column into the LTM column module Within a module the GC column is formed into packed coils using resistively heated wire and a temperature sensor The high efficiency of this proprietary design provides fast heating and cooling of the GC columns with greatly reduced power requirements compared to a conventional GC oven Mounting the modules o...

Page 9: ...ing fans The unions and mounting hardware for connecting the LTM column modules to the other GC components Figure 1 LTM oven door as installed on a 8890 GC Power supply The LTM system requires 1 or 2 separate power supplies depending on the option ordered Two modules can share one power supply However when using 5 inch column modules optional faster heating requires use of two power supplies See F...

Page 10: ...ach LTM column module attaches to a transfer line module and the resulting module assembly inserts into slots in the LTM oven door See Figure 3 NOTE The current transfer line module and LTM column module design uses guides in the column module to correctly position the column module onto the transfer line module The column module secures into the transfer line module using two screws Figure 3 LTM ...

Page 11: ... module Fan bracket The fan bracket contains the fans which cool the column module transfer line module assembly See Figure 5 The fan brackets attach to the front of the LTM oven door below the slots for the transfer line column module assemblies An indicating LED in the fan bracket displays diagnostic information Figure 5 Fan bracket for 5 inch module not to scale 5 inch LTM column module ...

Page 12: ...M column to the column segments that lead to the GC inlet detector or other components Agilent recommends using the CFT Ultimate unions and brackets supplied in the transfer line module kit See Figure 7 The CFT unions provide reusable fittings that should not require retightening after thermal cycling Figure 7 CFT union and bracket The CFT Ultimate union ferrules are available for the capillary co...

Page 13: ...he ULM unions are integrated with the bracket Figure 8 Union bracket with Valco ULM union We recommend the Valco re usable ferrules listed in Table 2 for use with the ULM unions Table 2 Valco re usable ferrules for use with ULM unions Fused silica capillary column od Recommended Ferrule 0 4 mm typically 0 25 mm or smaller id 5190 1437 5 pk 0 5 mm typically 0 32 mm id 5190 1438 5 pk 0 8 mm typicall...

Page 14: ...1 Introduction 14 User Guide ...

Page 15: ...rogen Safety 17 Safety and Regulatory Certifications 18 Cleaning 20 This sections describes the safety requirements for installation and operating the Low Thermal Mass LTM Series II system on an Agilent GC It also provides regulatory and related information ...

Page 16: ...sulation or insulation on any of the other external cables is frayed or worn the cord or cable must be replaced Contact your Agilent service representative Electrostatic discharge is a threat to GC electronics The printed circuit PC boards in the LTM system can be damaged by electrostatic discharge Do not touch any of the boards unless it is absolutely necessary If you must handle them wear a grou...

Page 17: ...work area wear long sleeves gloves safety glasses and a disposable dust mist respirator dispose of insulation in a sealed plastic bag wash your hands with mild soap and cold water after handling the insulation Hydrogen Safety Please refer to the Agilent 8890 Gas Chromatograph Safety Manual for important information regarding hydrogen safety WARNING Hydrogen is flammable Leaks when confined in an e...

Page 18: ... where you can drop off your waste equipment for recycling please contact your local city recycling office or the dealer from whom you originally purchased the product Information The Agilent Technologies LTM system meets the following IEC International Electrotechnical Commission classifications Safety Class I Transient Overvoltage Category II Pollution Degree 2 This unit has been designed and te...

Page 19: ...s earth ground terminal Indicates potential explosion hazard Indicates radioactivity hazard Indicates electrostatic discharge hazard Indicates a hazard See the Agilent 8890 GC user documentation for the item labeled Indicates that you must not discard this electrical electronic product in domestic household waste DC Voltage AC Voltage ...

Page 20: ...2 Safety 20 User Guide Cleaning To clean the unit disconnect the power and wipe down the exterior with a damp lint free cloth ...

Page 21: ...nion 52 To Remove a Column Module Assembly from the LTM Oven Door 54 To Remove a Column Module Assembly from a Transfer Line Module 56 To Remove the LTM Top Cover 58 To Connect the Column Using Valco ULM Unions 59 Please refer to this section when it is necessary to change the column in the LTM system This chapter explains how to assemble a column module to its transfer line module and how to atta...

Page 22: ... the column module onto the transfer line module 4 Attach the column ends to unions on the transfer line module 5 Install the transfer line and column module assembly into the LTM oven door 6 Connect the in and out column segments from the GC inlet and detector to the transfer line module unions The standard module size contains a 12 7 cm 5 inch column coil This coil size is compatible with delica...

Page 23: ...tal Plus Flexible Metal ferrules Each UltiMetal Plus Flexible Metal ferrule part number is uniquely designed to prevent inventory mix ups and to help you find the ferrule you need quickly Color variations between ferrules are a normal result of the UltiMetal coating Tools Required Two 1 4 inch open end wrenches Swaging nut G2855 20555 or swaging tool G2855 60200 Internal nut G2855 20530 Table 3 Av...

Page 24: ...rrule onto the column 1 Pass the column end through the internal nut the ferrule and the swaging wrench Figure 11 Figure 11 Thread the column through the internal nut ferrule and swaging wrench 2 Thread the internal nut into the swaging wrench with the column protruding out of the back of the wrench see Figure 12 Figure 12 Thread the internal nut onto the swaging wrench ...

Page 25: ... swage the ferrule to the column a Find your ferrule type in Table 4 and note the range of degrees to tighten the internal nut b Tighten the internal nut clockwise to the lower end of your ferrule s range c Check if the ferrule is gripping the column If yes stop If not continue to tighten the internal nut in small 5 to 15 degree increments Check after each increment to see if the ferrule is grippi...

Page 26: ...ing approximately 0 3 mm of the column extending from the ferrule Figure 15 The minimum size of the column head extending from the ferrule is 0 1 mm and the maximum is 0 5 mm It is important to have 0 5 mm or less column head to prevent column conflict in the union Figure 15 Properly trimmed column and ferrule Using a ceramic wafer helps provide the correct trim length a Place the wafer on the col...

Page 27: ...e column does not need to be perfectly square but cracks should not extend under the ferrule Figure 16 Technique for trimming the column in a CFT fitting 45 degree angle when cutting 0 3 mm to 0 5 mm of column extends past ferrule Column cutting wafer UltiMetal ferrule Internal nut Cut here ...

Page 28: ...rrect and correct swaging symmetry Figure 17 Incorrect and correct swaging symmetry If your column and ferrule appear like the incorrect example in Figure 17 above it is possible that your swaging wrench is defective or worn out Try swaging with a new wrench or new nut Incorrect Correct ...

Page 29: ...oosen and remove the internal nut If the column and ferrule do not come free insert a pointed object pen paper clip into the ferrule release hole see Figure 18 and press firmly You will hear a click as the ferrule releases Figure 18 CFT union ferrule release holes Ferrule release holes ...

Page 30: ...as the analytical column Using the same id column can help avoid peak broadening and other issues Cut a piece of fused silica that is long enough to let you open the LTM oven door at least half way plus some length to allow for several trimmings Typically use a length of column 40 to 50 cm long If possible avoid very long lengths While the GC oven typically remains isothermal it is still best to a...

Page 31: ...lumn module and transfer line module Figure 19 Column and transfer line module parts 1 Gather the following Column module Transfer line module sized for the column module Posidrive screwdriver T 10 Torx driver Scissors Column ends Transfer line tubes Inlet transfer line arms Column heater cable Transfer line wires ...

Page 32: ...ct your eyes from flying particles while handling cutting or installing glass or fused silica capillary columns Use care in handling these columns to prevent puncture wounds CAUTION The column module cover mounting screws are very short Loosen only enough so that the column cover can be removed Hold the column module over a table or other surface that can catch a screw that is accidentally removed...

Page 33: ... secure the transfer lines in place Figure 21 Cut the tie wraps that secure the transfer lines 5 Hold the column module over the transfer line module so the column ends align with the transfer line tubes Slide the ends of each column into the transfer lines ...

Page 34: ...22 Aligning the column module bracket onto the transfer line module rails 7 Continue to carefully slide the column module forward As the foil wrapped column approaches the transfer lines use a finger to gently move the column as needed to make sure the column sits evenly between the transfer lines The transfer lines must not cut the foil wrap Keep the column centered between the transfer lines so ...

Page 35: ...to the transfer line module rails check for interference from wiring Damage to the wires can result in electrical shock and equipment failure CAUTION To avoid breaking the column the transfer lines should very closely approach but not press into the column assembly 8 Check for correct installation The wrapped column should just meet the end of each transfer line See Figure 24 The transfer line sho...

Page 36: ...to transfer line 9 Secure the column module to the transfer line module using the two screws removed in step 2 10 Route the transfer line wires inside the screw mounts for the column module cover See Figure 25 Figure 25 Routing the transfer line heater wires Column wrapped in foil Transfer line Poor installation Column exposed Cold spots Correct installation Column not exposed No cold spots ...

Page 37: ...le assembly to the transfer line module is complete Tips Always handle the column and transfer line module assemblies as if separate items Periodically check the screws that secure the column module to the transfer line module CAUTION Do not trim the column ends before understanding how the sliding union attachment works The correct position of the union increases the number of times the column ma...

Page 38: ...ttings and unions first practice CFT ferrule installation on a scrap non LTM column or column segment 1 Gather the following Column cutter wafer 5181 8836 4 pk Magnifying loupe 20X 430 1020 Gloves heat resistant for handling hot parts Gloves lint free to prevent contamination of the column ferrules and so forth with skin oil and dirt UltiMetal ferrule appropriate for the column size see Consumable...

Page 39: ...e end 4 Clean the column end with an alcohol wipe 5 Slide one internal nut over the inlet column end Figure 27 Internal nut and UltiMetal ferrule on column 6 Slide the appropriate UltiMetal ferrule over the inlet column end See Figure 27 7 If not already installed slide one union hanger assembly onto the inlet transfer line arm as shown Be sure the hanger is at maximum extension on the arm Use a T...

Page 40: ...or new installations again check that the hanger is at maximum extension without extending past the end of the arm as shown below For existing installations slide the hanger to reach the open column end CAUTION Do not overtighten the internal nut into the fitting A properly swaged and tightened CFT connection will remain leak free for many connections End of arm Maximum extension Hanger body does ...

Page 41: ...ghten the internal nut b Tighten the internal nut clockwise to the lower end of your ferrule s range c Check if the ferrule is gripping the column If yes stop If not continue to tighten the internal nut in small 5 to 15 degree increments Check after each increment to see if the ferrule is gripping the column To check it lift the union from the bracket Stop as soon as gripping occurs see Figure 13 ...

Page 42: ...afer on the column then slide along the column until it rests against the end of the ferrule b Tilt the wafer at an approximate 45 degree angle c Score the column and remove the loose end This technique will leave approximately 0 3 mm of column extending beyond the ferrule Do not use other column cutting tools The ceramic wafer helps provide the correct trim length The column cannot extend more th...

Page 43: ...ule Figure 28 Proper technique for trimming the column in a CFT fitting 14 Place the CFT union back into the hanger and insert the column end Tighten finger tight then use two wrenches to tighten an additional 10 to 15 about one half of a flat 45 degree angle when cutting 0 3 mm to 0 5 mm of column extends past ferrule Column cutting wafe UltiMetal ferrule Internal nut Cut here ...

Page 44: ...Modules 44 User Guide 15 Use a Torx T20 driver to carefully tighten the hanger to the arm See the photos below for the final positioning 16 Follow the same procedure to install the union on the other column end ...

Page 45: ...t your hands or allow the parts to cool before beginning the work 1 Gather the following Module assembly to install Gloves heat resistant for handling hot parts Gloves lint free to prevent contamination of the column ferrules and so forth with skin oil and dirt 2 On the GC touchscreen go to Maintenance Instrument Perform Maintenance Maintenance Mode Perform Maintenance to cool down the GC ovens in...

Page 46: ...he LTM oven door carefully align the unions brackets and posts with the through holes in the LTM oven door The tolerances are close Slightly adjust spread the posts if needed If you have an assembly that is not clampless lift up slightly on the module assembly until the thumbscrew heads of the clamps are cleared and then the assembly will drop down into place and slide forward into the oven and th...

Page 47: ...amic paper gasket Figure 31 Two column modules installed in LTM oven door shown after installation of unions 8 Unplug the power supply or supplies from mains voltage 9 Open the electronics enclosure by gently turning the small knob counterclockwise as described in Connect the power supply and communications cables 10 Route the transfer line and column module connections total of three cables and c...

Page 48: ...rd The connectors are keyed and will only go onto the board one way If removing transfer line connectors from the board remove them by gripping the connector and not by pulling on the cable The cable wires are easily damaged The transfer line cables can go to either transfer line connector on the electronics board as long as it is for the correct module Check your work Make sure each connector ins...

Page 49: ...rs Module 1 Module 2 Column module P2 P6 Transfer lines P3 or P4 P7 or P8 Fan cable P5 P9 Other connections Power cord J1 Communications cable P1 Power cord Communications cable Column module cable Transfer line cables interchangeable Fan cable Module 1 connections Module 2 connections P1 J1 P2 P3 P4 P5 P6 P7 P8 P9 ...

Page 50: ...e connections on electronics board 12 Close and secure the cover on the LTM electronics housing 13 Reinstall the LTM top cover and secure with its two screws GC column 1 GC column 2 GC column 3 GC column 4 Board configured as LTMII Col1 Col2 Closest to GC Board configured as LTMII Col3 Col4 Front board optional Install connectors over both rows of pins ...

Page 51: ...ile working When finished turn on the GC The GC will read primary column configuration information from the column module as if it were a column Smart ID key However you will need to configure other column information such as the In and Out segment dimensions See Configuring LTM columns If the GC detects a problem during startup turn off the GC Check the column module and transfer line heater conn...

Page 52: ...for future trimming and reuse but avoid extra lengths that may allow the column to get caught in the LTM oven door or to touch the GC oven walls In some cases a minimum length is needed to reduce the chance of cold spots where the columns touch the GC oven walls The minimum final length is 25 cm to 27 cm which will allow the GC oven door to open between 1 4 to 1 3 of its full amount 5 Install the ...

Page 53: ...the columns on the GC column hanger as needed Gently test closing the LTM oven door If the door will close on the columns rearrange them 12 Exit maintenance mode Select Finished 13 Configure the In and Out segments See Configuring LTM columns on page 62 ...

Page 54: ...ors 3 Remove the LTM top cover See To Remove the LTM Top Cover 4 Open the LTM oven door 5 Using two wrenches disconnect the In and Out segments from the CFT unions 6 Loosen the retained screws that secure the column module assembly into the LTM oven door Figure 35 Two column modules installed in LTM oven door shown after installation of unions 7 Carefully slide the column assembly from the LTM ove...

Page 55: ...ulation See Consumables and Replacement Parts c Using a T 10 Torx driver loosen the fan bracket mounting screws and remove the fan bracket Disconnect the fan from the electronics board d Reinstall the slot cover s e Close the LTM electronics enclosure 12 Exit maintenance mode Select Finished The CFT fittings on the In and Out segment columns can be installed into another CFT fitting as is If stori...

Page 56: ...contamination of the column ferrules and so forth with skin oil and dirt UltiMetal ferrule appropriate for the column size see Consumables and Replacement Parts Two 1 4 inch open end wrenches T20 Torx driver Short metric ruler One 7 16 inch open end wrench 2 Using two wrenches loosen the column s internal nut at the CFT union and remove the fitting from the union Repeat for the other column connec...

Page 57: ...ng the mounting screws 6 Gently slide the column module off of the transfer line module Be careful to avoid damaging the column ends 7 Reinstall the column module cover Be careful not to clip the heater wires 8 If not re using the transfer line module immediately install the two column module mounting screws into the transfer line module for safe keeping Note that the installed unions remain on th...

Page 58: ... If hot wear heat resistant gloves to protect your hands or allow the parts to cool before beginning the work To remove the LTM top cover remove the 2 T20 Torx screws that secure the cover in place one on each side of the cover Lift and remove the cover from the LTM oven door assembly Always reinstall the cover and screws before operating the LTM system LTM top cover Screws ...

Page 59: ...observing the clamps with the mini unions The screw on each of these can be loosened just enough that the brackets can slide along the rails projecting from the oven side of the transfer line module It is not necessary to remove the screw just loosening the screw will allow the bracket to slide on and off of the rail With the screw toward the underside of the rail note that there are two choices f...

Page 60: ...nd wrench 3 Slide the ferrule and knurled nut up to the ULM union and tighten the nut using your fingers until the nut is snug note that this is LESS than finger tight Because the seal at the ferrule occurs near the tip of the ferrule over tightening will crush the tip of the ferrule and the capillary column It is recommended that the knurled nut be tightened until it feels snug and then tightened...

Page 61: ...User Guide 61 4 Operation Operating the LTM System 62 This section describes where to configure and program an LTM column module ...

Page 62: ... board See To Install a Column Module Assembly in the LTM Oven Door To complete column configuration enter the In Segment Out Segment and similar information Configuring LTM columns Configure each LTM column module in the GC as a composite column The GC defines all parts of the LTM column module columns as one composite column In Figure 37 the In segment analytical column and Out segment are all p...

Page 63: ...des its own configuration information the data system will be able to edit the column information to a more limited extent The primary column contained within the column module cannot be edited for film thickness maximum temperatures and certain other data You can calibrate the column by slightly changing its length or id but do not do so unless you can accurately calculate these dimensions Progra...

Page 64: ...4 Operation 64 User Guide ...

Page 65: ...leshooting Accessing LTM Diagnostic Information at the GC 66 Error Messages 67 Fan LEDs 69 Checking for Leaks 70 Column Configuration Problems 71 This sections describes error messages common issues and how to resolve them ...

Page 66: ...at the GC The GC handles LTM diagnostics conditions just like any other GC component Access diagnostic conditions from the GC touchscreen or browser interface by selecting Diagnostics Other information such as current readings may be available from Settings Service Mode ...

Page 67: ...LTM Warning messages Message Cause Effect LTM Column 1 Changed A new LTM column was installed The column is configured and in use LTM Column 1 New A new LTM column was installed The column needs to be configured LTM Column 1 Removed A LTM column is no longer detected The LTM column cannot be operated LTM Column 2 Changed A new LTM column was installed The column is configured and in use LTM Column...

Page 68: ...r Zero User zero invalid Flow will not be controlled to the desired setpoints Table 6 LTM Warning messages continued Message Cause Effect Table 7 LTM Fault messages Message Cause Effect LTM Controller 1 48 Volt Supply Fault The 48 volt supply is faulty The LTM is not functional LTM Controller 1 Board Fault Bad reading from the electronics The LTM is not functional LTM Controller 1 Configuration Fa...

Page 69: ... provide diagnostic information LED status Column module state Off No power or turned off On Run in progress Temperature may or may not be in control Flashing 2 seconds per blink Not in a run Temperature not in control Flashing 2 blinks per seconds Not in a run Temperature in control ...

Page 70: ...You can perform a pressure decay test by plugging the end of the column segment leading to the detector or by using a CFT plug fitting made from a piece of wire and normal UltiMetal ferrule in the detector side of the CFT union However compared to a non LTM system the additional volume provided by the column segments will cause some initial extra pressure decay until the setpoint pressure equilibr...

Page 71: ...configuration However if column configuration data does not appear correctly check the following Is the column module a series I version Older column modules do not contain configuration information and must be manually configured Is the GC firmware version correct Note that while LTM Series II column modules are backwards compatible with earlier LTM systems they do not otherwise enhance existing ...

Page 72: ...5 Troubleshooting 72 User Guide ...

Page 73: ...User Guide 73 6 Consumable and Replacement Parts Consumables and Replacement Parts 74 This section lists the common consumable and replacement parts needed for routine use of an LTM GC system ...

Page 74: ...nt com chem To purchase a new column module also visit the Agilent web site Figure 38 CPM Union and internal nut Table 8 Consumables Description Part number CFT fittings Internal nut G2855 20530 CPM Union inert G3182 60580 LTM union holder G6578 60120 Other parts Column cutting wafer 4 pk 5181 8836 Swaging nut G2855 20555 Swaging tool G2855 60200 Internal nut Union CPM Ferrule CFT ...

Page 75: ...xible Metal ferrule packages Item Part number Ferrule description 1 G3188 27501 0 1 0 25 mm column id 10 pk 2 G3188 27502 0 32 mm column id 10 pk 3 G3188 27503 0 45 0 53 mm column id 10 pk 4 G3188 27504 Plug 10 pk 5 G3188 27505 0 25 0 32 mm UltiMetal column id 10 pk 6 G3188 27506 0 53 mm UltiMetal column id 10 pk 1 2 3 4 5 6 ...

Page 76: ...r plate 0515 0680 4 Fan bracket assembly for standard 12 7 cm 5 in column module G6578 64025 5 Module retaining bolt G6578 80504 6 Transfer line module for one standard 12 7 cm 5 in column module G6578 64015 Upgrade kit for LTM CFT Unions includes internal nut swaging nut CPM union UltiMetal ferrules and 2 LTM union holders G6578 60122 2 Gasket 5 Module retaining 6 5 inch transfer line module 4 Fa...

Page 77: ... Guide 77 7 Site Preparation Environmental Conditions 78 Benchtop Space Requirements 78 Electrical Requirements 78 This section lists the GC and other requirements needed to install an LTM system into a GC ...

Page 78: ...n door The LTM oven door replaces the existing GC oven door Height 36 8 cm 14 5 in Width 43 2 cm 17 0 in Depths 25 4 cm 10 0 in With column modules installed unit extends 18 4 cm 7 2 in forward from the original door Average weight 6 7 kg 14 7 lb The external power supply Height 4 6 cm 1 8 in Width 8 5 cm 3 3 in Depths 21 cm 8 3 in Allow 5 cm 2 in in front and behind for power cord connections Ave...

Page 79: ...and Materials Required 82 Prepare the GC 83 Install the LTM System 86 This section describes how to install an LTM system onto an Agilent 8890 Gas Chromatograph GC The installation instructions assume an Agilent trained technician performs the work ...

Page 80: ... cables G3450 60111 as needed for connecting the ordered number of electronics boards to the GC The door assembly also includes screws 0515 0680 10 each for installing up to the maximum number of fan modules allowed Table 11 Low Thermal Mass System accessory parts Description Quantity All LTM Systems Power supply 1 LTM side covers and hardware kit 1 Power cord appropriate for country 1 One standar...

Page 81: ...shipped LTM system also includes Appropriate fused silica sized to match the column modules for creating the In and Out segments that connect the column modules to the GC inlet and detector Required consumables and supplies for completing the installation See LTM System Components for descriptions of important LTM parts ...

Page 82: ...est version of the tool from the Agilent web site Column cutter wafer 5181 8836 4 pk Magnifying loupe 20X 430 1020 Gloves heat resistant for handling hot parts Gloves lint free to prevent contamination of the column ferrules and so forth with skin oil and dirt UltiMetal ferrule appropriate for the column size see Consumables and Replacement Parts Two 1 4 inch open end wrenches Short metric ruler O...

Page 83: ... of the GC NOTE Vent even if using any type of purged union accessory LTM system installation requires shutting down the GC Update GC firmware GC only The LTM system requires 8890 GC firmware version 2 0 0 or greater Later firmware versions should be compatible Earlier versions are not compatible Check the GC firmware version and update it using the Agilent GC Firmware Update Tool if needed To che...

Page 84: ...ovided in the kit into the bottom threaded hole as shown in Figure 41 below Install the LTM panel mounting post bracket using two M4 x 6 mm long screws Install the two 13 mm standoffs at the top Figure 41 Installing the left side panel standoffs 5 Install the new metal side panel and secure in place with 4 M4 x 6 mm screws 0515 0684 If a PAL autosampler is installed instead use two 16 mm long flat...

Page 85: ... that attaches the door to the GC 5 The hinge shaft threads completely through its bracket so that the threads cannot engage and loosen during use To remove the shaft use a flat head screwdriver to lift the shaft from the bottom until it contacts the threads Hold in place while using a T 20 driver to loosen the shaft Turn the T 20 driver a few times to engage the threads on the bottom of the shaft...

Page 86: ... the inlet cover Connect the power supply and communications cables These instructions apply to systems with 1 electronics board If installing a G6880A make 2 sets of connections one for each electronics board 1 Open the electronics housing on the front of the LTM oven door Turn the small knob counter clockwise then lower the door Observe how the mechanism for the latch knob works from the inside ...

Page 87: ... to the board at P1 5 Route the other end of the communications cable around the left side of the GC Route the cable up through an open slot in the upper back panel typically through slot 3 Aux Gas or Power cord Communications cable Column module cable Transfer line cables interchangeable Fan cable Module 1 connections Module 2 connections P1 J1 P2 P3 P4 P5 P6 P7 P8 P9 Table 12 Electronics board c...

Page 88: ...Aux Gas Connect the LTM cable to the 4 pin connector at the bottom of the bay For an LTM with two boards repeat for the second cable Figure 43 Select an open slot in the GC top back panel Normally use slot 3 then slot 4 if unused 3 4 5 6 ...

Page 89: ... 1 Remove the slot cover using a T 10 Torx driver to remove the two screws See Figure 44 For a 5 inch column module remove both slot covers in the top or bottom row Figure 44 Slot covers Two top slot covers shown above installed 5 inch column module 2 Remove the insulation from the slot opening by gently pressing it out from the inside of the LTM oven door 3 Seal the cover plate insulation and scr...

Page 90: ...n bracket mounting screw locations 5 Place the fan assembly bracket over the mounting screws then tighten the screws until snug 6 Route the fan cable through the slot and gap in the lower left of this bracket where it attaches to the door 7 Connect the fan cable to the electronics board at P6 or P9 for module 2 See Figure 42 Used for 5 in module Slot Slot ...

Page 91: ...Module Union Check the cable routing Check the cable routing at the bottom left corner of the LTM oven door Make sure that some slack is present so that the GC door can be opened at east halfway If the cables are tight against the GC the LTM oven door will not open properly If needed install two plastic cable clamps to the metal left side panel One installs near the LTM oven door at the bottom fro...

Page 92: ...ns length diameter film thickness module column toroid size and temperature limits from the LTM column module Define the column that connects the GC inlet to the LTM column module as the In Segment Define the column that connects the detector to the column module as the Out Segment If the column segment connected to the detector passes through a second heated zone for example an MS transfer line d...

Page 93: ...f swaged and installed to the recommended tightness these fittings can be thermally cycled removed and reinstalled many times without leaking However always check for leaks after making changes Turn on the GC inlet pressure If the inlet does not hold pressure check the connection between the GC column module and the CFT union first Use an electronics leak checker to check for leaks at the new colu...

Page 94: ...M system for use Before using the LTM system prepare it for use 1 Establish a purge flow of carrier through the columns 2 Purge the columns with carrier gas for at least 15 minutes 3 Condition the columns according to the manufacturer s recommendations 4 Run a standard or GC checkout sample as desired ...

Reviews: