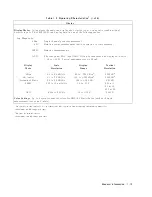


P
o
w
er
Requirements
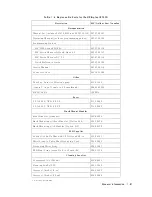
T
able
2-1.
HP/Agilent
8757D
P
o
w
er
Requirements
Characteristic
Requirement
Input
V
oltage
100,
120,
220,
or
240
V
(610%)
F
requency
48
to
66
Hz
P
o
w
er
155
V
A
(max)
Cautions
Before
switching
on
this
instrumen
t,
make
sure
the
line
v
oltage
selector
switch
is
set
to
the
v
oltage
of
the
mains
supply
the
correct
fuse
is
installed
the
supply
v
oltage
is
in
the
sp ecied
range
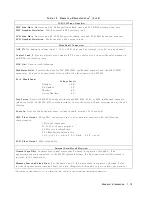
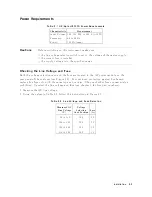
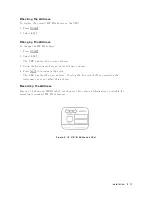
Checking
the
Line
V
oltage
and
Fuse
Both
the
v
oltage
selection
card
and
the
fuse
are
lo
cated
in
the
A
C
p o
w
er
mo
dule
on
the
rear
panel
of
the
analyzer
(see
Figure
2-3 ).
F
or
con
tinued
protection
against
re
hazard,
replace
line
fuse
only
with
the
same
t
yp e
and
ratings.
The
use
of
other
fuses
or
materials
is
prohibited.
T
o
select
the
line
v
oltage
and
fuse
(see
c
hapter
1
for
fuse
part
n
um
b ers):
1.
Measure
the
A
C
line
v
oltage.
2.
Using
the
v
alues
in
T
able
2-2 ,
follow
the
instructions
in
Figure
2-3 .
T
able
2-2.
Line
V
oltage
and
Fuse
Selection
Measured
A
C
Line
V
oltage
(V)
V
oltage
Selection
Card
P
osition
F
use
(A)
90
to
110
100
2.5
108
to
132
120
2.5
198
to
242
220
1.5
216
to
264
240
1.5
Installation
2-5
Summary of Contents for 8757D
Page 8: ......
Page 13: ...Figure 1 2 HP 8757D Scalar Network Analyzer and Accessories Supplied General Information 1 5 ...
Page 27: ...General Information 1 19 ...
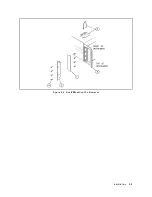
Page 39: ...Figure 2 4 Rack Mounting the Analyzer Installation 2 9 ...
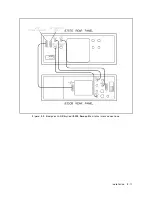
Page 41: ...Figure 2 5 Analyzer to HP Agilent 8350 Sweep Oscillator Interconnections Installation 2 11 ...
Page 43: ...Figure 2 7 Analyzer to HP Agilent 8360 Series Synthesizer Interconnections Installation 2 13 ...
Page 44: ...Figure 2 8 Analyzer to HP Agilent 83750 Series Synthesizer Interconnections 2 14 Installation ...
Page 45: ...Figure 2 9 Rear Panel Display Connectors Installation 2 15 ...
Page 49: ...Figure 2 11 HP IB Connectors Signals and Pin Configuration Installation 2 19 ...
Page 52: ......
Page 55: ......
Page 56: ......
Page 57: ......
Page 58: ......
Page 59: ......
Page 60: ......
Page 61: ......
Page 62: ......
Page 63: ......
Page 64: ......
Page 65: ......
Page 66: ......
Page 67: ......
Page 68: ......
Page 69: ......
Page 70: ......
Page 71: ......
Page 72: ......
Page 73: ......
Page 74: ......
Page 75: ......
Page 76: ......
Page 77: ......
Page 78: ......


