CONNECTION AND SETUP
1
1. CONNECTION AND SETUP
Before the DVR is powered on, make sure you have installed a hard disk, connected at least one camera and a
HDMI monitor. For details, please refer to the following sections.
Note:
The DVR is designed to automatically detect the video system of the connected cameras (NTSC
or PAL). To make sure the system detection is correct, please check if the cameras are connected
to the DVR and power-supplied before the DVR is powered on.
1.1 SATA Hard Disk Installation
A hard disk is necessary for the recorder to save video footage, and firmware upgrade might be failed if there’s
no hard disk installed in this recorder.
Note:
Here takes a 8CH model as an example of how to connect a hard disk to your device. To know
how many hard disks could be installed, please refer to the specifications of your device.
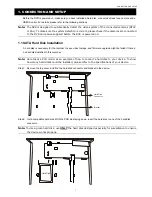
Step1: Remove the top cover, and find the hard disk connector and bracket in the device.
CR2032
Hard Disk
Connector
Bracket
Step2: Get a compatible hard disk. With the PCB side facing down, insert the hard disk to one of the hard disk
connector.
Note:
To use a green hard disk, use
ONLY
the hard disk designed especially for surveillance to ensure
the device works properly.
CR2032
Hard Disk
Summary of Contents for VC-SYS-HT1603
Page 2: ......
Page 16: ...CONNECTION AND SETUP 10 ...
Page 20: ...USER INTERFACE 14 ...
Page 24: ...HARDWARE OVERVIEW 18 ...
Page 33: ...REMOTE OPERATION 27 5 1 1 IVS Statistics Note This function is for selected models only ...


