14 GB
j
Carry out the desired work procedures as
described in following chapters.
j
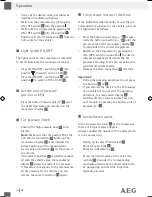
Switch on the compressor by pressing the
ON-/ OFF switch
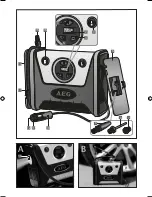
3
into the position .
j
Switch off the compressor by pressing the
ON-/ OFF switch
3
into the position .
j
Pull the 12 V vehicle connection
10
from the
12 V-socket of the vehicle.
Light switch ON / OFF
The light source on the compressor is intended
to better illuminate the working area (valve)
j
Press the ON-/OFF –switch Light
16
into
position , to switch on the 3 LED
14
.
j
Press the ON-/OFF –switch Light
16
into
position , to switch off the 3 LED
14
.
Set the unit of pressure
(psi, bar or kPa)
j
Press the button Pressure unit „R“
1
until
the desired pressure unit is shown on the
manometer display
2
.
Tire pressure check
j
Unwind the high-pressure hose
13
com-
pletely.
note:
Make sure that the power LED at the
12 V vehicle connection
10
lights up. The
manometer display
2
must indicate 0,0
before beginning of the measurement.
j
Fix the valve connection
15
on the valve of
the vehicle.
If the valve connection
15
is correctly connect-
ed with the vehicle valve, the manometer
display
2
shows the current tire pressure.
j
If this value corresponds to the recommend-
ed tire pressure for the vehicle, you can
remove the valve connection
15
again.
Tire pressure increase / decrease
If the indicated value lies under or over the rec-
ommended tire pressure for the vehicle, proceed
for adjustment as follows:
j
Press the button pre-setting „+ “
5
respec-
tively the button pre-setting „- “
4
until the
pre-set value of the manometer display
2
corresponds to the correct tire pressure.
j
Switch on the compressor by pressing the
ON- /OFF- switch into position . The device
increases respectively decreases the tire
pressure according to the pre-set value and
switches off automatically.
j
Remove the valve connection
15
carefully.
Important:
j
During the pumping procedure do not press
the buttons
4
or
5
.
j
If you connect the device to the 12 V-supply
of a vehicle but do not start the pumping
procedure, the manometer display
2
switches off after some minutes. You acti-
vate it again, by pressing the button unit of
pressure „R “
1
.
Use delivered valves
In the stowage box cover
6
of the compressor
there are 3 typical valve adapters.
Always consider the manual of the object which
is to be pumped up.
· Racing cycle valve (Presta valve)
7
· Valve for sport balls
8
· Valve for inflatable toy
9
j
Screw the desired valve on the valve con-
nection
15
. Consider the corresponding
maximum pressure of the object which is to
be pumped up and read the respective
operating manual.
Operation
97136_AEG_Kompressor_Content_EU.indd 14
05.11.10 13:50

