background image

TPC-300 Series/TPC-B510 User Manual

64

C States

This item allows users to enable/disable CPU power management. This will 

enable the CPU to go to C states when not 100% utilized.

GT - Power Management Control

RC6 (Render Standby)

Maximum GT Frequency

The maximum GT frequency can be configured by the user. Choose between 

300 MHz (RPN) and 1000 MHz (RPO). Values outside this range will be 

clipped to min/max supported by the SKU.

Disable Turbo GT Frequency

Enabled: Turbo GT frequency will be disabled. Disabled: GT frequency is not 

limited.

C.1.2.3

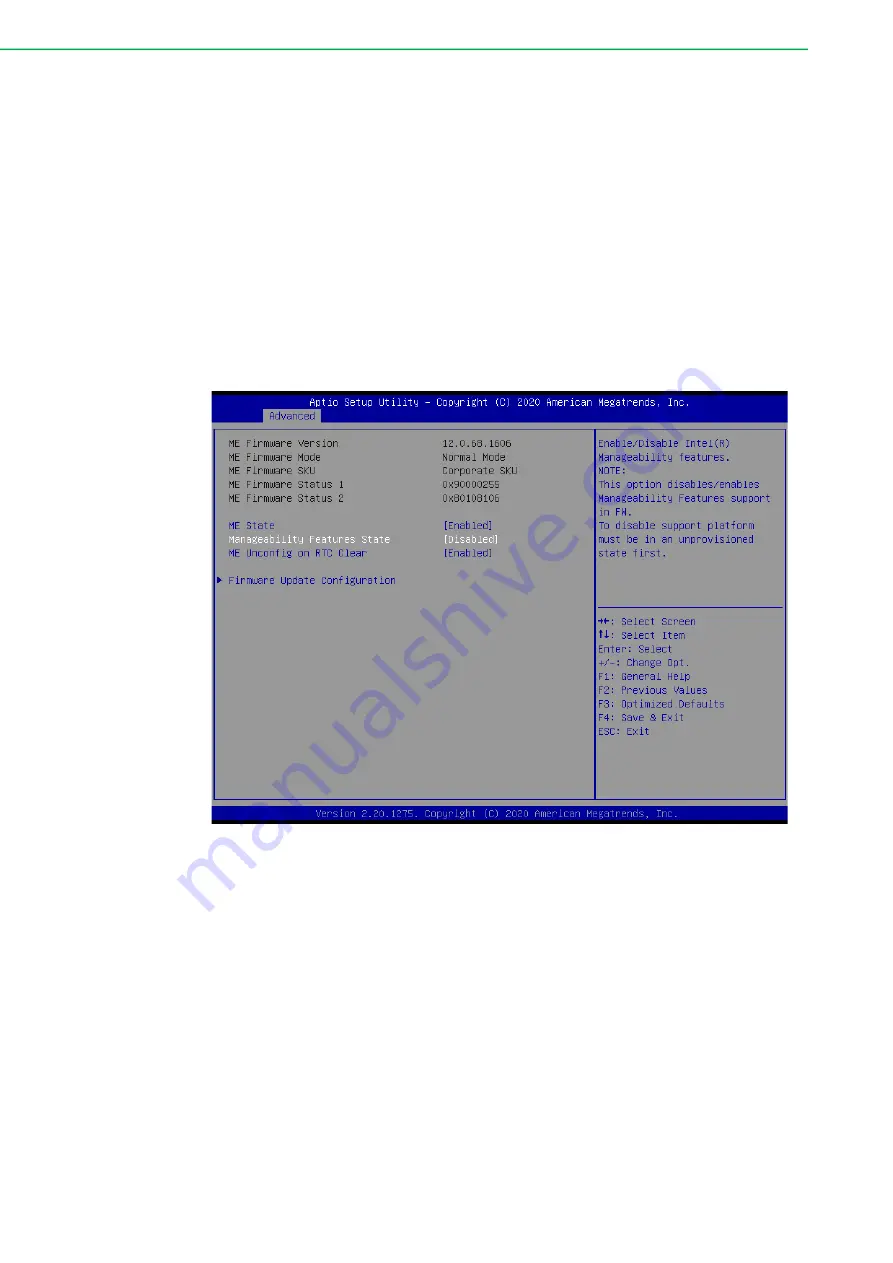
PCH-FW Configuration

ME State

Manageability Features State

This item allows users to enable/disable Intel (R) manageability features. This 

option disables/enables firmware support for manageability features. To disable 

this item, the support platform must be in an unprovisioned state first.

ME Unconfig on RTC Clear

When disabled, ME will not be unconfigured on RTC Clear.

Firmware Update Configuration

This item allows users to configure the management engine technology param

-

eters.

Summary of Contents for TPC-300 Series

Page 1: ...User Manual TPC 300 Series TPC B510 Industrial Touch Panel Computer with 8th Gen Intel Core Processor...

Page 2: ...rate and reliable How ever Advantech Co Ltd assumes no responsibility for its use nor for any infringe ments of the rights of third parties which may result from its use Acknowledgments Intel and Pent...

Page 3: ...any relevant information readily available 3 If your product is diagnosed as defective obtain a return merchandize authori zation RMA number from your dealer This allows us to process your return more...

Page 4: ...achments Description of your software operating system version application software etc A complete description of the problem The exact wording of any error messages Warnings Cautions and Notes Warnin...

Page 5: ...15 Never open the equipment For safety reasons the equipment should be opened only by qualified service personnel 16 If one of the following occurs have the equipment checked by qualified service pers...

Page 6: ...nce with IEC 704 1 specifications Advantech disclaims all responsibility for the accuracy of any statements contained herein Document Feedback To assist us with improving this manual we welcome all co...

Page 7: ...Unpacking 14 2 1 1 Transport 14 2 1 2 Unpacking 14 Figure 2 1 Power Connector and Power Lines 14 Figure 2 2 Power Connector 15 2 2 Panel Mounting 15 Figure 2 3 Panel Mounting Positioning 15 Figure 2 4...

Page 8: ...M 2 M Key Slot CN17 NVMe SATA Storage 34 A 3 5 M 2 B Key Slot CN26 PCIe USB SATA 35 Table A 7 M 2 B Key Slot CN26 PCIe USB SATA 35 A 3 6 Power Input Connector CN1 36 Table A 8 Power Input Connector CN...

Page 9: ...ix TPC 300 Series TPC B510 User Manual C 1 1 Main Setup 61 C 1 2 Advanced BIOS Features Setup 62 C 1 3 Chipset Configuration 71 C 1 4 Security 73 C 1 5 Boot 74 C 1 6 Save Exit 75...

Page 10: ...TPC 300 Series TPC B510 User Manual x...

Page 11: ...Chapter 1 1 General Information...

Page 12: ...and other contaminants Dual Channel DDR4 SODIMM Dual memory slots support up to 32GB of memory NVMe High Speed Storage M 2 M key connector supports NVMe PCIe x4 for high speed storage iDoor Technolog...

Page 13: ...orage Slots 1 x M 2 M key 2280 SATA NVMe PCIe x4 1 x M 2 B key 2242 SATA 3042 3052 LTE 5G slot 7 1 x 2 5 SATA SSD I O Ports 2 x RS 232 422 485 1 x USB 2 0 4 x USB3 2 Gen 2 1 x iDoor slot 1 x DisplayPo...

Page 14: ...tion 1024x768 Max Color 16 7M Luminance cd m2 300 Viewing Angle H V 176 176 Backlight Life 70 000 hrs Contrast Ratio 2000 1 TPC 317 Display Type SXGA TFT LED LCD Display Size 17 4 3 Max Resolution 128...

Page 15: ...Type Projected capacitive 1 2 5 Safety and Environmental 1 2 5 1 Safety FCC Class A CE certified 1 2 5 2 Environmental TPC 312 Humidity 10 95 RH 40 C 104 F non condensing Ingress Protection IP66 rate...

Page 16: ...perature 20 70 C 4 158 F Vibration Protection With SSD 1 Grms 5 500 Hz operating random TPC B510 Humidity 10 95 relative humidity 40 C 104 F non condensing Ingress Protection IP66 rated front panel Op...

Page 17: ...mation 1 4 Dimensions and Cutouts 1 4 1 TPC 312 Series Weight Net TBD Dimensions L x W x H 410 4 x 343 4 x 68 mm 16 16 x 13 52 x 2 68 in Cutout Dimensions L x H 303 x 229 mm 11 93 x 9 02 in Figure 1 2...

Page 18: ...315 Series Weight Net 5 8 kg 12 79 lb Dimensions L x W x H 383 2 x 307 3 x 66 5 mm 15 09 x 12 1 x 2 62 in Cutout Dimensions L x H 374 5 x 298 5 mm 14 74 x 11 75 in Figure 1 3 TPC 315 Dimensions 383 2...

Page 19: ...l Information 1 4 3 TPC 317 Series Weight Net TBD Dimensions L x W x H 410 4 x 343 4 x 68 mm 16 16 x 13 52 x 2 68 in Cutout Dimensions L x H 401 3 x 334 8 mm 15 80 x 13 18 in Figure 1 4 TPC 317 Dimens...

Page 20: ...ser Manual 10 1 4 4 TPC 324W Series Weight Net 9 3 kg 20 5 lb Dimensions L x W x H 595 9 x 374 1 x 70 mm 23 46 x 14 73 x 2 76 in Cutout Dimensions L x W 587 x 365 3 mm 23 11 x 14 38 in Figure 1 5 TPC...

Page 21: ...ries TPC B510 User Manual Chapter 1 General Information 1 4 5 TPC B510 Series Weight Net 2 6 kg 5 73 lb Dimensions L x W x H 269 x 203 x 40 mm 10 6 x 8 0 x 1 6 in Figure 1 6 TPC B510 Dimensions 268 96...

Page 22: ...TPC 300 Series TPC B510 User Manual 12...

Page 23: ...Chapter 2 2 Installation...

Page 24: ...ng indi cates that ambient conditions have already had a massive impact on the device Therefore we recommend using the original packaging during transportation and storage If the device is transported...

Page 25: ...llation Figure 2 2 Power Connector 3 Plug the power lines into the system power receptor 4 Power on the system 5 Calibrate the touchscreen 2 2 Panel Mounting 1 Position the TPC panel computer against...

Page 26: ...ttach clamps to the side of the TPC panel computer Figure 2 4 Panel Mounting Clamp Attachment 3 Secure the clamps in place using the M4 x 25L screws provided in the acces sory box Torque 5 kgf cm 0 5...

Page 27: ...of the TPC device and fasten in place using four M4 screws Figure 2 6 VESA Mounting 2 4 Cabinet Installation and Grounding Follow these instructions to install the TPC device into a cabinet The ground...

Page 28: ...llation 2 4 2 System Wiring 1 Connect the cabinet to the earth ground 2 Ensure that all cabinets have been grounded together 3 Connect the ground of the power supply to the cabinet 4 Connect the groun...

Page 29: ...ing Diagram Note Ensure all wiring follows the installation guidelines to avoid performance issues Note If a USB device or mini PCIe card is installed in the TPC device double check the voltage betwee...

Page 30: ...tion protection the following must be considered The Ethernet connection is isolated LAN connections will not affect the isolation design General USB devices are built to minimize EMI and ESD issues...

Page 31: ...Chapter 3 3 Windows Embedded Features...

Page 32: ...memory media like SSDs Important UWF is unable to protect external removable drives USB devices or flash drives The overlay does not mirror the entire volume but dynamically grows to keep track of red...

Page 33: ...c tor Any change that is made to the transparency overlay affects the projected picture as it is seen by the viewer However if the transparency overlay is removed the underlying picture remains unchan...

Page 34: ...nput the desired size MB Important When setting up a RAM based overlay be sure to leave sufficient available RAM to meet the minimum RAM requirements for system operation For example if the OS require...

Page 35: ...5 TPC 300 Series TPC B510 User Manual Chapter 3 Windows Embedded Features 3 Select the mode RAM or Disk Figure 3 5 UWF Overlay Settings Step 3 4 Click OK or Apply Figure 3 6 UWF Overlay Settings Step...

Page 36: ...ps below Ensure UWF is enabled Ensure that the volume s is protected The system must not have any file folder or registry exclusions configured for UWF The UWF overlay must be set to RAM based mode be...

Page 37: ...B510 User Manual Chapter 3 Windows Embedded Features 1 Click Start Menu Advantech Embedded Lockdown Manager Enable HORM Figure 3 8 HORM Settings Step 1 2 Click Yes in the popup dialog window Figure 3...

Page 38: ...TPC 300 Series TPC B510 User Manual 28...

Page 39: ...Appendix A A Serial Port Settings...

Page 40: ...cations A 1 1 Board Layout Figure A 1 Board Layout Top View Figure A 2 Board Layout Underside View Table A 1 Connectors and Jumpers Top Label Function BAT1 CN1 Power input connector CN3 DDR4 SODIMM I...

Page 41: ...ni PCIe slot CN36 DisplayPort connector CN37 SATA connector CN38 Audio connector COM1 COM1 RS 232 422 485 connector COM2 COM2 RS 232 connector JP1 CMOS clear runction Bottom CN2 DDR4 SODIMM II CN16 Li...

Page 42: ...GND GND 2 A Signal pair A TX Transmit 3 A 4 GND GND 5 B Signal pair B RX Receive 6 B 7 GND GND Table A 3 SATA Connector CN37 Table A 4 SATA Power Connector CN24 Pin Signal Description 1 V5SATA SATA po...

Page 43: ...USB 2 0 specifications 37 GND 36 USB_D 35 GND 34 GND 33 PETp0 PCI express differential transmit pair 32 SMB_DATA SMBus data signals are compliant with SMBus 2 0 specifications 31 PETn0 30 SMB_CLK 29 G...

Page 44: ...ey M 58 NC 57 GND 56 NC 55 REFCLKp 54 PEWAKE I O 0 1 8V 3 3V or NC 53 REFCLKn 52 CLKREQ I O 0 1 8V 3 3V or NC 51 GND 50 PERST O 0 1 8V 3 3V or NC 49 PETp0 SATA A 48 NC 47 PETn0 SATA A 46 NC 45 GND 44...

Page 45: ...7 PETn0 SATA A 46 GPIO_3 I O 0 1 8V 45 GND 44 GPIO_2 I O ALERT I 0 1 8V 43 PETp0 SATA B 42 GPIO_1 I O SMB_DATA I O 0 1 8V 41 PETn0 SATA B 40 GPIO_0 I O SMB_CLK I O 0 1 8V 39 GND 38 DEVSLP O 37 PERp1 U...

Page 46: ...rresponds to BI_DB 10BASE T and 100BASE TX In MDI configuration MDI 0 is used for the transmit pair and in MDIX configuration MDI 0 is used for the receive pair 2 MDI0 3 MDI1 In BASE T Media dependent...

Page 47: ...Link 100 Link 1000 Link Active Off Orange Green Green Table A 11 USB Connector CN19 CN20 Pin Signal Description 1 10 USB VBUS USB power output USB 3 0 5V 0 9A 2 11 USB_P USB2 0 date 3 12 USB_P USB2 0...

Page 48: ...or CN21 Signal Description USB VBUS USB power output USB 2 0 5V 0 5A and USB 3 0 5V 0 9A USB_P USB2 0 date USB_P USB2 0 date GND Ground for power return Table A 13 COM1 RS 232 422 485 Connector COM1 P...

Page 49: ...onnector COM2 Pin RS232 Pin RS232 1 DCD 2 DCD 3 RX 4 RX 5 TX 6 TX 7 DTR 8 DTR 9 GND 10 GND 11 DSR 12 DSR 13 RTS 14 RTS 15 CTS 16 CTS 17 RI 18 RI 19 NC 20 NC Table A 15 DisplayPort Connector CN36 Pin S...

Page 50: ...User Manual 40 A 3 12 Audio Connector CN38 16 GND 17 AUX_CH n 18 Hot plug 19 GND 20 DP_PWR Table A 15 DisplayPort Connector CN36 Table A 16 Audio Connector CN38 Pin Signal 1 LOUT1_L 2 LOUT1_R 3 GND 4...

Page 51: ...41 TPC 300 Series TPC B510 User Manual Appendix A Serial Port Settings A 3 13 SIM Connector CN10 Table A 17 SIM Connector CN10 Pin Signal 1 PWR 2 RESET 3 CLK 4 NA 5 GND 6 VPP 7 DATA...

Page 52: ...TPC 300 Series TPC B510 User Manual 42...

Page 53: ...Appendix B B Driver Installation Configuration...

Page 54: ...B 1 Intel Chipset Software Installation Utility Follow the steps below to install the Intel Chipset Software Installation Utility 1 Launch Driver Root Path 01 MIO 5373_Chipset Driver_Win10 32 64bit 2...

Page 55: ...45 TPC 300 Series TPC B510 User Manual Appendix B Driver Installation Configuration 4 Click Accept 5 Click Install...

Page 56: ...46 6 Click Restart Now to complete the installation B 2 Intel Graphics Driver Installation Follow the steps below to install the Intel graphics driver 1 Launch folder Driver Root Path 02 graphic_winXX...

Page 57: ...47 TPC 300 Series TPC B510 User Manual Appendix B Driver Installation Configuration 3 Click Next 4 Click Yes...

Page 58: ...TPC 300 Series TPC B510 User Manual 48 5 Click Next 6 Click Next...

Page 59: ...stallation Configuration 7 Select Yes I want to restart this computer now Then click Finish B 3 LAN Driver Installation Follow the steps below to install the LAN driver 1 Launch folder Driver Root Pat...

Page 60: ...TPC 300 Series TPC B510 User Manual 50 3 Click Next 4 Click Next...

Page 61: ...51 TPC 300 Series TPC B510 User Manual Appendix B Driver Installation Configuration 5 Click Next 6 Click Install...

Page 62: ...l 52 7 Click Finish B 4 Intel Management Engine Installation Follow the steps below to install the Intel Trusted Execution Engine driver 1 1 Launch folder Driver Root Path LAN Win7 Install_Win7_7077_X...

Page 63: ...53 TPC 300 Series TPC B510 User Manual Appendix B Driver Installation Configuration 3 Click Next 4 Click Next...

Page 64: ...TPC 300 Series TPC B510 User Manual 54 5 Click Next 6 Click Finish...

Page 65: ...the following TPC models The driver must be installed before operation TPC 312 R833A TPC 312 R853A TPC 312 R873A TPC 315 R833A TPC 315 R853A TPC 315 R873A TPC 317 R833A TPC 317 R853A TPC 317 R873A TPC...

Page 66: ...TPC 300 Series TPC B510 User Manual 56 3 Click Next 4 Click I Agree...

Page 67: ...57 TPC 300 Series TPC B510 User Manual Appendix B Driver Installation Configuration 5 Click Install 6 Click Yes...

Page 68: ...TPC 300 Series TPC B510 User Manual 58 7 Click Finish...

Page 69: ...Appendix C C BIOS Setup...

Page 70: ...rmation is stored in flash ROM to ensure it is retained when the system is powered off C 1 Entering Setup Turn on the computer and check for the patch code If there is a number assigned to the patch c...

Page 71: ...ions presented in blue can be configured The right frame displays the key legend Above the key legend is an area reserved for a text message When an option is selected in the left frame it is highligh...

Page 72: ...n the left frame of the screen such as ACPI Settings and hit enter to access the sub menu for that item Users can display an Advanced BIOS Setup option by highlighting it using the Arrow keys All Adva...

Page 73: ...x C BIOS Setup C 1 2 2 Power Performance CPU Power Management Control Boot performance mode Turbo mode This item allows users to enable disable processor turbo mode regular Intel Speed Step or Intel S...

Page 74: ...by the SKU Disable Turbo GT Frequency Enabled Turbo GT frequency will be disabled Disabled GT frequency is not limited C 1 2 3 PCH FW Configuration ME State Manageability Features State This item all...

Page 75: ...rs to enable disable BIOS ACPI auto configuration Enable Hibernation This item allows users to enable disable the system hibernation function OS S4 Sleep State This option may not be available with so...

Page 76: ...the security device Note The computer must be restarted to change the security device state Platform Hierarchy This item allows users to enable disable platform hierarchy Storage Hierarchy This item a...

Page 77: ...BIOS Setup C 1 2 6 Embedded Controller Configuration Power Saving Mode This item allows users to select the Ite8518 power saving mode Deep Sleep Delay Time This item allows users to set the delay time...

Page 78: ...ver Support This item allows users to enable disable USB mass storage driver support USB S5 Wakeup Support This item allows users to enable disable USB S5 wakeup support USB Transfer Time Out This ite...

Page 79: ...ty of legacy UEFI ROMs Network This item allows users to control the execution of UEFI and legacy network OpROM Storage This item allows users to control the execution of UEFI and legacy storage OpROM...

Page 80: ...2 10 NVMe Configuration C 1 2 11 IT8768E Super IO Configuration Serial Port 1 Configuration This item allows users to set the parameters of Serial Port 1 COM A Serial Port 2 Configuration Serial Port...

Page 81: ...TPC B510 User Manual Appendix C BIOS Setup C 1 3 Chipset Configuration C 1 3 1 System Agent SA Configuration Memory Configuration This item allows users to set the memory configuration parameters Grap...

Page 82: ...A and RST Configuration USB Configuration XHCI Compliance Mode This item allows users to enable disable Compliance mode The default setting is disabled This option must be enabled for Compliance mode...

Page 83: ...73 TPC 300 Series TPC B510 User Manual Appendix C BIOS Setup C 1 4 Security Set Administrator Password...

Page 84: ...ite waiting Bootup NumLock State This item allows users to select the keyboard NumLock state Quiet Boot This item allows users to enable disable quiet boot option Boot Option 1 Boot Option 2 Boot Opti...

Page 85: ...hanges Discard Changes and Reset This item allows users to reset the system without saving changes Save Changes This item allows users to save any changes to the setup options Discard Changes This ite...

Page 86: ...TPC 300 Series TPC B510 User Manual 76...

Page 87: ...77 TPC 300 Series TPC B510 User Manual Appendix C BIOS Setup...

Page 88: ...e subject to change without notice No part of this publication may be reproduced in any form or by any means such as electronically by photocopying recording or otherwise without prior written permiss...

Reviews: