vii
Table of Contents
4.2.3
Advanced BIOS Features setup .................................... 39
Figure 4.3:Advanced BIOS Features setup................... 39
4.2.4
Advanced Chipset Features setup ................................. 40
Figure 4.4:Advanced Chipset Features setup ............... 40
4.2.5
Integrated Peripherals ................................................... 41
Figure 4.5:Integrated Peripherals.................................. 41
4.2.6
Power Management Setup ............................................ 41
Figure 4.6:Power Management Setup........................... 41
4.2.7
PnP/PCI Configurations................................................ 42
Figure 4.7:PnP/PCI Configurations .............................. 42
4.2.8
PC Health Status ........................................................... 42
Figure 4.8:PC Health Status.......................................... 42
4.2.9
Frequency/Voltage Control........................................... 43
Figure 4.9:Frequency/Voltage Control ......................... 43
4.2.10 Load Optimized Defaults.............................................. 44
Figure 4.10:Load BIOS defaults screen........................ 44
4.2.11 Set Password ................................................................. 44
4.2.12 Save & Exit Setup......................................................... 45
4.2.13 Exit Without Saving...................................................... 46
Chapter
5 PCI SVGA Setup ............................................48
5.1
Introduction ..................................................................... 48
5.1.1
Chipset .......................................................................... 48
5.1.2
Display memory............................................................ 48
5.1.3
Display types................................................................. 48
5.1.4
Dual/Simultaneous Display .......................................... 49
Figure 5.1:Selecting Display Settings........................... 49
5.2
Installation of the SVGA Driver ..................................... 50
5.2.1
Installation for Windows 95 ......................................... 50
5.2.2
Installation for Windows 98/Me ................................... 54
5.2.3
Installation for Windows NT ........................................ 59
5.2.4
Installation for Windows 2000 ..................................... 64
5.2.5
Installation for Windows XP ........................................ 69
5.3
Further Information ......................................................... 75
Chapter
6 Audio Setup.....................................................78
6.1
Introduction ..................................................................... 78
6.2
DOS utilities.................................................................... 78
6.2.1
VIA Sound Blaster Pro compatible set up program ..... 78
6.2.2
VIA Sound Blaster Installation..................................... 79
6.3
Driver installation............................................................ 79
6.3.1
Before you begin........................................................... 79
6.3.2
Windows 95/98 drivers................................................. 80
6.3.3
Windows NT drivers..................................................... 87
6.3.4
Windows 2000 Drivers ................................................. 90
Summary of Contents for PCM-9577
Page 10: ...PCM 9577 User s Manual x...
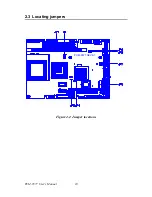
Page 20: ...PCM 9577 User s Manual 10 2 3 Locating jumpers Figure 2 1 Jumper locations PCM 9577 REV A1...
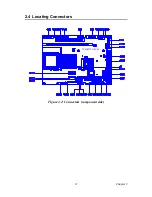
Page 21: ...11 Chapter2 2 4 Locating Connectors Figure 2 2 Connectors component side PCM 9577 REV A1...
Page 38: ...PCM 9577 User s Manual 28...
Page 44: ...PCM 9577 User s Manual 34...
Page 61: ...51 Chapter5 2 Choose the Adapter tab then press the Change button 3 Press the Have Disk button...
Page 65: ...55 Chapter5 2 Select Adapter then Change...
Page 66: ...PCM 9577 User s Manual 56 3 Press Next then Display a list 4 Press the Have disk button...
Page 70: ...PCM 9577 User s Manual 60 2 Choose the Settings tab and press the Display Type button...
Page 71: ...61 Chapter5 3 Press the Change button...
Page 75: ...65 Chapter5 2 Choose the Video Controller VGA Compatible button...
Page 76: ...PCM 9577 User s Manual 66 3 Choose the Drive button press Update Driver button...
Page 80: ...PCM 9577 User s Manual 70 2 Choose Hardware and Device Manager press OK button...
Page 81: ...71 Chapter5 3 Choose Video Controller VGA Compatible press OK button...
Page 86: ...PCM 9577 User s Manual 76...
Page 103: ...93 Chapter6 8 Press Next button 9 Press Finish to reboot...
Page 104: ...PCM 9577 User s Manual 94...
Page 110: ...PCM 9577 User s Manual 100 7 2 3 Installation for Windows 2000 1 Open Device Manager...
Page 111: ...101 Chapter7 2...
Page 112: ...PCM 9577 User s Manual 102 3 4...
Page 113: ...103 Chapter7 5 6...
Page 114: ...PCM 9577 User s Manual 104 7 8...
Page 116: ...PCM 9577 User s Manual 106 2 a Choose type of network b Click Next 3 a Click Select from list...
Page 118: ...PCM 9577 User s Manual 108 6 Check the highlighted item and click OK...
Page 119: ...109 Chapter7 7 Click Next to continue setup 8 Choose the networking protocols then click Next...
Page 122: ...PCM 9577 User s Manual 112...
Page 126: ...PCM 9577 User s Manual 116...
Page 129: ...119 AppendixB Figure B 1 PC 104 module mounting diagram...
Page 130: ...PCM 9577 User s Manual 120 Figure B 2 PC 104 module dimensions mm 0 1...
Page 156: ...PCM 9577 User s Manual 146...
Page 161: ...Appendix E Optional Extras for the PCM 9577...
Page 165: ...Appendix F Mechanical Drawings...
Page 167: ...157 AppendixF Figure F 2 PCM 9577 Mechanical Drawing solder side PCM 9577 REV A1...
Page 168: ...PCM 9577 User s Manual 158...


