145
Appendix C
3. 8PMJ = 8 position modular jack connector pin, hereinafter referred to as RJ45 (see IEC
603-7:1990), see Table 2-4 for details.
4. Note: These signals are optional and are defined to provide convenient access to LAN
signals without cabling. However, due to voltage limitations of the Type III connector,
additional insulation or engineering will be required to meet IEEE 802.3 and 802.5 elec-
trical isolation requirements.
5. Work in progress by the Mini PCI Working Group System Connector Sub Group.
91
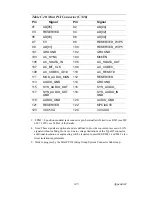
AD[05]
92
AD[04]
93
RESERVED
94
AD[02]
95
AD[03]
96
AD[00]
97
5V
98
RESERVED_WIP5
99
AD[01]
100
RESERVED_WIP5
101
GROUND
102
GROUND
103
AC_SYNC
104
M66EN
105
AC_SDATA_IN
106
AC_SDATA_OUT
107
AC_BIT_CLK
108
AC_CODEC_
109
AC_CODEC_ID1#
110
AC_RESET#
111
MOD_AUDIO_MON
112
RESERVED
113
AUDIO_GND
114
GROUND
115
SYS_AUDIO_OUT
116
SYS_AUDIO_
117
SYS_AUDIO_OUT
GND
118
SYS_AUDIO_IN
GND
119
AUDIO_GND
120
AUDIO_GND
121
RESERVED
122
MPCIACT#
123
VCC5VA
124
3.3VAUX
Table C.28: Mini PCI Connector (CN28)
Pin
Signal
Pin
Signal
Summary of Contents for PCM-9577
Page 10: ...PCM 9577 User s Manual x...
Page 20: ...PCM 9577 User s Manual 10 2 3 Locating jumpers Figure 2 1 Jumper locations PCM 9577 REV A1...
Page 21: ...11 Chapter2 2 4 Locating Connectors Figure 2 2 Connectors component side PCM 9577 REV A1...
Page 38: ...PCM 9577 User s Manual 28...
Page 44: ...PCM 9577 User s Manual 34...
Page 61: ...51 Chapter5 2 Choose the Adapter tab then press the Change button 3 Press the Have Disk button...
Page 65: ...55 Chapter5 2 Select Adapter then Change...
Page 66: ...PCM 9577 User s Manual 56 3 Press Next then Display a list 4 Press the Have disk button...
Page 70: ...PCM 9577 User s Manual 60 2 Choose the Settings tab and press the Display Type button...
Page 71: ...61 Chapter5 3 Press the Change button...
Page 75: ...65 Chapter5 2 Choose the Video Controller VGA Compatible button...
Page 76: ...PCM 9577 User s Manual 66 3 Choose the Drive button press Update Driver button...
Page 80: ...PCM 9577 User s Manual 70 2 Choose Hardware and Device Manager press OK button...
Page 81: ...71 Chapter5 3 Choose Video Controller VGA Compatible press OK button...
Page 86: ...PCM 9577 User s Manual 76...
Page 103: ...93 Chapter6 8 Press Next button 9 Press Finish to reboot...
Page 104: ...PCM 9577 User s Manual 94...
Page 110: ...PCM 9577 User s Manual 100 7 2 3 Installation for Windows 2000 1 Open Device Manager...
Page 111: ...101 Chapter7 2...
Page 112: ...PCM 9577 User s Manual 102 3 4...
Page 113: ...103 Chapter7 5 6...
Page 114: ...PCM 9577 User s Manual 104 7 8...
Page 116: ...PCM 9577 User s Manual 106 2 a Choose type of network b Click Next 3 a Click Select from list...
Page 118: ...PCM 9577 User s Manual 108 6 Check the highlighted item and click OK...
Page 119: ...109 Chapter7 7 Click Next to continue setup 8 Choose the networking protocols then click Next...
Page 122: ...PCM 9577 User s Manual 112...
Page 126: ...PCM 9577 User s Manual 116...
Page 129: ...119 AppendixB Figure B 1 PC 104 module mounting diagram...
Page 130: ...PCM 9577 User s Manual 120 Figure B 2 PC 104 module dimensions mm 0 1...
Page 156: ...PCM 9577 User s Manual 146...
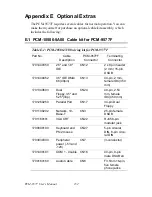
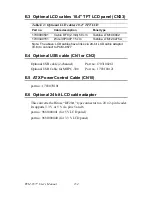
Page 161: ...Appendix E Optional Extras for the PCM 9577...
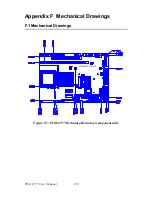
Page 165: ...Appendix F Mechanical Drawings...
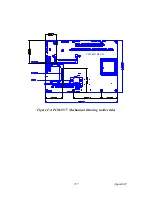
Page 167: ...157 AppendixF Figure F 2 PCM 9577 Mechanical Drawing solder side PCM 9577 REV A1...
Page 168: ...PCM 9577 User s Manual 158...


