background image


9/04/2015 

Free Standing Kiosk

 Assembly and Operation Instructions 

www.advancedkiosks.com


8


Additional USB Ports 

 
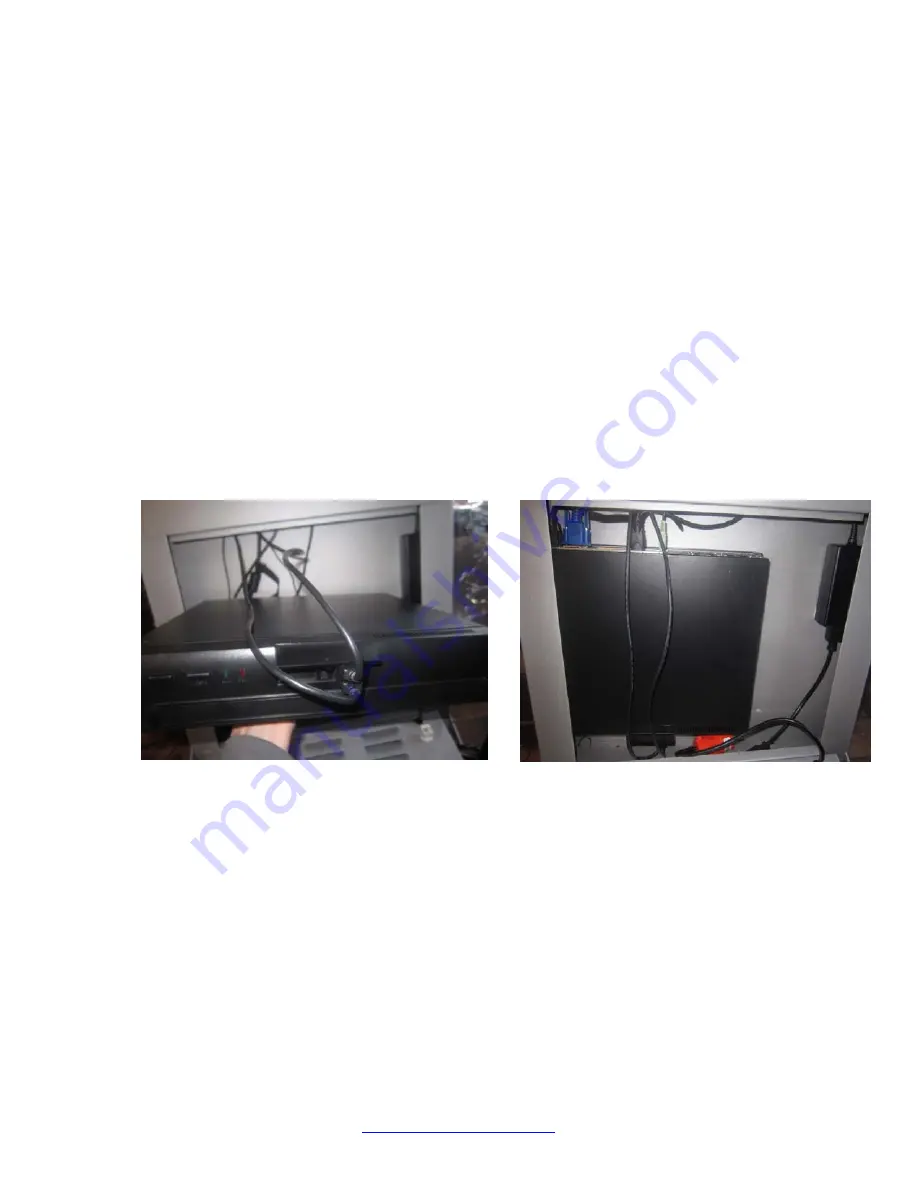
The standard Free Standing Kiosk requires five USB connections. If additional 
peripherals (e.g. credit card reader, biometrics) are included in your kiosk you may need 
to utilize the two USB ports located on the bottom (when located in kiosk) of the 
computer. 
 
Once the standard devices have been plugged in lay the computer flat. This will give you 
access the front the computer. Plug in the two longer USB cords into the front USB ports 
of the kiosks’ computer. Carefully place the computer into the kiosk. 
 
*Note: If the two external USB ports located on the back of the kiosk are not needed for 
daily operation, it is perfectly acceptable to leave them unplugged from the computer and 
to allow additional devices to be used in those ports instead. 


Summary of Contents for Free Standing Kiosk

Page 1: ...Important Read this whole manual before assembling Owners Manual for Free Standing Kiosk with WiFi Mag Strip Reader VIOP Printer and Keyboard options AK FSK OM 09 04 15 Engage Interact Satisfy ...

Page 2: ...UIPMENT 12 Label Printer 12 Receipt Printer 13 Bar Code Reader 14 External Keyboard Installation 16 SETUP AND OPERATION 18 BASIC SETUP 18 Before Powering On the Kiosk 18 Startup 19 Back Up Your Information 20 Adjusting Speaker Volume 20 SPECIFICATIONS 21 COMPUTER 21 Mini ITX Main board 21 Power Requirements 22 General Dimensional Information 22 Equipment Manuals 23 SOLVING PROBLEMS 24 Troubleshoot...

Page 3: ...ofessional or Windows 7 Precautions Do not assemble the kiosk until all the directions have been read and understood Do not plug in the power until all the directions have been read and the kiosk is fully assembled Do not use kiosk with an extension cord that does not have grounding When moving the kiosk using the wheels never run only walk with the kiosk in a controlled manner Running or not havi...

Page 4: ...read and follow the directions in this document as well as the directions for the touch screen monitor and the computer These documents are included with your equipment or may be on the computer as a PDF We strongly suggest you read these documents so that you can get the full value of this kiosk The following are questions we can not answer o Network questions This is not part of our equipment an...

Page 5: ...when signing for the shipment Your kiosk has been shipped fully insured so please keep any shipping paperwork If damage has occurred it is recommended that you take pictures of the damaged Any damage due to shipping must be reported to Advanced Kiosk within 48 hours after the arrival of the shipment After this allotted time shipping insurance is void Unpacking the Kiosk The Free Standing Kiosk is ...

Page 6: ... software are contained in a bag inside the box tapped to the front of the kiosk Keep the keys in a safe place Note Advanced Kiosks does not record key numbers Hint Write down the number and manufacturer that are on the key and keep it in a safe place If you loose your keys you will be able to call Advanced Kiosks and have it remade Note Keep the boxes and packaging material that the kiosk and com...

Page 7: ... is much easier Set the computer right next to the kiosk s opening and plug the cables in there When installing the computer it is important to follow the orientation label The fans need to be centered and pointing up This is required for the kiosk to cool efficiently The following cables should be connected for a standard Free Standing Kiosk Note The USB plugs are not port specific and can be plu...

Page 8: ...ttom when located in kiosk of the computer Once the standard devices have been plugged in lay the computer flat This will give you access the front the computer Plug in the two longer USB cords into the front USB ports of the kiosks computer Carefully place the computer into the kiosk Note If the two external USB ports located on the back of the kiosk are not needed for daily operation it is perfe...

Page 9: ...obble Securing the Kiosk to the Floor There are two holes located in the back of the base for securing the kiosk to the floor see image below these holes are located 17 inches apart Place the kiosk in the location that you want it to be mounted at keeping enough room for people to use the kiosk and not interrupt the flow of traffic Use the kiosk as a template and mark the location of the holes Dri...

Page 10: ...om of the kiosk one in each corner Prepare the wall to attach the Wall Bracket The bracket has 6 holes The holes in the wall need to be 38 inches off the floor These holes must be able to take a 300 lbs pull load to securely hold the kiosk It is recommended that the bracket be mounted into a stud Use the anchor chart below to help with this If you are using a different type of anchor make sure tha...

Page 11: ...9 04 2015 Free Standing Kiosk Assembly and Operation Instructions www advancedkiosks com 11 FreeStanding Wall Mount Dimensions ...

Page 12: ...secure the shelf to the outside of the kiosk See pictures below Top view of printer shelf Bottom View Printer shelf with Power supply attached Once the printer shelf is installed place the printer on the shelf Before sliding the printer forwards pull out some of the media to make sure that the printer paper lines up with the printer slot The label should exit the middle of the slot Having the labe...

Page 13: ...Printer The APS receipt printer is mounted to a plate to make servicing the printer easy The printer is mounted in the kiosk upside down in reference to the labels on the printer This makes it easy for the user to connect the power cable and the USB cables The Printer is held in place by 2 8 wing nuts ...

Page 14: ...ies to only the Honeywell MS9520 Hand held scanner If you have another type of scanner that you have purchased try using industrial Velcro to hold the handle to the side of the kiosk To mount the MS9520 hand held scanner please proceed with the following steps You will need the following parts for each kiosk A 3 0 inch long 8 32 pan head machine screw two 8 nuts and blue lock tight the type that c...

Page 15: ...ad in the mount Scanner Bracket parts 2 The above picture shows how the parts need to be assembled Using the 3 inch long screw put the 8 washer followed by the plastic washer longer barrel ends toward the washer the scanner bracket head the other plastic spacer longer barrel end away from bracket head Spacer and fender washer 3 The above assembly can now be screwed in to the blind threaded hole on...

Page 16: ...yboard Cord coming out the side of Tray Cord coming out hole in back Cord coming out the side of Tray Cord coming out hole in back If this is a permanent installation the knock out hole in the front of the kiosk will need to be punched out You will need a hammer and a metal punch or screw driver to knock out the plug First locate the knock out It is under the speaker holes on the right side above ...

Page 17: ...board can be assembled to the front of the kiosk Use a hex wrench and socket head screws to secure the keyboard to the kiosk There are 4 holes on each side of the keyboard The bottom holes must be installed first then choose which of the two top holes are best for the angle of the keyboard you would like ...

Page 18: ... s possible for cables to become loose or unplugged during shipping Attach the included Wi Fi antenna to the threaded connection on the back of the kiosk Plug the kiosk into a standard 110v wall outlet Note It is possible for a power cord to exit the bottom of the kiosk and connect directly to a floor outlet but the kiosk MUST be secured to the floor to prevent the cord from being damaged See Perm...

Page 19: ... finger Align the monitor by selecting this icon located on your desktop or control panel A copy of this Free Standing Kiosk manual is located on your desktop Drivers and other product manuals are located on your computer here Start Menu Documents Kiosk Files The Free Standing Kiosk comes standard with Wi Fi This hardware is installed already however you will need to configure the settings to conn...

Page 20: ...therboards malfunction electrical storms strike and CPUs call it quits taking our precious data with them Advanced Kiosks cannot recover your data If a replacement or repaired kiosk is required it will be shipped setup with our standard format Adjusting Speaker Volume This speaker bar uses a USB connection for amplified power If you are connecting your own speaker system disconnect the USB and aud...

Page 21: ...DDR3 DIMMS support DDR3 1066 SDRAM Total Max 8GB Expansion Slots 1 PCIE x16 slot supports up to PCIE x4 speed Onboard Serial ATA 4 SATA 6Gb s ports Onboard USB 8 USB 2 0 ports Onboard LAN Realtek RTL8111E 10 100 1000 Onboard Audio Integrated Realtek Audio Supports 7 1 channel audio out Back Panel I O 1 PS 2 mouse keyboard combo port 1 VGA port 1 HDMI port 8 USB ports 1 Coaxial S PDIF out port 1Opt...

Page 22: ... s standard components Over time manufactures may change these setting please review the manual that comes with each of the following components for the most recent power information Computer 12 Vdc 5A Computer Power Supply 100 240 Vac 2 0 A 50 60 Hz Monitor 12 Vdc 4 16 A Monitor Power Supply 100 240 Vac 1 5 A 50 60 Hz Speaker 5 Vdc 500 mA General Dimensional Information ...

Page 23: ... kiosk Drivers and other product manuals are located on your computer here Start Menu Documents Kiosk Files Please keep these in a safe place It is recommended that all serial numbers are also written down Serial Numbers Write all you equipment Serial Numbers here and keep this document in a safe place Serial ____________________ Key ____________________ Color __________________ Windows Product Ke...

Page 24: ...oblem started review the installation procedures and ensure that the part is correctly installed If a peripheral device does not work ensure that the device is properly connected and the appropriate drivers are installed If an error message occurs in a program check the program s documentation for the cause If the Touch Screen repeatedly looses alignment check for updated drivers and that the USB ...

Page 25: ...n above is from the ELO website www elotouch com Support TechnicalSupport cleaning asp Stainless Steel Cleaning and Maintenance The brushed Stainless Steel should be cleaned with a Stainless Steel Cleaner and a damp cloth Please read and follow all the directions on any product you use This is available at most automotive boat and hardware stores Be careful not to get this on the monitor since thi...

Page 26: ... the kiosk and the electronics It does not cover damage due to misuse vandalism water damage etc Any modification of the kiosk will void the warranty All replacements will be shipped back ground or freight Reformatting the HDD and or reinstalling the operating system do to file corruption or any reason not related to defective hardware is not included under this warranty and would have associated ...

Reviews: