Adobe
Photoshop Elements 2.0
ST. PATRICK’S DAY PROJECT
Photoshop Elements 2.0: St. Patrick’s Day Project
7
17.
Note that as you create each hill, a new layer is added to your
Layers palette. These layers will be titled shape 1, shape 2,
shape 3, etc. It is important to remember which layer is
associated with which hill as you will be working on
individual layers to create a 3D effect. If you want to re-label
each layer to distinguish them more easily, double-click on
the layer title and type in a new title in the dialog Box that
opens.
18.
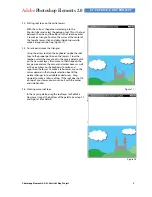
Creating a 3D effect on the hills.
In the Layers palette, click on the right-most hill layer to
activate it. In the Layer palette click the Layer Styles tab. Click
and hold on the small down-pointing arrow in the top left
corner to see the submenu. Click on Drop Shadows. Select
the Soft Edge shadow. A shadow will appear to the right of
the hill. Select each hill in the Layers palette and apply the
Soft Edge shadow to see your hills look as though they are
standing away from the page (Figure 12).
19.
Creating the Castle.
In the palette well, click on the Swatches tab, and select a
medium gray. In the options bar, select the rectangle-shape
tool, which is second from the left next to the arrow (Figure 13).
20.
A little right of center on top of the highest hill, click and drag a tall, narrow rectangle. This will be the first
tower of your castle (Figure 14).
Figure 12
Figure 14
Figure 13


