12
Installation
5.
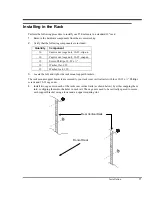
Secure the right and left side rack mount support brackets to the racks rear vertical rails using a 10-32 x
½” Phillips screw in each cage nut as shown below.
The T5 Enclosure is secured to your racks front vertical rails with four 10-32 x ½” Phillips screws and 10-32
cage nuts.
6.
Install two cage nuts in each of the racks front vertical rails by either snapping them into, or slipping
them into the holes in each rail. The cage nuts should be at the same vertical height as those securing the
support brackets.
7.
Remove the front bezel from the T5 Enclosure. It is held in place by four ball studs. Simply pull the
bezel off of the ball studs and set it aside.
8.
If necessary, obtain assistance to hold your T5 Enclosure chassis in the rack where it will be located.
The rack mount support brackets are designed to support the rear of the T5 chassis. Place the T5
Enclosure so that it rests on the support brackets at the rear.
Rear Vertical Rails
Support Brackets
Front of Rack
Summary of Contents for Tape Array 5
Page 1: ...Installation and O perating Guide Tape Array 5 Rackmount Enclosure...
Page 8: ...viii Blank Page...
Page 10: ...x Table of Contents Blank Page...
Page 16: ...6 Introduction Blank Page...
Page 24: ...14 Installation Blank Page...
Page 25: ...15 Chapter 3 Operation and Maintenance This Chapter p explains how to operate the T5 Enclosure...
Page 40: ...30 Operation and Maintenance Blank Page...
Page 44: ...34 Troubleshooting and Diagnostics Blank Page...
Page 45: ...35 Appendix A Specifications This Appendix p contains specification information on the T5...


