ADE STAN07 Operating Manual Download Page 22

21 

STAN07-210324-Rev005-UM-en


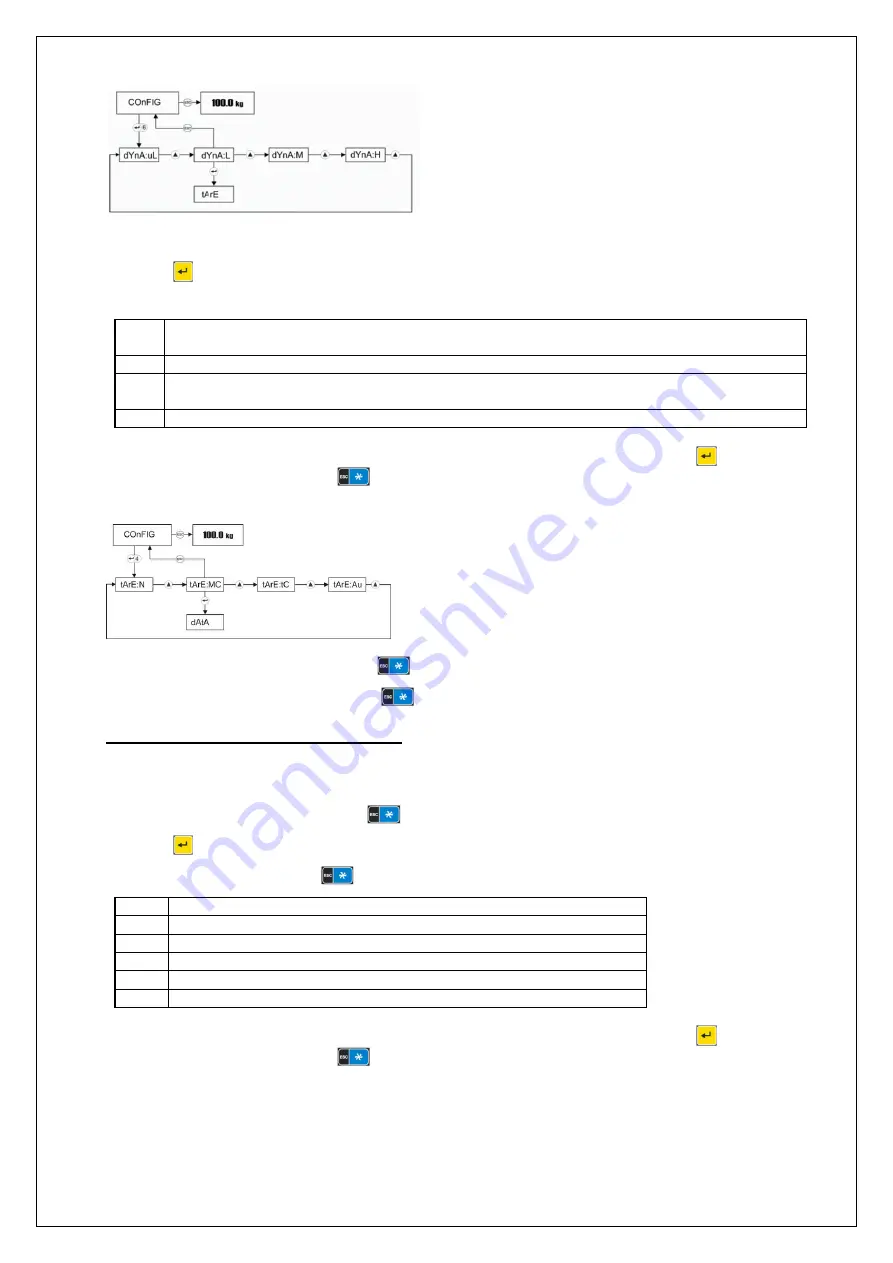
Presetting the tare function [tArE] 

Press the 

 key six times when [COnFIG] appears in the display. [tArE:] appears in the display. 

The scale offers four options for tare presetting: 

Mt 

Multi Tare - Tare value remains in the tare memory until tared again with unloaded weighing 
platform or the reset key is pressed 

Disables the tare key. Taring is not possible. 

AU 

Automatic Tare - Allows automatic taring without pressing the tare key when weighing in 
weighing mode. The tare weight must be greater than 20d. 

tC 

Tare Clear - For simultaneous deletion and overwriting of the tare memory. 

By means of the ▲ and ▼ keys, select the desired setting and confirm your choice with 

 to change 

to the next menu item or press the 

 key to return to the previous menu item. 

The following diagram shows the procedure: 


To exit the tare settings menu, press the 

 key. 

To exit the configuration menu, press the 

 key again. 

Programming the two multi-function keys 

The  indicator  has  two  programmable  multi-function  keys,  which  can  be  configured  by  the  user  for 
different functions. 

Programming the multi-function key 


Press the 

 key twice when [ConFiG] appears in the display. [-kEY:] appears in the display. 

To assign the multi-function key 

, you have six different programming options:  

Disabled. 

PC 

Piece counting. 

In 

Weighing with high resolution. 

Gn 

Switching between gross and net weight display. 

Un 

Change the weight units. 

An 

Animal weighing function. 

By means of the ▲ and ▼ keys, select the desired setting and confirm your choice with 

 to change 

to the next menu item or press the 

 key to return to the previous menu item. 

Summary of Contents for STAN07

Page 1: ...Operating Manual Industrial Electronic Scales Industrial Indicator STAN07 STAN07 210324 Rev005 UM en...

Page 2: ...ighing and piece counting mode 11 Average piece weights APW CLU 12 Performing check weighing in weighing mode 13 Conducting quantity inspections in piece counting mode 14 Gross net function 14 Animal...

Page 3: ...en 2 7 Care maintenance recalibration 29 Cleaning 29 Error messages 29 Safety information 30 Disposal 30 Storage and Transport Conditions 31 Guarantee 31 Recalibration 31 8 Technical Data 31 9 Declar...

Page 4: ...metrology Please note all safety instructions Assembly The ADE indicator STAN07 is suitable for wall and base mounting and as a standalone unit on a table The installation of the device will enable t...

Page 5: ...rged every month After use they should be fully charged Storage of the indicator in a discharged state leads to a shorter battery life If the scale is officially certified it may not be brought into u...

Page 6: ...The device can optionally be used with the battery or power operation Features Stainless steel case Large LCD display with multi colour backlighting 25 mm digit height Weighing taring counting summin...

Page 7: ...with unloaded weighing platform 5 Navigation keys Left right up and down and confirmation For use in setup and for changing numeric values 6 Key to clear memory Clears the total accumulated value fro...

Page 8: ...e battery charge status During charging the status indicator moves Battery empty level indicator Indicates that the batteries are almost empty and must be charged immediately 3 Function Operation of t...

Page 9: ...owledges the tare operation with a beep the display shows 0 and appears Now place the item to be weighed into the container and the display shows the net weight After unloading the weighing platform t...

Page 10: ...orrect count Switch on the indicator with an unloaded weighing platform Then press the key for more than one second to enter piece counting mode The display now shows the reference quantity 10 or the...

Page 11: ...Counting pieces when removing from a container In weighing mode place the full container with the parts on the weighing platform and press the key The display shows and appears If necessary you can e...

Page 12: ...The target values PLU ALU can be stored either exactly target or as tolerance values with maximum and minimum values HI or LO For data entry of a PLU ALU hold the key for more than one second in weigh...

Page 13: ...he average piece weight The following diagram shows the procedure Average piece weights APW CLU With the indicator you can store up to 100 average piece weights APW in CLU Count Look Up Determine the...

Page 14: ...ss the key to select Y and confirm with the key The number of the PLU appears in the display for example PLU 00 Select the desired PLU using the navigation keys and or and and confirm your selection w...

Page 15: ...inspection function can also be supported visually by a colour change of the display Using three different changing background colours the degree of achievement of the target amount can be displayed T...

Page 16: ...Switch back to the primary weight unit by pressing the key again The storage of PLU and CLU weight data should only be performed in the primary weight unit weight unit that appears after switching on...

Page 17: ...PLU memory menu PLUPrO Stored target values in a PLU are required for check weighing in weighing mode The procedure for storing and recalling the PLU values is further described above Storing target a...

Page 18: ...one as an audible signal for tolerance weighing and counting you have three options Ou Warning tone when the weight is outside the limits In Warning tone when the weight is within the limits H Warning...

Page 19: ...shows the procedure Basic setting of the backlight LiGH Press the key when bLIGHt appears in the display LiGH appears in the display For the backlight there are three different programming options OF...

Page 20: ...or the background colour for visual warning when exceeding or falling below target values Below Within the tolerance range Above rE Red Green Yellow YE Yellow Green Red By means of the and keys select...

Page 21: ...he scale To this end you have three options available L Faster response time with low filter M Medium setting recommended H Slower reaction time with high filter By means of the and keys select the de...

Page 22: ...the next menu item or press the key to return to the previous menu item The following diagram shows the procedure To exit the tare settings menu press the key To exit the configuration menu press the...

Page 23: ...elect the desired setting and confirm your choice with to change to the next menu item or press the key to return to the previous menu item The following diagram shows the procedure 5 RS232 interface...

Page 24: ...described above To print press the key when the display shows a stable weighing result Depending on the weighing mode various print formats can be chosen the changes are made to the parameter setting...

Page 25: ...and confirm again with the key when SPOrt1 appears in the display By means of the and keys select the desired setting and confirm your choice with to change to the next menu item or press the key to r...

Page 26: ...d setting and confirm your choice with to change to the next menu item or press the key to return to the previous menu item The following diagram shows the procedure Selection of the output device to...

Page 27: ...Weight negative 1 Error 1 Unstable Always 1 1 Zeroed with power on zero X 1 0 0 XXXXXO 1 0 X 1 0 1 0 XXXXXX 0 1 X 2 1 1 0 XXXXX X 1 1 X 5 0 Gross 0 Weight positive 0 No Error 0 Stable 0 Not power on z...

Page 28: ...g the printing language LAnG To select the language you have five options En English ES Spanish Fr French dE German tr Turkish Using the and keys select the desired language and confirm the selection...

Page 29: ...the date format ForM Once CLoCk is displayed press the key ForM appears in the display To select the date format you have three options d DD MM YY day month year m MM DD YY month day year y YY MM DD y...

Page 30: ...supply When cleaning do not use any aggressive cleaning agents but only a cloth and water or neutral disinfectant The display can be cleaned under running water Make sure that the indicator is disconn...

Page 31: ...t Replace the motherboard Err 37 Scales are not sufficiently stable for calibration Err 70 Maximum capacity is higher than 60kg Reduce the capacity of the scales Err XX All other errors Disconnect the...

Page 32: ...re the indicator was purchased is responsible Recalibration According to the national regulations of the legislature only authorized companies or authorized personnel can perform recalibration On the...

Page 33: ...items in piece counting mode ALU memory for 100 amounts in piece counting mode Summing in weighing and counting modes Overload indicator Automatic shutdown after 1 2 3 4 or 5 minutes and can be disab...

Page 34: ...I directive 2014 31 EU EMC Directive 2014 30 EU Low voltage directive 2014 35 EU RoHS Directive 2011 65 EC in their respectively applicable versions The declaration becomes invalid if a change not agr...

Page 35: ...STAN07 210324 Rev005 UM en 34...

Page 36: ...35 STAN07 210324 Rev005 UM en Distributor...

Reviews: