background image

175

XX

Bluetooth

® HandsFreeLink®

X

Making a Call

Bl

ueto

oth

® HandsFreeLink®

H

PHONE button


X

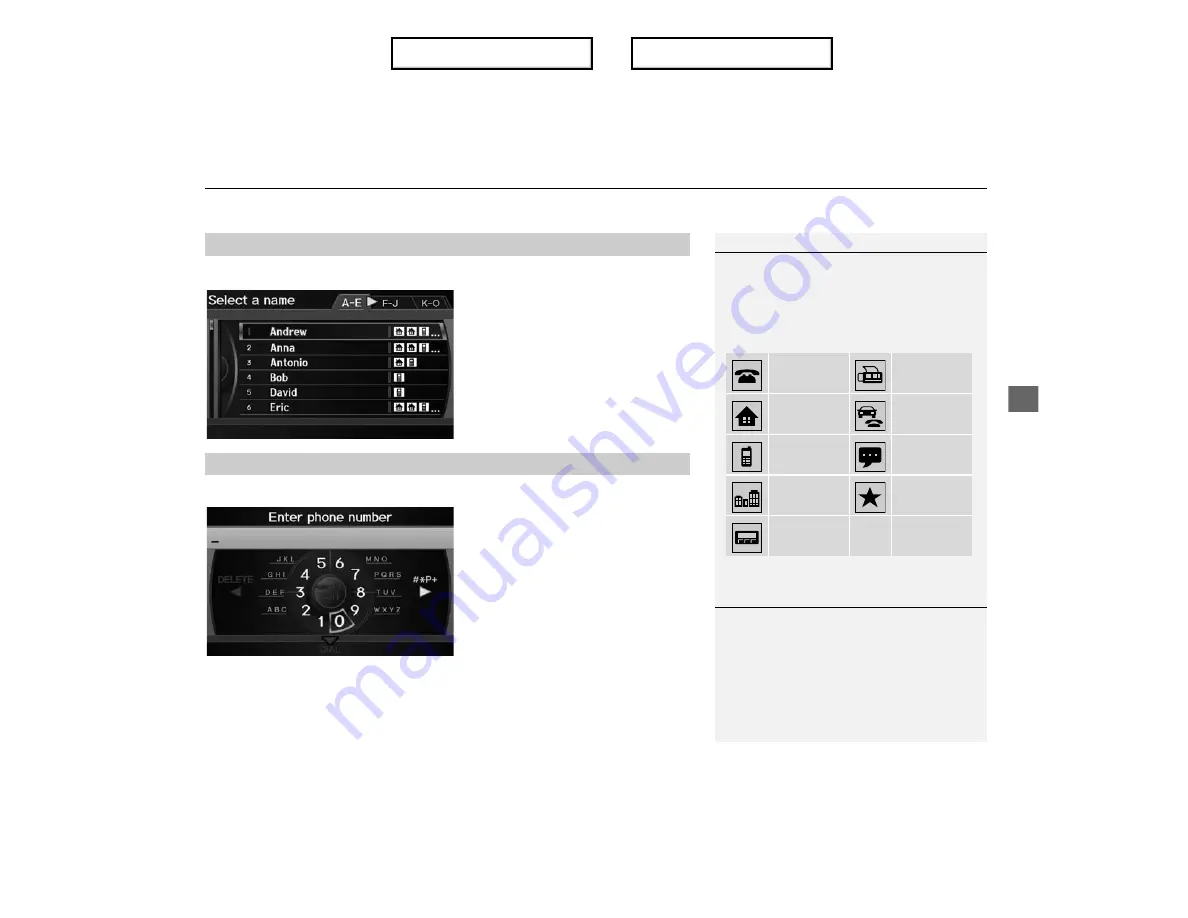
 Phone Book

1.

Rotate 

i

 to select a name. Press 

u

.

X

Move 

w

 or 

y

 to select 

alphabetical tabs to display the 
entries in the group.

2.

Rotate 

i

 to select a number. 

Press 

u

 to begin dialing.

H

PHONE button


X

 Dial

1.

Enter a phone number.

2.

Move 

r

 to select 

DIAL

 to begin 

dialing.

Using the Phonebook

1

Using the Phonebook

Your phonebook is automatically imported when 
the phone is paired.

Up to three icons are displayed for each 
phonebook entry. If there are more than three 
numbers for an entry, “…” is displayed.

This feature is not available on all phones.

Preference

Fax

Home

Car

Mobile

Voice

Work

Other

Pager

Entering a Phone Number

1

Entering a Phone Number

A command that consists of several words can be 
spoken together. For example, say 

d


“123-456-

7890”

 at once.

Continued

Index

Table of contents

Summary of Contents for ILX 2013

Page 1: ...when stopped As you drive listen to the audible instructions and use voice commands when possible Pull to the side of the road if you need more time to look at the screen or operate the controls Route...

Page 2: ...158 Audio Remote Controls 159 2 Bluetooth HandsFreeLink P 161 Bluetooth HandsFreeLink 162 Pairing a Phone 164 Setting Up Speed Dialing 169 Editing User Name and PIN 171 Phone Setup 172 Making a Call 1...

Page 3: ...re home addresses P41 Register 2 home addresses Store contacts P37 Store up to 200 contacts in address book Enter destination P64 Select your destination using 12 methods Select route P88 Set route pr...

Page 4: ...iPod P147 USB Flash Drive P152 Bluetooth Audio P156 Voice Control P22 Use voice commands to control the system while driving You can operate all key functions of the navigation audio Bluetooth HandsFr...

Page 5: ...DIO Button P7 6 TUNE Bar P6 7 XM Button P130 lg MAP GUIDE Button P100 lh CANCEL Button mc Interface Dial ENTER Button P8 5 CATEGORY Bar P6 Navigation Screen Audio Navigation Voice Control Bluetooth Ha...

Page 6: ...nd the system beeps when ready for a command Press the K Back button to cancel Available voice commands are highlighted on the screen d Talk Button The audio system is muted during voice control mode...

Page 7: ...tracks or press and hold to fast reverse forward Disc SCAN Plays 10 second sample of each station FM AM channel XM or track Disc Press again to play the current selection TUNE Tunes to next frequency...

Page 8: ...Drive P152 Band Stereo indicator Presets Tune scan and other functions iPod mode HDD mode USB mode Search menu Track list Repeat shuffle and other functions Compact Disc P133 Bluetooth Audio P156 Disc...

Page 9: ...Map screens Highlights menu options Menu screens Rotate dial Press ENTER Move up Move left Move down Move right Scrolls map 8 directions Map screens Selects labeled function Menu screens Selects funct...

Page 10: ...d Five to select item 5 z Say d Up or d Previous to scroll up one page z Say d Down or d Next to scroll down one page Using the Interface Dial Rotate i to highlight a character The pound symbol or at...

Page 11: ...108 Current vehicle position P106 Feature areas Streets Landmark icons P103 Park Hospital Shopping Mall Golf Course Airport Business Water Area Cemetery University Highways State routes Verified stree...

Page 12: ...ination Distance of the actual route Estimated time to destination Waypoint P112 Destination icon P89 Calculated route unverified roads P91 Calculated route P90 Street name of guidance point Route gui...

Page 13: ...e Rotate i to select Edit Name Press u f Enter a name g Rotate i to select Edit Address Press u h Rotate i to select Address Press u i Enter an address j Rotate i to select Edit Phone No Press u k Ent...

Page 14: ...ct Street Press u d Enter the name of your destination street e Rotate i to select your destination street from the list Press u f Enter the street number Move r to select OK when finished g If there...

Page 15: ...ed e Move r to select OK Changing Your Destination There are four methods you can use to specify a new destination during route guidance z Say d Find Nearest P117 Searches for the nearest place landma...

Page 16: ...es the clock may keep adjusting the time You can turn this feature off 2 Clock Adjustment P 55 How do I specify a destination when an entered city or street could not be found Try entering the street...

Page 17: ...ntering a destination from the Address Book Then go to that chapter to view a more specific table of contents Searching the Index P229 Menu items displayed on the navigation screen e g Address Book ca...

Page 18: ...an also be activated with voice commands Press the hard button on the system control panel Press the DEST ROUTE button Select the menu option with the Interface Dial Rotate i to select Address Book Pr...

Page 19: ...18 NOTE Index Table of contents...

Page 20: ...Setting 32 Personal Information 36 Address Book 37 Home Addresses 41 PIN Numbers 42 Previous Destinations 43 Music Search Setup 44 Song By Voice SBV 45 Phonetic Modification 46 Routing Guidance 48 Rer...

Page 21: ...ers they are displayed Proceed to step 4 1 Start up If the navigation system loses power at any time you may need to press and hold the VOL 9 Volume Power button for more than two seconds or you may b...

Page 22: ...the reminder off Certain manual functions are disabled or inoperable while the vehicle is in motion You cannot select a grayed out option until the vehicle is stopped Voice commands are still operable...

Page 23: ...onfirmation or asks you for further information If you do not wish to hear this feedback you can turn it off However listening to the feedback will help familiarise you with the way the system expects...

Page 24: ...st the dashboard and side vents so air does not blow onto the microphone on the ceiling Speak clearly in a clear natural speaking voice without pausing between words Reduce any background noise if pos...

Page 25: ...black level Volume Adjusts the navigation system volume level 1 Display and Volume Settings You can set separate daytime and night time settings for Brightness Contrast and Black Level Adjust each set...

Page 26: ...ss u The following options are available ON Always reads the selection AUTO factory default Reads the selection only when the vehicle is moving OFF Disables the feature 1 Interface Dial Feedback You c...

Page 27: ...ult Provides voice control system confirmation or prompts OFF Disables the feature Display Voice Command Tips Alerts you when manual control of the system is disabled to prevent distraction while driv...

Page 28: ...Choose the colour of the navigation map and system menus Rotate i to select an item Press u The following items are available Map Colour Sets the colour of the map screen 2 Map Colour P 28 Menu Colou...

Page 29: ...modes 1 Rotate i to select Day or Night Press u 2 Rotate i to select a colour for the menu screens Press u Map Colour 1 Map Colour For Day mode Set to WHITE factory default is BEIGE to obtain the best...

Page 30: ...onds X Rotate i to adjust the brightness Press u 2 Press the a button again X Repeat the procedure to switch the display modes Switching Display Mode Manually 1 Switching Display Mode Manually A visua...

Page 31: ...Dash illumination adjustment buttons see your Owner s Manual for location 3 When headlights are turned on and you wish to have the Day display mode adjust the illumination to the full brightness sett...

Page 32: ...ens You can choose from three languages English Fran ais French Espa ol Spanish Rotate i to select the system language Press u 1 Language Voice confirmation of cities and streets only occurs when Engl...

Page 33: ...n Rotate i to select an item Press u The following items are available Select wallpaper picture Sets the desired picture for the wallpaper 2 Selecting a Wallpaper Picture P 33 Delete pictures on HDD D...

Page 34: ...tate i to select a picture X The picture is displayed on the screen X Alternatively rotate i to select Blank to disable the wallpaper picture setting 2 Press u to set the wallpaper image Selecting a W...

Page 35: ...e compartment 2 Connecting a USB Flash Drive P 152 You can only import pictures from the root directory Pictures in folders cannot be imported The display size is a fixed 800 u 480 pixels Smaller pict...

Page 36: ...other pictures X Items to be deleted are indicated with a trash icon 2 Move r to select OK 3 Rotate i to select Yes Press u to delete the picture s Deleting Pictures from HDD 1 Deleting Pictures from...

Page 37: ...owing items are available Address Book Stores new addresses or edits your address book 2 Address Book P 37 Home Address 1 Sets or edits your home address 2 Home Addresses P 41 Home Address 2 Sets or e...

Page 38: ...lains how to enter the name and address 1 Rotate i to select New Address Press u 1 Address Book If you have PIN protected your address book enter your PIN when prompted Move r to select OK PINs are op...

Page 39: ...ss Edits the address of the entry Edit Phone No Edits the phone number of the entry Edit Category Specifies the category of the entry Delete Deletes the entry 3 Rotate i to select Edit Name Press u 4...

Page 40: ...Place Category P 76 Place Phone No Enter the phone number of a place landmark 2 Place Phone Number P 80 H INFO button X Set up X Personal Information X Address Book 1 Rotate i to select the address to...

Page 41: ...played in the list of categories Deleting or Editing a Category 1 Move y to select Edit 2 Rotate i to select Delete or Edit Category Press u 3 Delete an existing category or change the name and icon X...

Page 42: ...k Entry 1 Deleting an Address Book Entry When you transfer the vehicle to a third party delete all address book entries 1 Home Addresses If you have PIN protected your home addresses enter your PIN wh...

Page 43: ...digit PIN 3 Re enter the new PIN when prompted to confirm the number you just entered X If you have not entered the same number both times an INCORRECT PIN message is displayed Enter your PIN again 1...

Page 44: ...re You can delete some or all of your previous destinations from the list 1 Rotate i to select the destination to delete Press u X Repeat the procedure as necessary X Items to be deleted are indicated...

Page 45: ...ong By Voice Turns the feature on or off 2 Song By Voice SBV P 45 Phonetic Modification Changes the phonetic song name artist name etc so that they are more easily recognized through voice commands 2...

Page 46: ...o enable SBV Rotate i to select an option Press u The following options are available ON factory default Song By Voice commands are available 2 Searching for Music Using Song By Voice SBV P 151 OFF Di...

Page 47: ...media source HDD or iPod Press u 1 Phonetic Modification You can also display the Music Search Setup items in the DISC music CD or HDD mode Select HDD Setup in AUDIO MENU Phonetic Modification is grey...

Page 48: ...te i to select Play to listen to the phonetic modification Press u X Rotate i to select OK and press u when finished 6 Enter the phonetic spelling you wish to use e g Artist A when prompted 7 Move r t...

Page 49: ...automatic or manual mode 2 Rerouting P 49 Unverified Area Routing Sets whether you use the route guidance in unverified areas 2 Unverified Area Routing P 50 Edit Avoid Area Specifies areas to avoid wh...

Page 50: ...The system calculates a new route automatically when you deviate from the route It is strongly recommended that you leave the system set to Automatic MANUAL Disables route recalculation The system bee...

Page 51: ...wishes to manually navigate using the navigation map and choose the streets that lead to the destination The driver chooses to let the navigation system suggest possible routing knowing that the guida...

Page 52: ...se if possible to remind you to verify all traffic restrictions Directions list A direction list is typically not available However depending on your route directions are provided to help you reach th...

Page 53: ...o select Edit Area to define the area to avoid Press u The following options are available after an area is set View Area Map Displays the selected avoid area on the map Delete Deletes the selected av...

Page 54: ...85 6 If you select Map Input scroll the map to position the cursor over your desired start point adjusting the map scale as necessary Press u to mark the start point X To redo the area selection pres...

Page 55: ...You can specify a different search distance for highways and surface streets 1 Rotate i to select an item Press u 2 Rotate i to select a search distance Press u The following items are available On H...

Page 56: ...iving through different time zones ON factory default Adjusts the clock automatically OFF Disables the feature ADJUST TIME Adjust the current time manually 2 Adjust Time P 56 Reset Reset the clock set...

Page 57: ...Adjust the current time hours and minutes 1 Move w or y to select HOUR or MINUTE 2 Rotate i to adjust the value 3 Move r to select OK Resetting the Clock Settings H INFO button X Set up X Other X Clo...

Page 58: ...position displayed on the map Rotate i to select an item Press u The following items are available Off road Tracking Set whether to display the tracking dots on the map 2 Off road Tracking P 58 Corre...

Page 59: ...henever you drive into an area approximately 800 m away from a mapped road Rotate i to select an option Press u The following options are available ON factory default The system displays the white tra...

Page 60: ...rowhead in the correct direction the vehicle is facing 5 Press u to select OK 1 Correct Vehicle Position An apparent position error can occur where buildings tunnels and other objects block or reflect...

Page 61: ...hicle to a third party reset all settings to default and delete all personal data The following settings are reset Brightness Contrast Black Level Volume Interface Dial Feedback Brightness multi view...

Page 62: ...vehicle to a third party reset all settings to default and delete all personal data The following items can be deleted Address book Home address 1 and 2 Previous destinations Calendar entries Avoid ar...

Page 63: ...62 Index Table of contents...

Page 64: ...ing the Route 87 Changing the Route Preference 88 Viewing the Routes 88 Calculating the Route on the Destination Map 89 Driving to Your Destination 90 Viewing the Route 90 Listening to Voice Guidance...

Page 65: ...ddress P 66 Address Book Sets a destination by selecting an address stored in your Address Book 2 Address Book P 71 Previous Destinations Sets a destination by selecting a previous destination 2 Previ...

Page 66: ...e landmark 2 Place Phone Number P 80 ZAGAT Sets a destination restaurant by using ZAGAT SURVEY Rating information 2 ZAGAT P 80 Coordinate Sets a destination by entering latitude and longitude 2 Coordi...

Page 67: ...lumbia Rotate i to select an item Press u The following items are available City Selects your destination city 2 Selecting a City P 68 Street Selects your destination street 2 Selecting a Street P 69...

Page 68: ...nation 2 Move r to select LIST Selecting the State or Province 1 Selecting the State or Province Move w or y to select the following areas USA for the U S mainland Hawaii and Puerto Rico Canada AK for...

Page 69: ...urrently located is displayed 1 Enter the name of a different city or move r to select OK for the current city X Move r to select LIST to display a list of cities Selecting a City 1 Selecting a City V...

Page 70: ...t X Move r to select LIST to display a list of streets 1 Selecting a City If your city is not listed it may be part of a larger metropolitan area Try entering the street first Non detailed area mark T...

Page 71: ...top of the list Matching letters are in yellow 3 Enter the street number Move r to select OK X Only valid street numbers can be entered 4 Set the route to your destination 2 Calculating the Route P 8...

Page 72: ...ting the Route P 87 X Move w or y to display only the entries in a category ALL BUSINESS PERSONAL or other categories you have created 2 Selecting an Address Book Category P 40 1 Address Book If you h...

Page 73: ...tion at the top 1 Rotate i to select a destination from the list Press u 2 Set the route to your destination 2 Calculating the Route P 87 1 Previous Destinations If Previous Destinations is greyed out...

Page 74: ...select it 2 Place Name in Multiple Categories P 74 4 Set the route to your destination 2 Calculating the Route P 87 1 Place Name This option is convenient if you know the exact name of a place Move e...

Page 75: ...database the following screen is displayed 1 Rotate i to select a place name Press u 2 Rotate i to select a subcategory Press u Place Name in Multiple Categories 1 Place Name in Multiple Categories M...

Page 76: ...75 XXEntering a DestinationXPlace Name Navigation 3 Rotate i to select a place Press u 4 Set the route to your destination 2 Calculating the Route P 87 Index Table of contents...

Page 77: ...y to change the main category 2 List of Categories P 228 1 Place Category This option is convenient if you do not know the exact name of a place or if you want to narrow down the number of matches ret...

Page 78: ...arches for a place by keyword when you do not know the exact category Select Sort by Distance to Travel for locations near your current location or select City Vicinity for locations in a specific cit...

Page 79: ...Favorites Store up to 30 favourite subcategories 1 Place Category The straight line distance as the crow flies not driving distance and direction to the destination are shown for the highlighted plac...

Page 80: ...ct a favourite subcategory on the Favorite Subcategory screen 2 Move r to select DELETE FROM MY FAVORITES 1 My Favorites Stored categories A subcategory stored in My Favorites has a star at the end of...

Page 81: ...g the Route P 87 ZAGAT H DEST ROUTE button X Dest MENU 2 X ZAGAT Find a restaurant by ZAGAT SURVEY Rating information 1 Rotate i to select an item Press u 1 Place Phone Number All 10 digits must be en...

Page 82: ...ally Sort by ZAGAT Rating Searches for a restaurant by ZAGAT SURVEY Rating information 2 Finding Restaurants by ZAGAT Rating P 82 2 Rotate i to select a restaurant Press u X The ZAGAT ratings are show...

Page 83: ...restaurants Press u The following options are available Food D cor Service Lists the restaurants by the rating value Cost Lists the restaurants by the average cost of a meal including drink and tip 2...

Page 84: ...other location and try again 4 Press u again to display the route calculation menu 2 Calculating the Route P 87 5 Rotate i to select Set as Dest Press u 1 Coordinate Latitude and longitude must be ent...

Page 85: ...re the intersection is located You are prompted to enter the name of the two intersecting streets 2 Selecting a City P 68 Change Province Selects the state or province 2 Selecting the State or Provinc...

Page 86: ...fine the map area to display 1 Rotate i to select an item Press u The following items are available Current Position Your current location is centred on the map City You are prompted to select the cit...

Page 87: ...ulating the Route P 87 4 Rotate i to select Set as Dest Press u 1 Map Input A yellow box shown at scales above 400 m denotes the area that can be viewed when you press u on the current map Information...

Page 88: ...tion 2 Driving to Your Destination P 90 X The system provides you with pop up messages if your route passes through unverified areas or avoid areas 1 Calculating the Route The current route preference...

Page 89: ...layed for each route XThe system calculates and displays the route line on the map screen 2 Route Line P 91 1 Changing the Route Preference The calculated route may be the shortest route or the route...

Page 90: ...stination Map Calculate the route from the map of the destination address Rotate i to select Calculate Route Press u XThe system calculates and displays the route line on the map screen 2 Route Line P...

Page 91: ...ay d Display 3 km scale 2 Map Scale Commands P 219 You can also change the map scale by rotating i You can control the icons displayed on the map screen using voice commands e g say d Display post off...

Page 92: ...rified streets If Unverified Area Routing is OFF the route line uses verified streets only when possible A dotted vector line pointing directly towards your destination is also displayed Guidance Scre...

Page 93: ...route the system automatically recalculates a route to the desired destination based on your current location and direction 2 Rerouting P 49 Blue pink route line Deviating From the Planned Route 1 De...

Page 94: ...ot on a digitized road may appear when you drive 800 m away from a mapped road Breadcrumbs may occasionally be displayed in urban areas such as large parking lots in shopping malls in new subdivisions...

Page 95: ...tate i to select Voice in the Map Menu If you select Voice between guidance points voice guidance for the next guidance point is provided 1 Listening to Voice Guidance d Voice on the map screen You ca...

Page 96: ...an item Press u The following items are available Voice Select to hear the voice guidance when en route 2 Listening to Voice Guidance P 94 Map Information Allows you to select the information icons to...

Page 97: ...nce Menu P 97 Find Nearest Allows you to find the nearest place landmark e g nearest gas station by specifying a category You can then add the location to the list of destinations set as a waypoint or...

Page 98: ...isplay mode for the map and guidance screens Rotate i to select an item Press u The following items are available Directions Displays a list of the guidance points 2 Directions P 98 Exit Info Displays...

Page 99: ...displays a map of the guidance point 2 Press u to select RETURN or press the CANCEL button to return to the previous screen Directions 1 Directions Guidance points with exit information are indicated...

Page 100: ...play information for different exits X The location is displayed on the Calculate Route screen 2 Calculating the Route P 87 Highway Exit Information 1 Highway Exit Information d Display Highway Exit I...

Page 101: ...t or split screen mode Rotate i to select an option Press u The following options are available Single Screen Displays the map and guidance screens on separate screens Guidance Mode 1 Guidance Mode Th...

Page 102: ...simultaneously on the map screen 1 Guidance Mode Next guidance point The next guidance point the pop up window is displayed on the map screen as you approach a guidance point in the single screen mode...

Page 103: ...mbols displayed on the map Rotate i to select an item Press u The following items are available Show Icon on Map Selects the icons to display on the map 2 Showing Icons on the Map P 103 North up Headi...

Page 104: ...display on or off XRepeat the procedure as necessary The following options are available Icon check boxes Displays or hides the landmark icons 2 Map Screen Legend P 10 ALL OFF Hides all icons ICON OP...

Page 105: ...t an icon category from the list e g Other Icons Press u 2 Rotate i to select the icons to display on the map Press u X Pressing u toggles the icon display on or off X Repeat the procedure as necessar...

Page 106: ...The following options are available North up Displays the map with North always pointing up Heading up Displays the map so that the direction you are travelling is always pointing up Map Orientation...

Page 107: ...ok P 37 3 Move r to select OK Current Location 1 Current Location d Display Current Location on map screen You can also save the current location by saying d Register the Current Location If you have...

Page 108: ...ation X Map Legend See an overview of the map lines areas routes and navigation icons Rotate to i select an item XThe system displays the map legend Map Legend 1 Map Legend A visual guide helps you se...

Page 109: ...0 240 560 1600 Icon display Landmark icon 10 Exit info 10 One way traffic 10 Waypoint flag 11 Map orientation Heading up 105 North up 105 Others Off road tracking dots 93 Unverified road 10 Map featur...

Page 110: ...No icon No Yes Parking garage Yes Yes Yes Parking lot Yes Yes Yes Highway exit info Yes Yes No 1 Map Icons and Functions You can display or hide the icons using voice commands on the map screen e g s...

Page 111: ...our P 111 Avoid Streets Avoids streets along your route 2 Avoiding Streets P 111 Change Route Preference Changes the route preferences calculating method 2 Changing the Route Preference P 88 Waypoint...

Page 112: ...epeat the procedure to avoid other streets X Streets to be avoided are indicated with a trash icon 1 Cancelling the Route You can also cancel your route from the Map Menu 2 Map Menu P 95 1 Taking a De...

Page 113: ...s in the order they are listed in the Destination List 1 Adding Waypoints Waypoints allow you to stop for gas or food for example and then continue on to your destination Press the MAP GUIDE button to...

Page 114: ...s are available SEARCH AROUND Searches in a spiral pattern around the location you select SEARCH ALONG Searches within a corridor on either side of the locations you select 2 Rotate i to select a wayp...

Page 115: ...ing Waypoints Navigation 3 Rotate i to select a place Press u X The waypoint is added to the Destination List 4 Move r to select OK X The route is automatically recalculated and displayed on the map s...

Page 116: ...o select ADD TO Dest List Press u 2 Rotate i to select a location in the Destination List Press u 3 Move r to select OK X The route is automatically recalculated and displayed on the map screen Adding...

Page 117: ...ect Map to display the destination and waypoints on the map screen 2 Rotate i to select an item Press u 3 Move r to select OK X The route is automatically recalculated and displayed on the map screen...

Page 118: ...arest Press u 2 Rotate i to select a category type Press u 3 Rotate i to select a place Press u 4 Rotate i to set the place as a destination or add to the destination list Press u X The system calcula...

Page 119: ...y Press u X If the address displayed is not the desired location press the CANCEL button and repeat the procedure 2 Rotate i to select OK or Set as Dest depending on the screen displayed Press u 2 Cal...

Page 120: ...new waypoint Entering a New Destination H DEST ROUTE button when en route X Dest MENU 1 or Dest MENU 2 Enter a new destination using the Destination Menu screen even when you are en route 1 Rotate i t...

Page 121: ...3 Rotate i to select an option Press u X The route is automatically recalculated and displayed on the map screen The following options are available New Dest Sets the location as your new destination...

Page 122: ...P 88 DESTINATION MAP Move r to select DESTINATION MAP to display a map of the destination 2 Calculating the Route on the Destination Map P 89 1 Resuming Your Trip The Continue Trip screen has the same...

Page 123: ...122 Index Table of contents...

Page 124: ...P3 WMA AAC Discs 135 Recommended Discs 136 Playing Hard Disc Drive HDD Audio 137 Selecting HDD Mode 137 Audio Screen Control 138 Audio Menu 138 Recording a Music CD to HDD 140 Searching for Music 142...

Page 125: ...rate the audio system by voice commands 2 Audio Commands P 221 In some cases the name of the artist album or track may not appear correctly State or local laws may prohibit the operation of handheld e...

Page 126: ...onds X The system is reactivated when the system s control unit recognizes that the system is in your vehicle X If the control unit fails to recognize ENTER CODE appears on the navigation screen 3 Ent...

Page 127: ...ate i to select a preset station Press u X Press and hold u until a beep sounds to store the current station in a preset button X Move r to select AUDIO MENU 2 Audio Menu P 127 1 Playing FM AM Radio d...

Page 128: ...s for stations with a strong signal in the current band and plays a 10 second sample Select Scan again to stop scanning and play the current selection A Sel Auto Select When set to ON scans and automa...

Page 129: ...played H AUDIO button in FM AM mode X AUDIO MENU X RDS Search Search for FM stations with a strong signal that are broadcast the selected RDS category information 1 Move w or y to select a search meth...

Page 130: ...in FM AM mode X AUDIO MENU X Read Radio Text Display the radio text information of the selected RDS station Radio Text Display 1 Radio Text Display The RDS indicator comes on the display when the sel...

Page 131: ...MENU 2 Audio Menu P 131 1 Playing XM Radio d Display audio screen You can control the radio using voice commands 2 Radio Commands P 221 A visual guide helps you operate the audio system 2 System Contr...

Page 132: ...f available channels Scroll the list to select a channel Channel Scan Scans for channels with a strong signal in the current band and plays a 10 second sample Select Channel Scan again to stop scannin...

Page 133: ...o such channel exists the channel is not part of your subscription or the artist or title information is not available CHECK ANTENNA There is a problem with the XM antenna Contact a dealer Subscribing...

Page 134: ...iscs having a folder structure 2 Playing MP3 WMA AAC Discs P 135 XMove r to select AUDIO MENU to display the Audio Menu 2 Audio Menu P 134 1 Playing a Disc d Display audio screen You can control the d...

Page 135: ...up Displays the sound preferences screen 2 Adjusting the Sound P 158 HDD Setup Displays menu for setting HDD preferences for recording music CDs and for updating Gracenote information 2 Recording a Mu...

Page 136: ...n Playing MP3 WMA AAC Discs H AUDIO button in DISC mode X FOLDERS Change the folder on MP3 WMA AAC discs that have tracks stored in a folder structure 1 Rotate i to select a folder Press u X The syste...

Page 137: ...AC Tracks Some software files may not allow for audio play or text data display Some versions of MP3 WMA or AAC formats may be unsupported If an unsupported track is found the audio unit displays Unpl...

Page 138: ...ists An original playlist is automatically created for each album when a music CD is recorded You can customise up to six user playlists provided on the HDD by adding tracks from your original playlis...

Page 139: ...o display the Music Search Menu 2 Searching for Music P 142 XMove r to select AUDIO MENU 2 Audio Menu P 138 Audio Menu H AUDIO button in HDD mode X AUDIO MENU Rotate i to select an item Press u 1 Audi...

Page 140: ...enre You can also delete albums 2 Editing a Playlist or Album P 143 Edit Playlist user playlists Edits playlist name artist name genre and track order in playlists You can also delete playlists 2 Edit...

Page 141: ...3 2 Editing Track Information P 144 If you stop the engine or the power system is turned off while recording a CD there may be pauses between songs when you play back from the HDD Repeat random and sc...

Page 142: ...MANUAL Press u 3 Move r to select RETURN 4 Move r to select AUDIO MENU 5 Rotate i to select Record CD Press u X During recording rotate i to select Cancel CD Recording Press u to cancel Recording a CD...

Page 143: ...eens X The first track begins playing 1 Searching for Music Albums Artists and Tracks display lists in alphabetical order Record Date displays albums in chronological order You can also search for mus...

Page 144: ...irmation prompt to delete the current track Delete Playlist user playlists Deletes the user playlist Rotate i to select Yes at the confirmation prompt to delete the playlist Delete Album original play...

Page 145: ...um name track title artist name and genre You can also delete tracks Rotate i to select an item Press u The following items are available Edit Track Name Edits track name and artist name Rotate i to s...

Page 146: ...ton in HDD mode X AUDIO MENU X Get Album Info Display the music information album name artist name genre for an album original playlist XGracenote searches for the information of the currently selecte...

Page 147: ...update 2 Rotate i to select Update Gracenote Info Press u 3 Rotate i to select USB or Disc update source media Press u 4 Rotate i to select Yes on the confirmation screen Press u X The system updates...

Page 148: ...up your data before using the device in your vehicle Displayed messages may vary depending on the device model and software version Your audio system may not work with all software versions of these...

Page 149: ...to select a track Press u XMove e to select MUSIC SEARCH to change songs in the track list 2 Searching for Music P 150 XMove r to select AUDIO MENU 2 Audio Menu P 149 1 Playing an iPod d Display audio...

Page 150: ...search abilities when using Song By Voice SBV commands 2 Music Search Setup P 44 Repeat 6 Repeats the current track Shuffle F Plays all tracks in the track list in random order L Plays all tracks in...

Page 151: ...ching for Music The order of the track list displayed if you select All on the iPod menu varies depending on the iPod model and software You can also search for music on the iPod through voice command...

Page 152: ...at artist 4 To cancel SBV mode press the K Back button on the steering wheel or any button on the navigation system interface The selected song continues playing 1 Searching for Music Using Song By Vo...

Page 153: ...of MP3 WMA or AAC formats may be unsupported Connecting a USB Flash Drive 1 Connecting a USB Flash Drive Do not use an extension cable with the USB adapter cable Do not connect your USB flash drive us...

Page 154: ...s P 155 XMove r to select AUDIO MENU 2 Audio Menu P 154 1 Playing a USB Flash Drive d Display audio screen You can control the USB flash drive using voice commands 2 USB Commands P 222 A visual guide...

Page 155: ...all tracks in the current folder Random F Plays all tracks on the USB flash drive in random order I Plays all tracks in the current folder in random order Scan 1 Scans all tracks in the current folder...

Page 156: ...a folder Press u X The system displays the track list 2 Rotate i to select a track Press u X The system begins playing the selected track 1 Playing Tracks in Folders Folder List Any music tracks not i...

Page 157: ...gnized Another HFL compatible phone which is not compatible for Bluetooth Audio is already connected 1 Playing Bluetooth Audio d Display audio screen You can control the Bluetooth Audio using voice co...

Page 158: ...llowing items are available Sound Setup Displays the sound preferences screen 2 Adjusting the Sound P 158 Resume Pause Resumes pauses play 1 Playing Bluetooth Audio If more than one phone is paired to...

Page 159: ...n the level reaches the centre you will see C in the display Fader adjusts the front to back strength while balance adjusts the side to side strength If the fader adjustment is set to the maximum fron...

Page 160: ...es the audio source mode 1 MODE Button Press to cycle through FM1 FM2 AM XM1 XM2 DISC HDD USB or iPod Bluetooth Audio AUX FM1 When in AUX mode the following are operable from the remote audio controls...

Page 161: ...g signal XM Press and hold for one second to skip to the next or previous station channel in the current category DISC HDD iPod USB Bluetooth Audio on some phones Press the N button to skip to the end...

Page 162: ...d receive phone calls using your vehicle s audio system without handling your cell phone Bluetooth HandsFreeLink 162 Pairing a Phone 164 Setting Up Speed Dialing 169 Editing User Name and PIN 171 Phon...

Page 163: ...1 Bluetooth HandsFreeLink You can control the HFL system using voice commands 2 HFL Menus P 178 To use HFL you need a Bluetooth compatible cell phone For a list of compatible phones pairing procedure...

Page 164: ...egistered trademarks owned by Bluetooth SIG Inc and any use of such marks by Honda Motors Co Ltd is under license Other trademarks and trade names are those of their respective owners HFL Limitations...

Page 165: ...1 Pairing a Phone Your Bluetooth compatible phone must be paired to HFL before you can make and receive hands free calls You can control the HFL system using voice commands 2 HFL Menus P 178 The maxi...

Page 166: ...he system begins to search for your phone 4 Rotate i to select your phone in the list X Select PHONE NOT FOUND if your phone is not found X Refer to your phone manual for instructions on searching for...

Page 167: ...ton X PHONE SETUP X Connection 1 Rotate i to select Pass key Press u 2 Rotate i to select an item Press u The following items are available Random Uses a randomly generated pass key Fixed Create your...

Page 168: ...LETE to remove the current pass key 4 Enter a new pass key Move r to select OK H PHONE button X PHONE SETUP X Connection 1 Rotate i to select Delete Press u Deleting a Paired Phone 1 Deleting a Paired...

Page 169: ...the device s H PHONE button X PHONE SETUP X Connection 1 Rotate i to select Connect Press u 2 Rotate i to select a phone Press u X HFL disconnects the linked phone and starts connecting to another pai...

Page 170: ...rompt to enter a voice tag The following options are available Phone Book Adds a number from the imported phonebook Call History Adds a number from the last 30 numbers Dial Enters a number manually 1...

Page 171: ...call speed dial entries from any screen by saying d Dial by voice tag and the voice tag followed by d Dial Avoid using duplicate voice tags Avoid using Home as a voice tag It is easier for HFL to reco...

Page 172: ...N Rotate i to select an item Press u The following items are available Name Enter a name PIN Enter a four digit PIN Re enter to confirm You can select DO NOT USE PIN to remove a PIN 1 Editing User Nam...

Page 173: ...oice tag 2 Setting Up Speed Dialing P 169 Edit Phone Name PIN Change your phone name or protects the phonebook speed dials with a PIN 2 Editing User Name and PIN P 171 Auto Transfer Sets whether to au...

Page 174: ...book entries speed dials and pass keys Text Message Notice Sets whether to give an incoming message notification ON factory default Gives an incoming message notification OFF Messages are still receiv...

Page 175: ...ng a Call You can control the HFL system using voice commands 2 HFL Menus P 178 When you say d Dial by number or d Dial by voice tag on most screens the following screen appears Say the phone number o...

Page 176: ...AL to begin dialing Using the Phonebook 1 Using the Phonebook Your phonebook is automatically imported when the phone is paired Up to three icons are displayed for each phonebook entry If there are mo...

Page 177: ...to begin dialing From the Cellular Phone screen Rotate i to select More Speed Dial Press u Rotate i to select a number Press u to begin dialing Using Call History 1 Using Call History The call history...

Page 178: ...you to mute your voice 1 Receiving a Call An incoming call notification appears on the screen and you hear an audible ring tone If your phone has Call Waiting press the h button to put the original c...

Page 179: ...hone screen Press the d Talk button each time you give a voice command Pair your phone to the system 2 Pairing a Phone P 164 Set a fixed or random pass key code for phone pairing 2 Changing the Pass k...

Page 180: ...d Delete all paired phones phonebook entries speed dials and pass keys 2 Phone Setup P 172 Display the paired phone s imported phonebook 2 Using the Phonebook P 175 Display the last 30 incoming outgoi...

Page 181: ...ellular Phone screen Display a list of all 20 speed dial entries 2 Using Speed Dial P 176 2 Using Speed Dial P 176 Send numbers or names during a call Say a phone number to dial 2 Entering a Phone Num...

Page 182: ...me using the VOL 9 Volume Power knob 1 Text Messages You can control the text messages feature using voice commands 2 Text Message Commands P 224 To use this function you need a Bluetooth and MAP Mess...

Page 183: ...the next message 1 Rotate i to select the message you want to use Press u 2 Rotate i to select Send Press u Replying to the Message 1 Text Messages You can set up text message notification when the fi...

Page 184: ...igation system Calendar 184 Calculator 186 Unit Conversion 186 Information Functions 188 Scenic Road Information 188 System Device Information 188 Map Update Status 189 Roadside Assistance 189 Key to...

Page 185: ...ou can enter a message on two lines using k to change between lines Move r to select OK to return to the Schedule screen 1 Calendar You can select the day of the month on the calendar using voice comm...

Page 186: ...the specified date on the Calendar screen Reminder Sets whether event reminders are displayed each time you start your vehicle 2 Start up P 20 Delete Deletes the event Select Yes on the confirmation s...

Page 187: ...Enter a numeric value to convert e g 1000 2 Move r to select UNIT CONVERSION 3 Rotate i to select the type of unit to convert e g Length Press u 1 Unit Conversion If you do not enter a value to conver...

Page 188: ...Features 4 Rotate i to select the base unit to convert from e g mm X The conversion into other units is displayed on the right e g 1000 mm is 39 37 inches 5 Move y to select CALC to return to the Cal...

Page 189: ...Press u System Device Information H INFO button X Other X System Device Information View database software device and vehicle identification information 1 Scenic Road Information If you select a scen...

Page 190: ...nce is provided as a service to Acura clients Use this feature to call for assistance when a Bluetooth compatible phone is paired to Bluetooth HandsFreeLink Rotate i to select Call Press u to begin di...

Page 191: ...data displayed for the surveyed restaurants Rotate i to scroll the complete ratings description 1 Key to ZAGAT Ratings Food Decor and Service categories are rated using numbered values e g 0 9 10 15 C...

Page 192: ...ow Wallpaper H INFO button X Other X Show Wallpaper View the picture currently set as the wallpaper Press the CANCEL button to return to the previous screen 1 Show Wallpaper You can change the wallpap...

Page 193: ...rear camera has a lens that makes distances appear different than they actually are Always take care when reversing and look behind you for obstacles Navigation controls are disabled when in Reverse A...

Page 194: ...Destinations 194 Guidance Routing 196 Update Coverage Map Errors 198 Display Accessories 198 Multi View Rear Camera 198 Miscellaneous Questions 199 Error Messages 200 Navigation System 200 Disc Playe...

Page 195: ...reyed out when I enter an address As you enter each letter in an address or a place landmark the navigation system looks in the database to see what letters are possible and greys out letters that do...

Page 196: ...um 2 Press the INFO button Select Set up Other Colour Map Colour Set the Night colour to Black for the best contrast 2 Switching Display Mode Manually P 29 The screen is dark when I drive during the d...

Page 197: ...The blue highlighted route and voice guidance stopped or turned into a blue pink dashed line before I got to my destination Your route has entered an unverified area 2 Unverified Area Routing P 50 How...

Page 198: ...used when routing When you draw your area to avoid make sure to select sections of roads that include at least one intersection 2 Avoiding Streets P 111 My elevation shown when I display the current...

Page 199: ...find in the database Minor errors are bound to occur in a large database If you encounter major errors see 2 Reporting Errors P 210 Problem Solution The display appears dim when starting the car in re...

Page 200: ...even though Auto Daylight is set to ON The automatic daylight feature does not work in regions where the daylight saving time system has not been adopted The navigation system automatic daylight featu...

Page 201: ...y reading the HDD when the temperature is below approximately 30 C 22 F The navigation system starts up automatically when the display warms up Cannot access the HDD due to low atmospheric pressure Na...

Page 202: ...new disc plays there is a problem with the first disc If the error message repeats or the disc cannot be removed contact a dealer Do not try to force the disc out of the player BAD DISC PLEASE CHECK...

Page 203: ...RTED Ver Appears when an unsupported iPod is connected Update the iPod software to the latest version CONNECT RETRY Appears when the iPod cannot be authenticated Reconnect the iPod No Song Appears whe...

Page 204: ...unsupported device is connected If it appears when a supported device is connected reconnect the device Unplayable File Appears when the tracks in the USB flash drive are DRM or an unsupported format...

Page 205: ...204 Index Table of contents...

Page 206: ...Limitations 208 GPS System 208 Address Calculation 208 Database 208 Client Assistance 210 Resolving Problems 210 Reporting Errors 210 Acura Client Relations Contact Information 210 Visiting a Dealer...

Page 207: ...code See step 3 2 Press and hold the VOL 9 Volume Power button for more than two seconds X The system is reactivated when the system s control unit recognizes that the system is in your vehicle If the...

Page 208: ...rocess of using the acquired GPS information to locate your position on the map screen If you are on a mapped road the name of the road is displayed along the bottom of the map screen when map matchin...

Page 209: ...on The destination icon shows only the approximate location of a destination address This occurs if the number of possible addresses is different from the number of actual addresses on a block For exa...

Page 210: ...or proximity of law enforcement Emergency rescue medical or other assistance Construction work zones or hazards Road and lane closures Legal restrictions such as vehicular type weight load height and...

Page 211: ...port errors in places landmarks such as changes in business names Information about points of interest are constantly being updated An updated database is available for purchase usually in the fall of...

Page 212: ...s on the most recent update 4 Click Map Coverage Details to display a PDF document with a full listing of all coverage areas X Adobe Reader is required for viewing and printing the Portable Document F...

Page 213: ...the express written permission of the Licensers The HDD may not be transferred or sublicensed to any third party for profit rent or loan or licenced for reuse in any manner Navigation System User Agre...

Page 214: ...on of the HDD or software Use duplication or disclosure of this HDD by or on behalf of the United States government is subject to Restricted Rights as set forth at FAR 52 227 14 19 or DFARS 252 227 70...

Page 215: ...ansfer or transmit the Gracenote Software or any Gracenote Data to any third party YOU AGREE NOT TO USE OR EXPLOIT GRACENOTE DATA THE GRACENOTE SOFTWARE OR GRACENOTE SERVERS EXCEPT AS EXPRESSLY PERMIT...

Page 216: ...E AND NON INFRINGEMENT GRACENOTE DOES NOT WARRANT THE RESULTS THAT WILL BE OBTAINED BY YOUR USE OF THE GRACENOTE SOFTWARE OR ANY GRACENOTE SERVER IN NO CASE WILL GRACENOTE BE LIABLE FOR ANY CONSEQUENT...

Page 217: ...216 Index Table of contents...

Page 218: ...nds 218 Global Commands 218 Navigation Commands 218 Climate Control Commands 220 Audio Commands 221 Cellular Phone Commands 224 Main Setup Screen Commands 224 On Screen Commands 225 Spelling Assistanc...

Page 219: ...ay destination if en route displays the Route screen Display navigation if en route displays the Route screen Display map Display map guide when en route shows the next guidance point Display informat...

Page 220: ...aler Gas station Hydrogen station Auto parts electronics shop Auto repair maintenance shop Car wash detailing shop Motorcycle dealer Other car dealer Parking garage Parking lot Rental car agency Roads...

Page 221: ...e club Bus station Camping Commuter rail station Ferry terminal Named place Park ride Rest area Ski area Tourist attraction Tourist information center Train station Travel agency Truck stop The system...

Page 222: ...ion Audio Commands The system accepts these commands on most screens Audio on Audio off Radio on Radio off Radio select FM1 Radio select FM2 Radio select AM Radio tune to FM frequency e g 95 5 Radio t...

Page 223: ...down HDD playlist up 1 HDD playlist down 1 HDD track repeat 2 HDD track scan 1 HDD track random 2 HDD normal play cancels random repeat or scan play mode resumes normal play mode 1 These commands are...

Page 224: ...OTE Bluetooth Audio commands may not work on some phones or Bluetooth audio devices AUX play or Auxiliary play Bluetooth Audio Commands AUX Commands iPod search activates Song By Voice HDD search acti...

Page 225: ...t message Previous message Read Cancel These commands are accepted when a text message is received Text Message Commands Main Setup Screen Commands The system accepts these commands on the Main Setup...

Page 226: ...Assistance The voice control system can also recognize phonetic alphabet input for numbers letters accented letters punctuation marks and symbols NOTE When selecting letters using the voice control sy...

Page 227: ...ra T Tango Tom U Uncle Uniform V Victor W William Whiskey X X ray Y Yellow Yankee Z Zebra Zulu Say Or say Accented Letters Say Say or Symbol A grave A circumflex A umlaut C cedilla E grave E acute E c...

Page 228: ...Underscore Back quote Comma Dot Question mark Colon Semicolon Plus Symbols Say Say or Symbol Hyphen Exclamation point Double quote Pound Dollar Percent Ampersand Apostrophe Open parenthesis Close par...

Page 229: ...arina Tourist Attraction Home Improvement Banking Movie Theater Travel All Types Bank Restaurant All Types Parking Garage House ATM Check Cashing Money Transfer All Types Ice Cream Dessert Airport Par...

Page 230: ...ime Zone 55 Auto Transfer 172 AUX Input Jack 124 Voice Commands List 223 Avoid Streets 111 B Banking Place Category 76 Basic Settings 26 Black Level 24 Bluetooth Audio Playing 156 Voice Commands List...

Page 231: ...N 171 Edit Speed Dial 169 Edit Track 144 Edit Waypoint Search Area 54 Emergency Place Category 76 ENT Button 8 Error Messages 200 Disc Player 201 iPod 202 Navigation System 200 USB Flash Drive 203 Exi...

Page 232: ...ce 45 151 Music Search Setup 44 Mute 177 N Night Mode Map Colour 28 Menu Colour 28 Switching Display Mode 29 North up 105 O Off road Tracking Driving 93 Setting 58 P Pair Phone 164 Pass Key 166 Person...

Page 233: ...176 Registering 169 Split Screen 101 Street 69 System Device Information 188 T Text Message Receiving 181 Replying 182 Text Message Notice 173 TITLE Button 6 Transfer 177 Travel Place Category 76 Tune...

Page 234: ...3 XXIndex Index Waypoint Adding 112 Deleting Ordering 116 X XM Button 6 130 XM Radio Playing 130 Voice Commands List 221 Z ZAGAT Displaying Review 73 78 81 Setting Destination 80 Index Table of conten...

Reviews: