background image

200S

27

I - 3 Milling Specific Oper

ations

Circle, and Linear Patterns

This section describes the hole pattern functions for Circle and Linear 
patterns.

Press the CIRCLE, or


LINEAR PATTERN soft keys to access the 

Pattern function, then enter the required data.  The 200S calculates 
the positions of all the holes, and displays the pattern graphically on 
the screen.

The 200S provides one user definable pattern each for Circle, and 
Linear pattern.  They can be recalled, and executed from the DRO 
anytime during operation.

The View Graphic enables verification of the hole pattern before you 
start machining.  It is also useful when selecting holes directly, 
executing holes separately, and skipping holes.

Soft key Functions

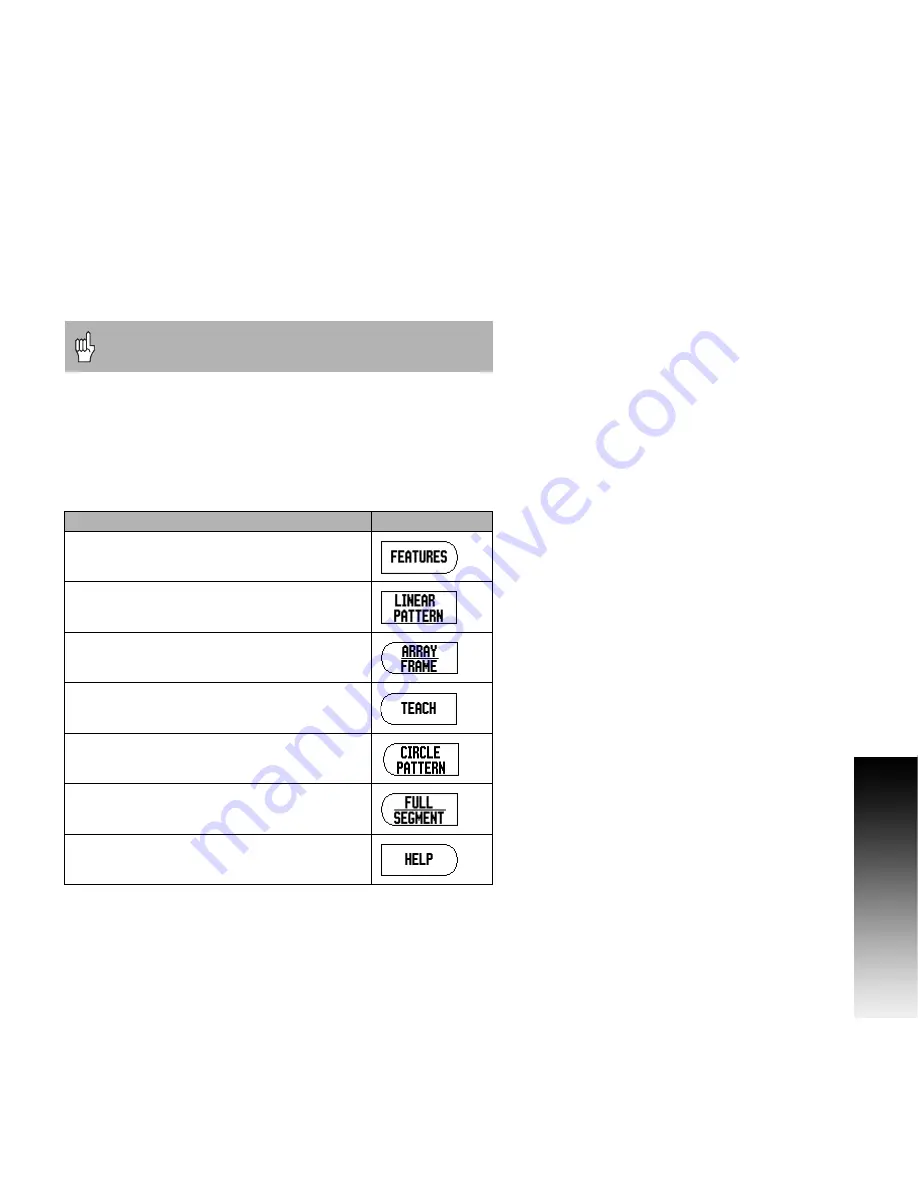
The following soft keys are available while in the Circle, and Linear 
Pattern Milling feature.

Defined Circle, and Linear patterns are not remembered 
when power is cycled.

Function

Soft key

Press to access the FEATURES soft keys.

Press to access the linear pattern table.

Press to select linear hole pattern style (array, 
or frame.

Press to use current tool position.

Press to access the circle pattern table.

Press to select circle hole pattern style (full, or 
segment).

Press HELP for additional information about 
the pattern.

Summary of Contents for 200S READOUTS

Page 1: ...200S READOUTS REFERENCE MANUAL ...

Page 2: ......

Page 3: ...icator 2 Set Zero Indicator Soft Key function Page 1 Soft key Opens on screen help instructions Opens the Tool Table Page 18 for Milling and page 36 for Turning Switches display between operating modes Actual Value Absolute Distance to Go incremental See page 10 Toggles between Set Zero functions Used with individual axis keys page 16 Soft Key function Page 2 Soft key Opens the Datum form to set t...

Page 4: ...unction is for Turning applications only page 41 Soft Key function Page 3 Soft key Opens the Job Setup menu and provides access to the Installation Setup soft key page 11 Press when ready to identify a reference mark page 9 Opens the Calculator functions for standard math trigonometry RPM and Taper for Turning functions Toggles between inch and millimeter units page 11 Soft Key function Page 2 Sof...

Page 5: ...p section also Begin by pressing the SETUP soft key Press the soft key INSTALLATION SETUP Press the access code numbers 8891 using the numeric key pad Press the ENTER key The readout is now ready for machine parameter setting operations IMPORTANT The access code is 8891 IMPORTANT To prevent setup parameters from being changed remove this page from the Reference Manual after initially setting up th...

Page 6: ...iv ...

Page 7: ...SETUP soft key Hard keys ENTER hard key This User s Manual covers the functions of the 200S for both milling and turning applications Operational information is arranged in three sections General Operations Mill Specific Operations and Turn Specific Operations The 200S DRO is available in two and three axis form The 3 axis 200S DRO is used through out this manual for illustration and description o...

Page 8: ...vi ...

Page 9: ...od of one 1 year at no charge Notice of the claimed defect must be received by ACU RITE within the warranty period This warranty applies only to products and accessories installed and operated in accordance with this reference manual ACU RITE shall have no obligation with respect to any defect or other condition caused in whole or part by the customer s incorrect use improper maintenance modificat...

Page 10: ...viii ...

Page 11: ...atums 2 Actual Position Nominal Position and Distance To Go 2 Absolute Workpiece Positions 3 Incremental workpiece positions 3 Zero Angle Reference Axis 4 Reading head position 4 Encoder Reference Marks 5 I 2 General Operations for 200S Screen Layout 6 General Navigation 7 Power Up 7 Reference Mark 8 Working without reference mark 9 Enable Disable Ref function 9 Operating Modes 10 Setup 11 Job Set...

Page 12: ... difference ΔL 19 Calling the Tool from the Tool Table 20 Datum Soft Key 20 Probing Functions for Datum Setting 20 Probing with a Tool 21 Example Probe workpiece edge and set edge as datum 22 Presets 23 Absolute Distance Preset 23 Incremental Distance Preset 25 1 2 Soft Key 26 Circle and Linear Patterns 27 Soft key Functions 27 Circle and Linear Pattern Form 28 Circle or Linear Pattern Execution 2...

Page 13: ...n 48 Linear Error Compensation 49 Non Linear Error Compensation 49 Starting a Non Linear Error Compensation Table 50 Configuring the Compensation Table 50 Exporting the current Compensation Table 51 Importing the current Compensation Table 51 Backlash Compensation 51 Serial Port 52 Counter Settings 52 Diagnostics 53 Keypad Test 53 Edge Finder Test 53 Display Test 53 II 2 RS 232C Serial Communicati...

Page 14: ...ions Pin layout for Electronic Edge Finder 56 Wiring the Serial communication cable 57 II 5 Remote Switch Data Output Data output using external signals 58 Data output using Edge Finder 60 II 6 Dimensions DRO Dimensions 63 ...

Page 15: ...1 Operating Instructions ...

Page 16: ...ive coordinate systems The workpiece which is aligned with the machine axes is moved to a certain position relative to the tool The display is set either to zero or to another appropriate value e g to compensate for tool radius Actual Position Nominal Position and Distance To Go The position of the tool at any given moment is called the ACTUAL POSITION I while the position that the tool is to move...

Page 17: ...sition In this case the relative datum is always the last nominal position Such coordinates are referred to as incremental coordinates increment increase They are also called incremental or chain dimensions since the positions are defined as a chain of dimensions Incremental coordinates are designated with the prefix I Example Incremental coordinates of position 3 referenced to position 2 Absolute...

Page 18: ... position The reading head position provides feed back to the 200S that converts the movement of the machine axes into electrical signals The 200S constantly evaluates these signals and calculates the actual positions of the machine axes which it displays as a numerical value on the screen If there is an interruption in power the calculated position will no longer correspond to the actual position...

Page 19: ...marks along the length of the encoder to re establish the prior datums This configuration means that the operator only has to travel less than two inches any where along the encoder to re establish the datums when the 200S is turned back on Fixed reference marks Encoders that have one or more marks on fixed intervals have to re establish the datums correctly It is necessary to use the same exact r...

Page 20: ... on setting up the Status Bar parameters Display Area Indicates the current position of each axis Also shows forms fields instruction boxes error messages and help topics Axis Labels Indicates axis for corresponding axis key Ref Symbols Indicates current reference mark status Soft key Labels Indicates the various milling or turning functions 1 Datum 2 Tool 3 Feed Rate 4 Job Clock 5 Unit of Measure...

Page 21: ...lds within a form and list boxes within a menu The orientation of the cursor is such that it will return to the top once it has reached the bottom of a menu Power Up Switch on the power located on the back The initial screen will appear see figure at right This screen will only appear the very first time the unit is powered up The following steps may have already been completed by the installer Se...

Page 22: ... on prior datum settings The REF indicator 1 will stop flashing and change to black This action allows the encoder to cross over it s reference marks and re establish it s location Press the NO REF soft key to exit the reference mark routine and continue The DISABLE REF softkey is used for other specific applications using this screen described later in this manual This key is not applicable for t...

Page 23: ...0 years or older were manufactured with Fixed Reference Marks All newer encoders have the Position Trac feature and this does not apply When the DISABLE REF soft key is pressed the recovery routine is paused and any fixed reference marks that are crossed during encoder movement are ignored When the ENABLE REF soft key is then pressed the recovery routine once again becomes active and the next cros...

Page 24: ...tal dimensions Milling applications have only the tool length offsets active while in the Actual Value Mode In the Distance To Go mode both the diameter and length offsets are used to calculate the amount of distance to go required to get to the desired nominal position This is relative to the edge of the tool that will be doing the cutting Turning applications have both diameter and length offset...

Page 25: ...en in the Job Setup menu the following soft keys will be available INSTALLATION SETUP Press to begin accessing the Installation Setup parameters See Installation Setup Parameters on page 46 IMPORT EXPORT Press to begin importing or exporting operating parameters See Import Export on page 15 HELP Will open on line help Job Setup Parameters To view and change Job Setup parameters first press the SET...

Page 26: ...n on the axis display The ON OFF soft key is used to disable the current scale factors Mirroring a part Edge Finder milling applications only The diameter length offset and units of the edge finder are set in this form Both values are in the units indicated in the form Please see Probing Functions for Datum Setting on page 20 for details on using Edge Finder functions The numeric keys are used to ...

Page 27: ...ut feature probe measurement values can be sent over the serial port Also output of the current display positions is activated via a command Ctrl B sent to the 200S over the serial port The Measured Value Output form is used to set data output during probing operations Data Output Probing Milling Only may be set to either On or Off When On the measurement data is output when the probe operation is...

Page 28: ...ng Remote Switch The remote switch sets the parameters so the external switch pendant or foot switch can be enabled to perform any or all of the following functions Data Output Zero and Next Hole Refer to Section II for information on connecting remote switches via Grounding Edge Finder input Data Output to send position information out of the serial port or to print the current position Zero to z...

Page 29: ...nce This form is also used to set the display saver s idle time out The display saver setting is the amount of time the system is idle before the LCD is turned off The idle time may be set from 30 to 120 minutes The display saver can be disabled during the current power cycle Language The 200S supports multiple languages To change the language selection Press the LANGUAGE soft key until the desire...

Page 30: ...g screen Set Zero Soft Key The SET ZERO soft key 1 is a toggle key that determines the effect of pressing an axis key 2 Pressing the SET ZERO soft key switches the functionality between SET and ZERO 3 The current setting is indicated in the Status Bar 3 2 3 1 2 3 ...

Page 31: ...urrent Distance To Go value will automatically set to zero when an axis key is pressed Actual Value mode ABS When the setting is SET and in Actual Value mode ABS pressing an axis key opens the DATUM form for the selected axis The value shown is the previous datum value entered New datum values can now be entered When the setting is ZERO and the 200S is in Actual Value mode ABS selecting an Axis ke...

Page 32: ...e diameter and length offset information for each of the tools that may be commonly used up to 16 tools The following soft keys are available while in the Tool Table form or in the individual tool data form Function Soft key Use this key to select which axis all the tool length offsets will affect The tool s diameter values will subsequently be used to offset the remaining two axes Press to automa...

Page 33: ...reference tool is indicated by T1 Sign for the length difference ΔL If the tool is longer than the reference tool ΔL 0 If the tool is shorter than the reference tool ΔL 0 The length offset may be entered as a known value or the 200S may determine the offset automatically To have the 200S determine a tool s length offset involves touching the tip of each tool to a common reference surface This allo...

Page 34: ...hrough the edge finder input The 200S also supports a grounding type edge finder connected via the 3 5mm Phono Jack on the back of the unit Both types of edge finders operate the same way The following probing soft key functions are available Workpiece edge as datum EDGE soft key Centerline between two workpiece edges CENTER LINE soft key Center of a hole or cylinder CIRCLE CENTER soft key In all ...

Page 35: ... using a tool or non electrical edge finder to set datum points the 200S probing functions can still be used Datum points can be set by touching the edges of a workpiece one after the other with a tool and then manually entering the tool s position as datum points ...

Page 36: ...M Press the Down arrow key until the X axis field is highlighted Press PROBE soft key Press EDGE soft key Touch workpiece edge Press the TEACH soft key to store the current absolute value while the tool is in contact with the workpiece edge The location for the touched edge will take into account the diameter of the tool in use T 1 2 and the last direction the tool was moved prior to pressing the ...

Page 37: ...the tool will be doing the machining at the nominal position The R soft key in the Preset form defines the offset that will be in effect during the move R indicates that the center line of the current tool is in a more positive direction than the edge of the tool R indicates that the center line is in a more negative direction than the edge of the current tool Using R offsets automatically adjusts...

Page 38: ... to axis form Press ENTER Traverse the Y axis until the display value is zero The square in the near zero warning is now centered between the two triangular marks Press the PRESET soft key Press the X axis key ALTERNATIVE METHOD Press the SET ZERO soft key so that you are in Set mode Press the X axis key Enter nominal position value for corner point 2 X 1 5 select tool radius compensation R with R...

Page 39: ...hat these presets are Absolute Presets Press the DOWN arrow key Enter nominal position value for hole 1 Y 1 Ensure no tool radius compensation is showing Press the DOWN arrow key Enter the nominal position value for the hole depth Z 0 5 Press ENTER hard key Drill hole 1 Traverse the X Y and Z axis until the display value is zero The square in the near zero warning is now centered between the two t...

Page 40: ...ro The square in the near zero warning is now centered between the two triangular marks To preset the Z axis Press the PRESET soft key Press the Z axis key Press the ENTER key use last entered preset Drill hole 2 Traverse Z axis until the display value is zero The square in the near zero warning is now centered between the two triangular marks Retract the drill 1 2 Soft Key The 1 2 soft key is use...

Page 41: ...he View Graphic enables verification of the hole pattern before you start machining It is also useful when selecting holes directly executing holes separately and skipping holes Soft key Functions The following soft keys are available while in the Circle and Linear Pattern Milling feature Defined Circle and Linear patterns are not remembered when power is cycled Function Soft key Press to access t...

Page 42: ...sing it s soft key Press the UP DOWN arrow keys to define a new pattern or edit the current pattern Press the ENTER hard key to run the pattern Circle Pattern Information Required Type type of pattern FULL or SEGMENT Holes number of holes in the pattern Center location of the center of the hole pattern Radius radius of the pattern Start Angle angle between X axis zero and the first hole End Angle ...

Page 43: ...circle or linear pattern enter the table of that milling operation Press the ENTER hard key and the program will begin The 200S then calculates the positions of the holes It will also provide a graphical view of the hole pattern The following soft keys become available while running a Circle or Linear Pattern Function Soft key Press to select the graphic view of the pattern Available in both incre...

Page 44: ... be recalled and executed from the DRO anytime during operation The View Graphic enables verification of the pattern before and during machining Soft Key Functions The following soft keys are available while in the Milling Feature table Defined Incline and Arc patterns are not remembered when power is cycled Function Soft key Press to access the FEATURES soft keys Press to access the Incline Mill ...

Page 45: ...pattern or edit the current pattern Press the RUN soft key to run the pattern Incline Mill information required Plane The axis the tool will travel Start point beginning of the arc End point end of the arc Step optional distance the tool will move between each pass Arc Mill information required Plane The axis the tool will travel Center point location of the arc s center point Start point beginnin...

Page 46: ...the coordinates of the start point or press TEACH to set the coordinate to the current position End Point Enter the coordinates of the end point or press teach to set the coordinate to current position Step Enter the step size When milling this is the distance between each pass or each step along the line Press the ENTER or RUN soft key to execute the surface milling operation Press C hard key to ...

Page 47: ...H to set the coordinate to the current position Start Point Enter the coordinates of the start point or press TEACH to set the coordinate to current position End Point Enter the coordinates of the end point or press TEACH to set the coordinate to current position Step Enter the step size When milling this is the distance along the circumference of the arc between each pass or step along the arc s ...

Page 48: ...ion is applied based on the radius of the current tool If the plane selection involves the tool axis the tool tip is assumed to have a ball end Move to the start point and make a plunge cut or the first pass across the surface Press the NEXT PASS soft key to continue with the next step along the contour The incremental display shows the distance from the next pass along the line or arc s contour F...

Page 49: ...ental DRO contour and absolute DRO The contour view shows the position of the tool relative to the milling surface When the crosshair representing the tool is on the line representing the surface the tool is in position The tool crosshair remains fixed in the center of the graph As the table is moved the surface line moves Press END to exit the milling operation The tool offset direction R or R is...

Page 50: ...rom the new datum Calling a Tool from the Tool Table To call a tool press the TOOL soft key Use the Up Down arrow keys to cursor through the selection of tools 1 16 Highlight the tool you want Using the status bar verify the proper tool has been called and press the C key to select the tool and exit Setting Tool Offsets using TOOL SET Before you can use a tool you must enter its offset the cutting...

Page 51: ...Z 0 Press ENTER Setting Tool Offsets using the LOCK AXIS Function The LOCK AXIS function can be used to set a tool s offset when a tool is under load and the diameter of the workpiece is not known The LOCK AXIS function is useful when determining tool data by touching the workpiece To avoid losing the position value when the tool is retracted to measure the workpiece this value can be stored by pr...

Page 52: ...nter of the chuck but it may be helpful to define additional datums for the Z axis The table can hold up to 10 datum points The recommended way to set datum points is to touch a workpiece at a known diameter or location then enter that dimension as the value that the display should be showing Example Setting a workpiece datum Preparation Call the tool data by selecting the tool which you are using...

Page 53: ... a datum when a tool is under load and the diameter of the workpiece is not known To use the LOCK AXIS function Press the DATUM soft key The cursor will be in the DATUM NUMBER field Enter the datum number and press the DOWN arrow key to go to the X axis field Turn a diameter in the X axis Press the LOCK AXIS soft key while the tool is still cutting Retract from the current position Turn the spindl...

Page 54: ...o include the taper calculator functions To calculate the taper angle using two diameters and length between press the taper di D2 l soft keys First taper point diameter 1 either enter a point using the numeic keys and press enter or touch the tool to one point and press TEACH Repeat this for the diameter 2 field When using the TEACH key the taper angle is automatically calculated When entering da...

Page 55: ... can be either radius or diameter values It is important to be sure the units you are entering for the preset agree with the state that the display is currently using A diameter value is shown with a Ø symbol The state of the display can be changed using the RAD DIA soft key available in both operating modes Radius Diameter Soft Key Drawings for lathe parts usually give diameter values 200S can di...

Page 56: ...ft key to enable the vectoring feature Arrow down to the Angle field to enter the angle between the longitudinal slide and top slide with 0 indicating the top slide is moving parallel to the longitudinal slide Press ENTER Z Coupling The 200S Turning application provides a quick method for coupling the Z0 and Z axes positions on a 3 or 4 axis system The display can be coupled in either the Z0 and Z...

Page 57: ... the Z display press and hold the Z key for approximately 2 seconds The sum of the Z positions will be displayed on the Z display and the Z0 display will be blanked The coupling is preserved in between power cycles Moving either Z0 or Z inputs will update the coupled Z position When a position is coupled the reference mark for both encoders must be found in order to recall the previous datum Disab...

Page 58: ...44 I I 4 Turning Specific Operations ...

Page 59: ...45 Technical Information ...

Page 60: ...een is now displayed Installation Setup parameters are established during the initial installation and do not often change For this reason the installation setup parameters are protected by the passcode See Readout Parameter Access Code on page iii Encoder Setup The ENCODER SETUP is used to set the encoder resolution type linear rotary count direction and reference mark type Press the UP or DOWN a...

Page 61: ...or POSITION TRAC for an encoder with the Position Trac feature Arrow down to the COUNT DIRECTION field In the COUNT DIRECTION field select the count direction by pressing the POSITIVE NEGATIVE soft key When the encoder s count direction matches the operators count direction select positive When they do not match select negative Arrow down to the ERROR MONITOR field In the ERROR MONITOR field selec...

Page 62: ...ys to select the display resolution Scroll to the Angle Display field if the encoder type is set to Rotary Press the ANGLE soft key to display the position as 0 360 180 infinity or RPM Error Compensation The distance a cutting tool travels measured by an encoder can in certain cases differ from the actual tool travel This error can occur due to ball screw pitch error or deflection and tilting of a...

Page 63: ...der s error information is entered directly Press the TYPE soft key to select LINEAR compensation Enter the compensation factor in parts per million ppm and press the ENTER key Non Linear Error Compensation Non linear error compensation should be applied if the results of the comparison with a reference standard show an alternating or oscillating deviation The required correction values are calcul...

Page 64: ...TION Press ENTER Configuring the Compensation Table Press the EDIT TABLE soft key to view the table entries Use the UP or DOWN arrow keys or the numeric keys to move the cursor to the correction point to be added or changed Press ENTER Enter the known error which exists at this point Press ENTER When completed press C key to exit the table and return to the Error Compensation form Reading the Grap...

Page 65: ...ble Press the EDIT TABLE soft key Press the IMPORT EXPORT soft key Press the IMPORT TABLE soft key Backlash Compensation When using a rotary encoder with a lead screw a change in direction of the table might cause an error in the displayed position due to clearances within the lead screw assembly This clearance is referred to as backlash This error can be compensated for by inputting the amount of...

Page 66: ...t at the end of the measured value output transmission The output tail is initially 0 and can be set to a positive integer value 0 9 by using the numeric hard keys The serial port settings will be retained on a power cycle There is no parameter to enable or disable the serial port Refer to Data Interface section for cable connection and pin assignments Counter Settings The COUNTER SETTINGS feature...

Page 67: ...ressed indicating that it is operating properly Press the C key two times to exit the keypad test Edge Finder Test To test the edge finder touch the edge finder to a part An will appear on the display screen above the corresponding edge finder in use Grounding type edge finder symbol is to the left and an electronic edge finder symbol is to the right Display Test To test the display press the ENTE...

Page 68: ...being sent or received over the serial cable link All data transferred between the 200S and the PC is in ASCII text format To export data from the 200S to a PC the PC must first be made ready to receive the data to save it to a file Setup the terminal communication program to capture ASCII text data from the COM port to a file on the PC After the PC is ready to receive start the data transfer by p...

Page 69: ... Vac 5 mm x 20 mm Slo Blo line and neutral fused Environmental Operating temperature 0 to 45 C 32 to 113 F Storage temperature 20 to 70 C 4 to 158 F Mechanical weight 2 6 kg 5 2 lb Protective earthing grounding Preventative maintenance No special preventative maintenance is necessary For cleaning wipe lightly with a dry lint free cloth It is necessary to connect the protective conductor terminal o...

Page 70: ...to connectors marked Inputs 1 2 3 Pin layout for Electronic Edge Finder 15 Pin receptacle connector for Edge Finder Grounding Edge Finder Remote Switch Pin Assignment 1 0V Inner shield 2 Stand By 3 4 5 6 5V 7 8 0V 9 10 11 12 13 Switch Signal 14 15 Housing External Shield ...

Page 71: ...ta interface Pin connection for serial port with handshaking Pin Assignment Function 1 No assignment 3 TXD Transmitted Data 2 RXD Received data 7 RTS Request to send 8 CTS Clear to send 6 DSR Data set ready 5 SIGNAL GND Signal ground 4 DTR Data terminal ready 9 No assignment Pin connection for serial port without handshaking Signal Signal Level 1 active Signal level 0 inactive TXD RXD 3 V to 15 V ...

Page 72: ...rently visible Data output using external signals Example 1 Linear axis with radius display X 41 29 mm 1 Coordinate axis 2 Equal sign 3 sign 4 2 to 7 places before the decimal point 5 Decimal point 6 1 to 6 places after the decimal point 7 Unit blank space for mm for inches 8 Absolute display R for radius D for diameter Distance to go display r for radius d for diameter 9 Carriage return 10 Blank ...

Page 73: ...6 0 to 4 places after the decimal point 7 Blank space 8 W for angle in distance to go display w 9 Carriage return 10 Blank line Line Feed Example 3 Rotary axis with degrees minutes seconds display C 360 23 45 1 Coordinate axis 2 Equal sign 3 sign 4 3 to 8 places degrees 5 Colon 6 0 to 2 places minutes C 1 2 6 0 0 0 0 0 W CR LF 1 2 3 4 5 6 7 8 9 10 C 3 6 0 2 3 4 5 W CR LF 1 2 3 4 5 6 7 8 9 10 1 2 ...

Page 74: ...ability can be turned on or off in the Job Setup parameter Measured Value Output Information from here is transmitted from the selected axis Example 4 Probing function Edge Y 3674 4498 mm 1 Coordinate axis 2 2 Blank Spaces 3 Colon 4 sign or Blank Space 5 2 to 7 places before the decimal point 6 Decimal point 7 1 to 6 places after the decimal point 8 Unit blank space for mm for inches 9 R for Radiu...

Page 75: ...een the probed edges DST 2853 0012 mm Distance 1 Colon 2 sign or Blank Space 3 2 to 7 places before the decimal point 4 Decimal point 5 1 to 6 places after the decimal point 6 Unit blank space for mm for inches 7 R for Radius D for Diameter display 8 Carriage return 9 Blank line Line Feed CLX 3 4 7 6 9 9 6 3 R CR LF DST 2 8 5 3 0 0 1 2 R CR LF 1 2 3 4 5 6 7 8 9 ...

Page 76: ...axis coordinates depend on working plane Circle diameter DIA 1250 0500 mm 1 Colon 2 sign or Blank Space 3 2 to 7 places before the decimal point 4 Decimal point 5 1 to 6 places after the decimal point 6 Unit blank space for mm for inches 7 R for Radius D for Diameter display 8 Carriage return 9 Blank line Line Feed CCX 1 6 1 6 3 4 2 9 R CR LF CCY 4 3 6 2 9 8 7 6 R CR LF DIA 1 2 5 0 0 5 0 0 R CR LF...

Page 77: ...200S 63 II 6 Dimensions II 6 Dimensions DRO Dimensions Top view with Dimensions Dimensions in inches mm Front view with Dimensions Bottom view with Dimensions Back view ...

Page 78: ...64 I II 6 Dimensions ...

Page 79: ...nable Ref soft key 9 Enable Disable Ref Function 9 Enabling Z0 and Z Coupling 43 Encoder Reference Marks 5 Encoder Setup 46 Environmental Specifications 55 Error Compensation 48 F Fundamentals of Positioning 2 G General Navigation 7 General Operations for 200S 6 Grounding Earth 55 I Import Export setting 15 Incline and Arc Milling 30 incremental coordinates 3 Incremental Distance Preset 25 Increme...

Page 80: ... Setup soft key 11 Soft key Labels 6 Status Bar 6 14 T Taper Calculator Turn 40 Tool Compensation Mill 19 Tool Soft Key 18 Tool Table Mill 18 Tool Table Turning 36 Turning Specific Operations 36 U Units of measurement setting 11 V Vectoring 42 Z Z Coupling Mill 42 Zero Angle Reference Axis 4 ...

Page 81: ......

Page 82: ...Acu Rite Companies Inc One Precision Way Jamestown NY 14701 Ve 00 532823 22 Printed in USA Subject to change without notice 8 08 Acu Rite Companies Inc is an ISO 9001 CERTIFIED MANUFACTURER ...

Reviews: