background image


30 


3.2 USING REMOTE SURVEILLANCE   

With your system connected to your local area network, you can now log in to your system 

using  Internet Explorer. 

NOTE: 

Your system must be connected to your local or wide area network before attempting 

remote access. 

Logging In to Your System 

With your IP address, you can now log in to your system over your local or wide area 

network. 

NOTE: 

You must configure DDNS settings locally.   

To access your system: 
1

    Open Internet Explorer. In the address bar, enter the IP address of your system (i.e. 

192.168.3.97).   

2

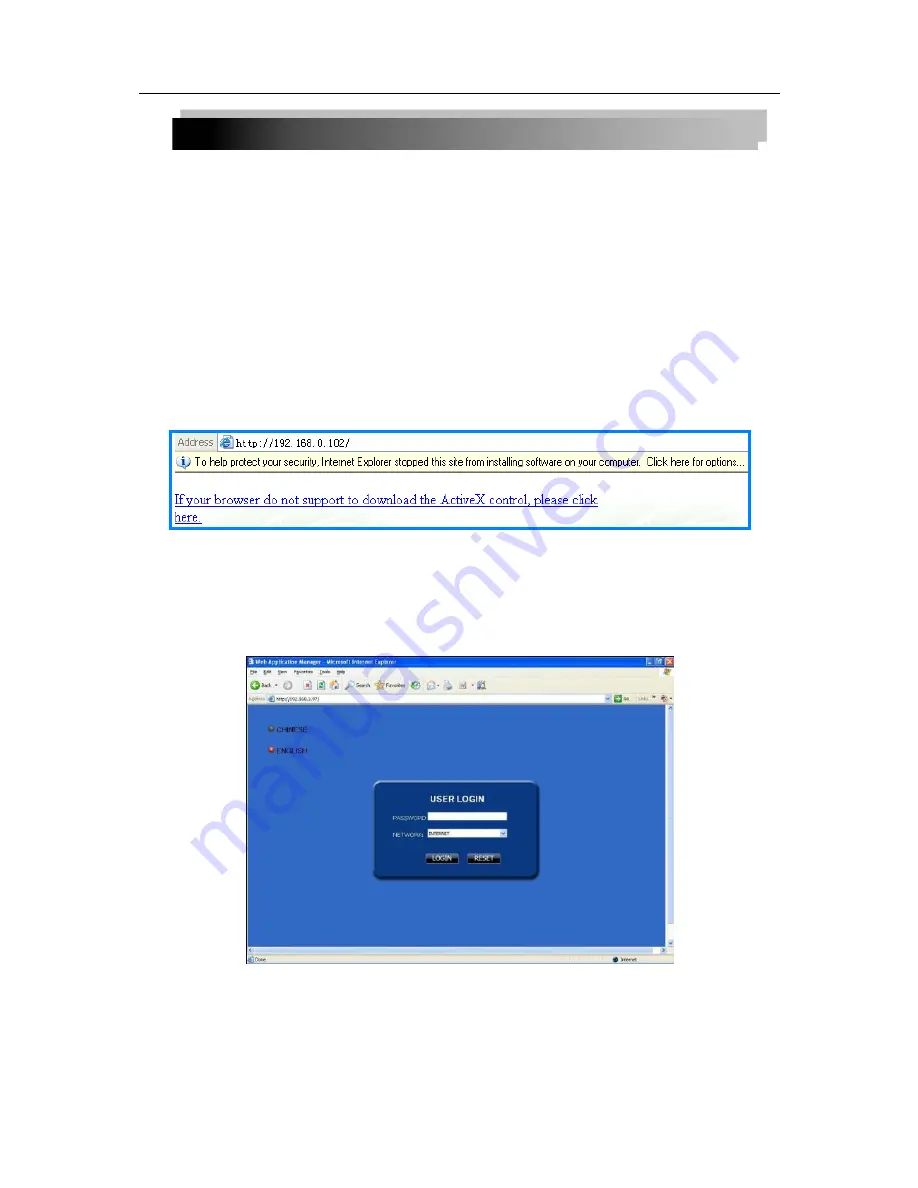
    You must install the ActiveX® in order to access your system. Click the attention bar at 

the top of the main page and select 

Install ActiveX Control

. DVR Net viewer will reset. 


Figure 3.2.1 Click the ActiveX attention bar 

3

    In the warning box click 

Install

. The login page appears. 

4

    Leave the password field 

blank 

(default). 

NOTE: 

If you have enabled passwords on your system, enter your USER or ADMIN password. 

However, only the ADMIN can change settings and options on the system. 
5

    Select 

LAN 

or 

INTERNET 

from the drop-down menu and click 

LOGIN

. The process will last 

for 1~2 minutes. 


Summary of Contents for SX-412-16

Page 1: ...INSTRUCTION MANUAL H 264 NETWORK DIGITAL VIDEO SURVEILLANCE RECORDER...

Page 2: ...2...

Page 3: ...2 2 USING THE MAIN MENU 11 2 2 3 DEVICES MANAGEMENT 18 2 2 4 SYSTEM SETUP 25 3 IE OPERATION 29 3 1 FEATURE 29 3 2 USING REMOTE SURVEILLANCE 30 3 3 REMOTE SURVEILLANCE MAIN SCREEN 31 3 4 LIVE VIEWING 3...

Page 4: ...yback Double level user management Supports live view parameter setting and copy playback video via network 1 2 1 SPECIFICATION Item Device Performance index System Language English Chinese GUI Graphi...

Page 5: ...utput Connector Serial interface Support 1 RS232 Serial interface Support 1 RS485 Network interface RJ45 10M 100M USB Mouse USB1 1 Thumb drive USB2 0 VGA VGA 1 VGA optional Software PC playback Playba...

Page 6: ...ty while using the DVR and to prolong device life please pay attention to the following details 1 When installing device please comply with all the electric product safety criteria 2 Power and ground...

Page 7: ...Z Press to open the PTZ control window 7 EXIT Close menu windows 8 Navigation OK Move cursor in menus up Move cursor in menus right Move cursor in menus left Move cursor in menus down OK In menus pres...

Page 8: ...esigned for data backup to a USB flash drive Do not connect a USB flash drive to the bottom USB port on the rear panel Figure 1 0 Connect a USB mouse to the bottom USB port on the front panel 2 Use th...

Page 9: ...9 2 1 3 MENU TREE You can control the DVR via menu operation This tree will show you the menu structure and details will be shown in following chapters...

Page 10: ...ll begin powering up Password ATTENTION By default passwords are disabled on the system You do not need to enter a password when accessing any system menus However for security purposes it is highly r...

Page 11: ...Audio capable cameras not included are required for audio recording on the system 2 2 2 1 CAMERA Use the Display Setup menu to customize channel titles show hide the date and time in live viewing and...

Page 12: ...to enable disable recording from the selected channel 3 Under QUALITY Select GOOD MID or LOW Setup code rate for recording corresponding to 384Kbps 512Kbps and 768Kbps 2 Under AUDIO select ENABLE or D...

Page 13: ...EXIT in each menu until all windows are closed Example You want your system to record continuously on all channels from 9 AM to 5 PM Monday to Friday You also want Alarm Motion recording from 5 PM to...

Page 14: ...warding will not change in the event of power failure or resetting of your network 2 If you select PPPoE in step 1 enter your PPPoE user name and password in the respective fields using the Virtual Ke...

Page 15: ...r 2 View its WAN settings Enter the Primary or Secondary DNS address in the MANUAL DNS field on your system DDNS A DDNS account allows you to set up a web site address that points back to your Local N...

Page 16: ...L 2 Under DATE click the field and enter the desired date using the Virtual Keyboard and then click SEARCH The system searches for date 3 Under VIDEO STATE the system shows recorded events in a Month...

Page 17: ...You can select up to 4 channels you want to playback BACKUP Use the File List sub menu to find recorded video on your system and copy it to a USB flash drive not included NOTE The system is compatibl...

Page 18: ...Click any date in this frame to search the recording status of that day The searching result will be showed in the date frame below 2 DAY It will show all the recording status in this day You can play...

Page 19: ...system will record over the oldest video data once the HDD is full If Overwrite is disabled the system will stop recording once the HDD is full and the FULL LED on the front panel of the system will l...

Page 20: ...u want to disable the alarm during motion detection DURATION Set the time in seconds for the system to record after a triggered alarm 0s 10s 20s 40s or 60s EMAIL SETUP The system can send an email not...

Page 21: ...ELCO P for the selected channel Click NEXT PAGE for additional channels 8 channel models only 3 Under BAUD RATE select 1200 2400 4800 or 9600 4 Under DATA BIT select 5 6 7 or 8 5 Under STOP BIT select...

Page 22: ...required To configure mobile notification settings 1 Under MOBILE NETWORK select 3G 2 75G or 2 5G NOTE Contact your cellular provider if you are unsure about the network of your cellular phone 2 Unde...

Page 23: ...ore sensitive the motion detection 3 Under MD SETUP click SETUP The red motion grid appears over the selected channel in full screen 4 Click the blocks in the grid to enable disable motion detection R...

Page 24: ...ginal factory settings 2 Click OK in the prompt To reboot 1 Click REBOOT 2 Click OK in the prompt To standby 1 Click STANDBY 2 Click OK in the prompt NOTE Recorded video on the HDD will not be erased...

Page 25: ...ngs of the device to an empty USB flash drive PARAMETER IMPORT Import system settings from another device 2 2 4 SYSTEM SETUP System setups include date time password video audio language info and main...

Page 26: ...OSE in the confirmation window 6 Click EXIT in each menu until all windows are closed tem date via numeric key 2 2 4 2 PASSWORD When you first startup your system you are technically logged in as the...

Page 27: ...ows are closed Use your new password to log in to the system and access system menus You can also use the USER and ADMIN passwords to access your system using the browser based remote software NETWORK...

Page 28: ...nge the system language 1 From the drop down menu select ENGLISH or CHINESE 2 Click APPLY Click CLOSE in the confirmation window 3 Click EXIT to close the menu NOTE The device will restart when you fi...

Page 29: ...using Internet Explorer Install the software through the IE browser of OS and you can operate the network remotely and conveniently DVR supports C S B S access through LAN and WAN it also supports IP...

Page 30: ...orer In the address bar enter the IP address of your system i e 192 168 3 97 2 You must install the ActiveX in order to access your system Click the attention bar at the top of the main page and selec...

Page 31: ...the top left corner 5 PTZ Control PTZ control for any connected PTZ cameras not included 6 Functions Click the icons to show hide channels take screen captures and record 7 Display Modes Click the ic...

Page 32: ...and then click the audio bars to increase or decrease listen in volume Click the icon to mute unmute NOTE The Talk function is not supported Audio capable camera not included required for listen in au...

Page 33: ...CLEAR to further control presets 3 5 3 SCREEN CAPTURES Use the remote surveillance software to take a snapshot of the channels on the main display screen Screen Captures can be useful for your own re...

Page 34: ...motion events are indicated by an exclamation mark icon 3 Double click a file from the File List to playback the file in the main screen The icon in the file list changes to Control playback using the...

Page 35: ...layback the file in the main screen REMOTE BACKUP You can backup recorded video files from your system to your PC using the Replay menu in the remote surveillance software To backup files remotely 1 C...

Page 36: ...to make changes to the system from the remote location To open remote setup Click SETUP at the top of the main screen The Remote Setup menu features the following tabbed options RECORD ALARM PTZ NETW...

Page 37: ...37 3 6 2 ALARM SETTING Click ALARM to enter into setup interface you can check the parameter settings as in GUI of DVR...

Page 38: ...38 3 6 3 PTZ Click to access setup interface you can check the parameter settings in GUI of DVR 3 6 4 NETWORK Click to access setup interface you can check the parameter settings in GUI of DVR...

Page 39: ...BANDWIDTH Set the bandwidth in kbps 128k 192k 256k 384k 512k 1024k that you want to allocate for traffic that matches the internet This bandwidth does not include audio FILE SAVE PATH the save path of...

Page 40: ...40 3 6 6 HOST INFO Click to access system information interface see below picture This interface includes HDD status remain record time firmware version and MAC Address All the information is fixed...

Page 41: ...tons on Front Panel Item Silk screen Description 1 ON OFF POWER ON OFF 2 Mouse USB mouse 4 REC Recording ALARM Alarm HDD1 HDD1 Status HDD2 HDD2 Status HDD FULL On means the HDD is full 100M On means n...

Page 42: ...eo output for connecting TV or monitor BNC 4 Video input For connecting analog video signal input BNC 5 Audio Input For connecting audio signal input 6 Alarm Input 8 I O alarm input Alarm Output I O o...

Page 43: ...43 3 System Network Diagram...

Page 44: ...ntact with the hard disk drive or DVR can damage it permanently Please install the HDD with the following steps 1 Open the cover of the DVR and you will see one HDD plate as follow 2 Connect HDD cable...

Page 45: ...output in the back panel of DVR Please insert the video source directly into the display device and check if they are causing the problem Check the brightness of the picture and bring it back to its o...

Page 46: ...USB backup error Answer The data exceeds the capacity of backup device The backup device is incompatible The backup device is damaged 13 Question How come the remote control is not working Answer The...

Page 47: ...47 configuration interface or exit DVR TROUBLESHOOTING...

Page 48: ...48 Troubleshooting cont d...

Reviews: