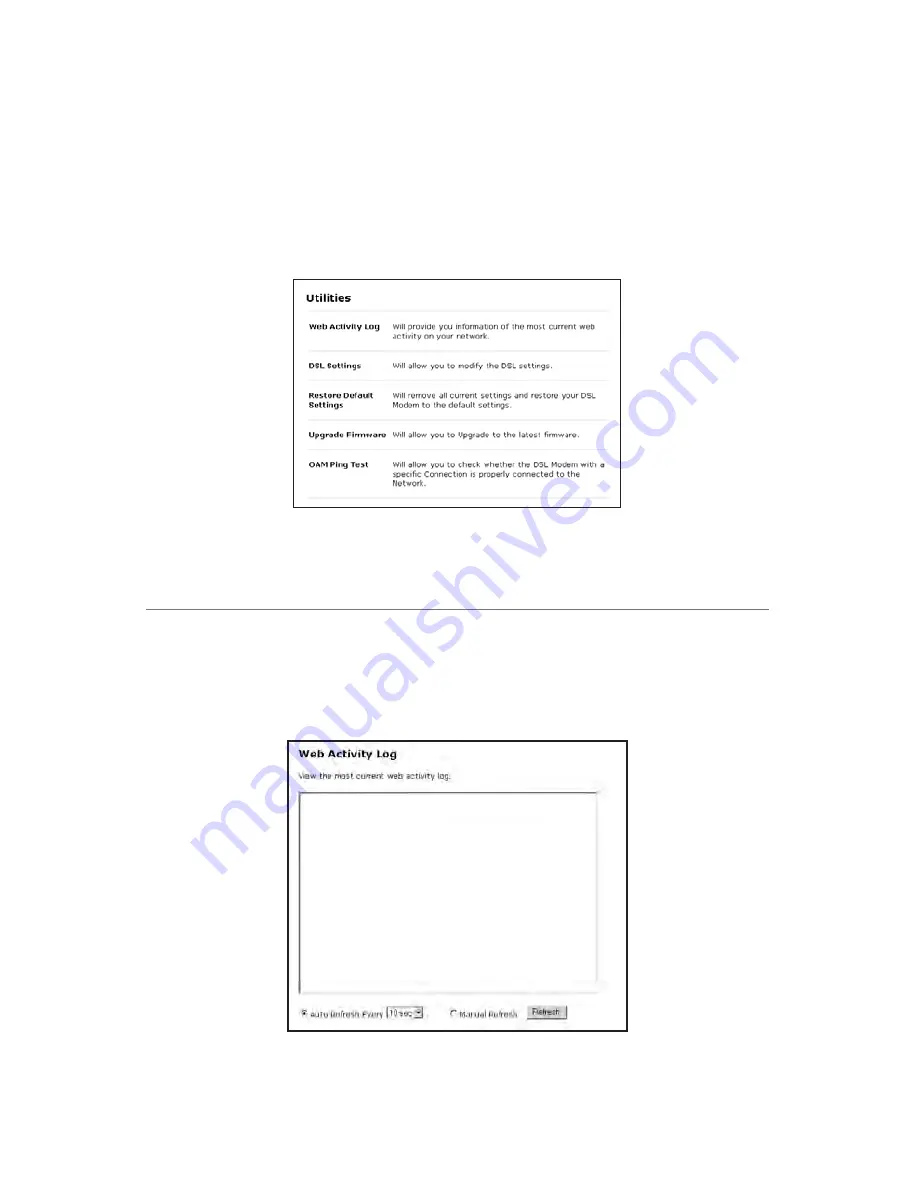
ActionTec GT701R User Manual Download Page 88

83

Using Utilities

To access the Modem’s Web-based Utilities, select 

Utilities

 from the 

“Main Menu” screen. The “Utilities” screen appears.

From this screen, the Web activity log can be viewed, the 

DSL

 settings changed, the 

Modem’s factory default settings restored, and the Modem’s firmware upgraded.

Web Activity Log

The Web Activity Log provides information about the Web sites each computer 
on the Modem’s network has visited. To access the Web Activity Log, select 

Web 

Activity Log

 from the “Utilities” screen.

7

Summary of Contents for GT701R

Page 1: ...Solutions for the Digital Life User Manual Ver 1 0 DSL Modem Model GT701R...

Page 2: ...net 45 4 Basic Setup 47 Basic Setup 47 Changing the User Name and Password 49 5 Setting Up Static IP Address 51 Configuring for a Single Static IP Address 51 Configuring for a Block of Static IP Addre...

Page 3: ...mputer 109 Windows 98 SE 109 Windows Me 112 Windows 2000 115 Windows XP 119 C Computer Security 125 Comparing DSL Service with a Dial Up Modem 125 Modem Security 126 Computer Security 126 Electronic S...

Page 4: ...ional Technical Support Options 145 Self Help 145 Basic Setup Support Getting Online 145 Advanced Feature Support 146 Networking LAN Support 146 Notices 149 Regulatory Compliance Notices 149 Modificat...

Page 5: ...iv Actiontec DSL Modem User Manual This page left intentionally blank...

Page 6: ...s If you want to take your computing to the next level the Actiontec 54 Mbps DSL Modem is sure to be one of the keys to your success Package Contents s Actiontec 54 Mbps DSL Modem s Power adapter s Ph...

Page 7: ...r 5 0 or higher 6 x recommended or Netscape Navigator 4 0 or higher 4 7 recommended s TCP IP network protocol installed on each computer Features This section contains a quick description of the Modem...

Page 8: ...d in the Modem has suffered a critical error and technical support should be contacted DSL Light The DSL light illuminates when the Modem is connected to a DSL line Internet Light When the Internet Li...

Page 9: ...cable Ethernet Port Used to connect computers to the Modem via Ethernet cable The Ethernet port is a 10 100 Mbps auto sensing port and either a straight through or crossover Ethernet cable can be use...

Page 10: ...so available on the main page of the Actiontec DSL Modem Web interface Enter 192 168 0 1 in the browser s address text box and when the first screen appears click HELP Basic Setup Support If unable to...

Page 11: ...s of the DSL Gateway s Enabling Services Blocking s Enabling Disabling DHCP s VIP feature These features are supported in the Modem only Implementation of the above features within the network LAN is...

Page 12: ...upport Center at 1 888 825 9025 Actiontec net working support is provided for a fee of 29 95 per incident Other fee based fea ture support includes s Port Forwarding Static NAT s Static Routing s MAC...

Page 13: ...8 Actiontec DSL Modem User Manual This page left intentionally blank...

Page 14: ...curity Alarm Provider or Qwest Sales as soon as possible to order and schedule your installation If your security alarm system is wired incorrectly it may not be able to make a notification call when...

Page 15: ...e Modem to the computer Note The following procedures are for U S installations only Connecting Via Ethernet 1 Insert the Installation CD in the CD ROM drive of the computer The Installation Guide wil...

Page 16: ...er 2 Setting Up the Modem 3 Read the instructions select Initial Setup by clicking on the appropriate radio button then click Next 4 Read the instructions regarding the service activation date then cl...

Page 17: ...Select the appropriate modem payment option then click Next 6 Read the on screen instructions regarding the terms and agreements of the rental or purchase contract click in the white circle next to I...

Page 18: ...13 Chapter 2 Setting Up the Modem 7 Click the check box next to Ethernet Recommended then click Next 8 Read the on screen information concerning home security alarms then click Next...

Page 19: ...14 Actiontec DSL Modem User Manual 9 Make sure the items needed to connect the Modem to the first computer on included in the kit then click Next 10 Get the Modem from the kit then click Next...

Page 20: ...he Modem 11 Get the Power cord from the black bag and plug the smaller end into the black Power port on the rear panel of the Modem then click Next 12 Plug the larger end of the Power cord into a powe...

Page 21: ...User Manual 13 Confirm the Power light on the front of the Modem glows solid green then click Next 14 Get the yellow Ethernet cable from the kit and plug one end into a Yellow port on the back of the...

Page 22: ...the yellow Ethernet cable into an Ethernet port on the back of the computer Click Next Note An Ethernet port looks similar to a phone jack but is slightly larger 16 Make sure the Ethernet Network lig...

Page 23: ...d into the green Line port on the rear panel of the Modem Click Next 18 Plug the other end of the green cable into the phone jack closest to the com puter Click Next The Modem is connected to a comput...

Page 24: ...on CD in the CD ROM drive of the computer The Installation Guide will start automatically Wait until the following screen appears read the on screen instructions select English then click Next 2 Read...

Page 25: ...tec DSL Modem User Manual 3 Read the instructions select Initial Setup by clicking on the appropriate radio button then click Next 4 Read the instructions regarding the service activation date then cl...

Page 26: ...elect the appropriate modem payment option then click Next 6 Read the on screen instructions regarding the terms and agreements of the rental or purchase contract click in the white circle next to I a...

Page 27: ...22 Actiontec DSL Modem User Manual 7 Click the check box next to USB then click Next 8 Read the on screen information concerning home security alarms then click Next...

Page 28: ...23 Chapter 2 Setting Up the Modem 9 Make sure the items needed to connect the Modem to the first computer on included in the kit then click Next 10 Get the Modem from the kit then click Next...

Page 29: ...er Manual 11 Get the Power cord from the black bag and plug the smaller end into the black Power port on the rear panel of the Modem then click Next 12 Plug the larger end of the Power cord into a pow...

Page 30: ...Modem 13 Confirm the Power light on the front of the Modem glows solid green then click Next 14 Get the purple USB cable from the kit and plug large square end into the purple USB port on the back of...

Page 31: ...dem User Manual 15 Plug the flat rectangular end of the purple USB cable into a USB port on the front or back of the computer Click Next 16 Make sure the USB light on the front of the Modem glows soli...

Page 32: ...end into the green Line port on the rear panel of the Modem Click Next 18 Plug the other end of the green cable into the phone jack closest to the com puter Click Next The Modem is connected to a comp...

Page 33: ...and other devices answering machines fax machines etc using the same phone line i e using the same phone number as the DSL line must have a phone filter installed To install a filter follow these ins...

Page 34: ...g the green DSL cable from the phone jack near your computer 4 Plug a phone filter into every phone jack with a telephone or other device connected to it then plug the ends of the phone lines disconne...

Page 35: ...If not installing a wall mount phone filter go step 7 6 Install a wall mount phone filter by removing the wall mount telephone and open ing the top and bottom toggles Then push the wall mount filter o...

Page 36: ...Jack on the back of the Modem The connections should look like the configuration in the picture below if the first computer is connected via Ethernet if the first computer is connected via USB the pur...

Page 37: ...ual 8 Make sure a phone filter is NOT connected to the green DSL cable and that the green DSL cable is connected as shown on screen 9 Make sure the appropriate lights on the front of the Modem glows s...

Page 38: ...on the next page Setting Up the DSL Connection After connecting the Modem and installing phone filters the DSL connection must be configured Select the type of Internet access MSN below Qwest net on p...

Page 39: ...ead the on screen subscription agreement and if you accept it click the circle next to I Agree Click Next 3 Enter the user name and password in the appropriate text boxes enter them again in the pop u...

Page 40: ...2 Setting Up the Modem 4 The Modem is configured This may take up to five minutes 5 After the Modem is finished being configured a Congratulations screen appears Read the on screen information then c...

Page 41: ...ontained in them and click Next in each When the screen below appears the Installation Guide has finished and the Modem has been connected and configured Click Finish The Modem is now connected to MSN...

Page 42: ...ead the on screen subscription agreement and if you accept it click the circle next to I Agree Click Next 3 Enter the user name and password in the appropriate text boxes enter them again in the pop u...

Page 43: ...ec DSL Modem User Manual 4 The Modem is configured This may take up to five minutes 5 After the Modem is finished being configured a Congratulations screen appears Read the on screen information then...

Page 44: ...ined in them and click Next in each When the screen below appears the Installation Guide has finished and the Modem has been connected and configured Click Finish The Modem is now connected to Qwest n...

Page 45: ...ould be provided by the ISP When finished click Next If PPPoE or PPPoA is selected go to step 3 If RFC 1483 is selected got to step 4 3 Enter the user name and password in the appropriate text boxes I...

Page 46: ...P type This information is available in the Welcome Letter When finished click Next If Static IP is selected go to step 5 If Dynamic IP DHCP is selected got to step 7 5 Select the type of Static IP ad...

Page 47: ...anual 6 Enter the IP Address Subnet Gateway DNS 1 and DNS 2 information if applicable in the proper text boxes This information is available in the Welcome Letter When finished click Next Block of IP...

Page 48: ...ing Up the Modem 7 The Installation Guide checks the configuration of the Modem 8 A Congratulations screen appears Read the on screen information then click through the next few windows to exit the In...

Page 49: ...ional screens appear Read the information contained in them and click Next in each When the screen below appears the Installation Guide has finished and the Modem has been connected and configured Cli...

Page 50: ...service Most Qwest DSL ISPs provide a dial up account for free If not there are a number of free Internet pro viders whose products make great backup Internet access in the unlikely event they are eve...

Page 51: ...46 Actiontec DSL Modem User Manual This page left intentionally blank...

Page 52: ...sometimes contained in a welcome letter or ISP worksheet If this document is not available contact the ISP immediately and request one Basic Setup To configure the Modem for basic operation Note If yo...

Page 53: ...osoft Network by clicking in the appropriate circle Then select the type of connection pro vided by the ISP by clicking in the circle next to PPPoA or PPPoE If unsure about the selection check the inf...

Page 54: ...users can start surfing the Web If an error stating the Web browser was unable to connect to the Internet appears check the configuration settings Ensure all the information required by the ISP is en...

Page 55: ...er name and password down and keep them in a secure location They will be needed to access to the Modem s Web Configurations screens in the future 3 Click Save and Restart at the bottom of the screen...

Page 56: ...Single Static IP Address To set up the Modem to use a single static IP address Note To complete this procedure you must have access to the Internet Service Provider ISP worksheet If no worksheet has b...

Page 57: ...52 Actiontec DSL Modem User Manual 3 In the Set Up Configuration screen select Non Windows Setup from the menu on the left side...

Page 58: ...p Page screen appears Using the Internet Service Provider ISP worksheet enter the following information ISP Protocol select RFC1483 Bridged RFC1483 Routed PPPoA or PPPoE by clicking in the appropriate...

Page 59: ...are not used dur ing this procedure 6 If provided with DNS settings on the ISP worksheet click the circle next to Static and enter the DNS addresses in the DNS Configuration section at the bottom of...

Page 60: ...assword in the Re enter New Password text box Make sure to write the user name and password down and keep them in a secure location They will be needed to access to the Modem s Web Configurations scre...

Page 61: ...have access to the Internet Service Provider ISP worksheet If no worksheet has been provided contact the ISP 1 Open the Web browser In the address bar enter http 192 168 0 1 then press Enter on the ke...

Page 62: ...WAN IP Address from the menu on the left side 6 Select Obtain an IP Address through PPPoA select Unnumbered Mode then enter the gateway and subnet mask addresses assigned by the ISP in the Gateway Ad...

Page 63: ...9 In the DHCP Server Configuration screen select Static from the DNS options near the center of the screen then enter the DNS Server IP addresses assigned by the ISP in the appropriate text boxes Note...

Page 64: ...om the menu on the left side 13 The Change Admin Username Password screen appears Enter a new user name optional in the New Username text box then a password in the New Password text box Re enter the...

Page 65: ...estart page appears Click Save and Restart to save the set tings changed in the Change Admin Username Password screen The Modem has been configured to support a block of static IP addresses Once the P...

Page 66: ...ng Advanced Setup To access the Advanced Settings screens follow these instructions 1 Open the Web browser In the address bar enter http 192 168 0 1 then press Enter on the keyboard 2 The Main Menu sc...

Page 67: ...me in the menu on the left Note To save changes made in any of the Advanced Settings screens click Save and Restart at the bottom of the menu on the left side of the screen WAN IP Address Selecting WA...

Page 68: ...continuing After selecting a connection type click Next to continue configuring the connection Transparent Bridging Select this option to use the Modem as a transparent bridge This option should only...

Page 69: ...User Name and Password was entered in the Installation Buddy or during Basic Setup it should be displayed in the Broadband Connection via PPPoE PPPoA screen If not enter the information now If the inf...

Page 70: ...the IP address and routing information which will terminate at the Modem as opposed to the IP address and routing information being bridged to terminate at the computer This allows the use of the rout...

Page 71: ...uting information to termi nate at the Modem as opposed to the IP address and routing information being bridged to terminate at the computer This allows the use of the router capabilities for the Loca...

Page 72: ...outed WAN to LAN as well as LAN to WAN Note The IP Address information should be obtained from the ISP when purchasing a block of public static IP address Contact the ISP if this information was not r...

Page 73: ...55 255 0 Note If the Modem s LAN IP Address is modified verify the DHCP Server range is within the same subnet For more infor mation see DHCP Server Configuration After changing settings click Next or...

Page 74: ...ault settings for these IP addresses 192 168 0 2 and 192 168 0 254 respectively The beginning and ending IP addresses define the IP address range of the Modem If the default values are left intact the...

Page 75: ...intact Services Blocking Selecting Services Blocking in the Advanced Settings screen generates the Services Blocking screen To modify Internet privileges Web FTP Newsgroups etc for the computers on t...

Page 76: ...umbered Mode and has a Public IP Address Netmeeting does not have to be enabled Website Blocking Selecting Website Blocking in the Advanced Settings screen generates the Website Blocking screen This f...

Page 77: ...selecting On next to Remote Management and writing down the WAN IP address of the Modem see WAN IP Address On a computer outside of the network open a Web browser and enter the Modem s WAN IP address...

Page 78: ...the Protocol list box then enter the IP address of the computer on the network to be used as a host Click Add The forwarded ports appear in the List of Forwarded Ports text box To remove forwarded po...

Page 79: ...grams usually require multiple open ports making the network acces sible from the Internet DMZ hosting symbolically places the DMZ host computer outside of the Modem s network Actiontec recommends act...

Page 80: ...cumentation that came with the gateway to see what kind of Dynamic Routing is required then select the needed option NAT Network Address Translation Selecting NAT in the Advanced Settings screen gener...

Page 81: ...ress will appear in the Static Routing Table To remove an address high light it by clicking on it in the Static Routing Table then click Remove Telnet Timeout Setting Selecting Telnet Timeout Setting...

Page 82: ...han connecting or disconnecting from the Internet can be changed from the Current Status screen Firmware Version Displays the firmware version the Modem is currently running MAC Address Displays the M...

Page 83: ...way Displays the Gateway address for the IP Address and Subnet Mask the ISP assigned to the Modem WAN DNS 1 2 Displays the Domain Name Server address es the ISP assigned to the Modem LAN IP Address Di...

Page 84: ...en there are other Status options available Routing Table WAN Status LAN Status Active User List and NAT Table Click to generate the option of choice Routing Table Selecting Routing Table generates th...

Page 85: ...80 Actiontec DSL Modem User Manual WAN Status Selecting WAN Status generates the WAN Status screen This screen displays on overview of the Modem s WAN Wide Area Network connection...

Page 86: ...isplays on overview of the Modem s LAN Local Area Network connections Active User List Selecting Active User List generates the Active User List screen This screen dis plays a list of the users curren...

Page 87: ...82 Actiontec DSL Modem User Manual NAT Table Selecting NAT Table generates the NAT Table screen This screen displays details concerning the Modem s NAT Network Address Translation settings...

Page 88: ...the Web activity log can be viewed the DSL settings changed the Modem s factory default settings restored and the Modem s firmware upgraded Web Activity Log The Web Activity Log provides information a...

Page 89: ...u that appears The Web Activity Log will refresh at the chosen interval Manual Refresh To set the Web Activity Log screen to manual refresh activate the circle next to Manual Refresh at the bottom of...

Page 90: ...the Modem s Power light flashes and the Modem is disabled N Warning Do not unplug the Power cord from the Modem dur ing the Restore Default Settings process Doing so may result in permanent damage to...

Page 91: ...Actiontec DSL Modem User Manual OAM Ping Test Selecting OAM Ping Test in the Utilities screen generates the OAM Ping Test screen Follow the instructions on screen to check the Modem s network connec t...

Page 92: ...in two ways Ethernet or USB Ethernet 1 Insert the Installation CD in the CD ROM drive of the computer The Installation Guide will start automatically Wait until the following screen appears read the...

Page 93: ...88 Actiontec DSL Modem User Manual 3 Read the instructions select Adding Computers by clicking on the appropriate radio button then click Next 4 Select Ethernet then click Next...

Page 94: ...se the appropriate ISP option indicated in the Welcome Letter then click Next If MSN or Qwest net is selected go to step 6 If Other ISP is selected go to step 7 6 Read the on screen rental agreement a...

Page 95: ...m User Manual 7 When the next window appears get the yellow Ethernet cable from the Quick Start Kit then click Next 8 Plug one end of the yellow Ethernet cable into the yellow port on the back of the...

Page 96: ...of the yellow Ethernet cable into an Ethernet port on the back of the computer then click Next Note An Ethernet port looks similar to a phone port but is slightly bigger 10 Make sure one of the Ether...

Page 97: ...92 Actiontec DSL Modem User Manual 11 In the next window the Installation Guide checks the configuration of the Modem 12 A congratulations window appears Read the on screen information then click Next...

Page 98: ...he Installation Guide has finished and the Modem has been connected and configured Click Finish The computer is connected to the Modem via Ethernet USB 1 Insert the Installation CD in the CD ROM drive...

Page 99: ...DSL Modem User Manual 2 Read the instructions concerning firewall and anti virus software then click Next 3 Read the instructions select Adding Computers by clicking on the appropriate radio button th...

Page 100: ...rk 4 Select USB then click Next 5 Read the on screen instructions choose the appropriate ISP option indicated in the Welcome Letter then click Next If MSN or Qwest net is selected go to step 6 If Othe...

Page 101: ...User Manual 6 Read the on screen rental agreement and if you accept it click on the radio button next to I Agree Click Next 7 When the next window appears get the purple USB cable from the Quick Star...

Page 102: ...ug the large square end of the purple USB cable into the purple USB port on the back of the Modem then click Next 9 Plug the flat rectangular end of the purple USB cable into a USB port on the front o...

Page 103: ...98 Actiontec DSL Modem User Manual 10 Make sure the USB light glow steadily green then click Next 11 In the next window the Installation Guide checks the configuration of the Modem...

Page 104: ...ion then click Next 13 A series of additional screens appear Read the information contained in them and click Next in each When the screen below appears the Installation Guide has finished and the Mod...

Page 105: ...100 Actiontec DSL Modem User Manual This page left intentionally blank...

Page 106: ...Modem s Ensure the Subnet Mask address is set to 255 255 255 0 by clicking Status in the Main Menu screen Cannot Connect to the Internet s Ensure both ends of the power cord and all network cables ar...

Page 107: ...ining a range from 2 though 255 If the Ethernet adapter is showing an incorrect IP address enter ipconfig release at the prompt then press Enter on the keyboard which sets all values back to 0 zero Ne...

Page 108: ...all the computers are working properly s Ensure the IP settings are correct s Ensure the Modem is on and connected properly s Verify the Modem s settings are the same as the computer by clicking Statu...

Page 109: ...104 Actiontec DSL Modem User Manual This page left intentionally blank...

Page 110: ...e System Properties window appears select General The version of the operating system processor type and amount of RAM installed in the computer are listed here 4 Close the System Properties window 5...

Page 111: ...arrow next to the Look In text box and select My Computer from the list that appears 6 Click Find Now 7 When the search is complete note the directory path that appears most often in the In Folder co...

Page 112: ...s directory Write down the directory path for future reference 8 Close the Search Results window Windows NT 4 0 1 From the desktop click Start 2 When the menu appears select Find then Files or Folders...

Page 113: ...riteria below appears In the Look in text box click the down arrow and select My Computer from the menu that appears 5 In the All or part of the file name text box enter i386 6 Click Search 7 When the...

Page 114: ...er and the Modem are on the same subnet To set up static IP on a computer select the operating system and follow the instructions Note The following procedures are based on the Modem s factory default...

Page 115: ...110 Actiontec DSL Modem User Manual 3 Another menu appears Select Control Panel 4 When the Control Panel window appears double click Network...

Page 116: ...roperties window appears Select IP Address 7 In the IP Address tab make sure the circle next to Specify an IP Address is selected When active a black dot appears in the circle If the circle already co...

Page 117: ...appears 11 In the Network window click OK The Network window disappears 12 The System Settings Change window appears asking whether the computer should be restarted Click Yes The computer restarts It...

Page 118: ...113 Appendix B Static IP on the Computer 3 Another menu appears Select Control Panel 4 When the Control Panel window appears double click Network...

Page 119: ...CP IP Properties window appears Click IP Address 7 In the IP Address tab make sure the circle next to Specify an IP Address is selected When active a black dot appears in the circle If the circle alre...

Page 120: ...ection to network media click on it to uncheck the box 12 In the Network window click OK The Network window disappears 13 The System Settings Change window appears asking whether the computer should b...

Page 121: ...116 Actiontec DSL Modem User Manual 3 Another menu appears Select Control Panel 4 When the Control Panel window appears double click Network and Dial up Connections...

Page 122: ...ay be displayed after the Local Area Connection If there is more than one Local Area Connection listed locate the one that cor responds to the network card installed in the computer by finding the nam...

Page 123: ...9 The Internet Protocol TCP IP Properties window appears 10 In the General tab make sure the circle next to Obtain an IP Address auto matically is selected When active a black dot appears in the circ...

Page 124: ...ow click OK The Local Area Connection Properties window disappears 15 Click Close in the Local Area Connection Status window The window disap pears 16 Close the Network and Dial up Connections window...

Page 125: ...e Network Connections window double click Local Area Connection A number may be displayed after the Local Area Connection If more than one Local Area Connection is listed locate the one that correspon...

Page 126: ...Computer 5 The Local Area Connection Properties window appears Select General 6 In the This connection uses the following items list box double click Internet Protocol TCP IP 7 The Internet Protocol T...

Page 127: ...box 255 255 255 0 Enter the periods in the address by pressing the space bar on the keyboard 11 Click OK The Internet Protocol TCP IP Properties window disappears 12 In the Local Area Connection Prope...

Page 128: ...123 Appendix B Static IP on the Computer...

Page 129: ...124 Actiontec DSL Modem User Manual This page left intentionally blank...

Page 130: ...p Modem With a dial up modem a computer user makes an Internet connection by dialing a telephone number surfs the Internet for a period of time and then disconnects the dial up modem No one on the Int...

Page 131: ...tware programs and operating system features affecting the security of the computer s data Anti Virus Programs The computer should have an anti virus program and the virus definitions should be update...

Page 132: ...s being used NAT provides a very basic level of security Firewalls The safest way to prevent attacks on the computer is through a firewall a hard ware device or software program that protects the comp...

Page 133: ...128 Actiontec DSL Modem User Manual This page left intentionally blank...

Page 134: ...u 100BaseTX G dmt G lite t1 413 RFC 1483 2364 2516 Protocol LAN CSMA CD WAN PPP DHCP Static IP WAN Full rate ADSL Interface LAN 10 100 RJ 45 switched port USB port Speed LAN Ethernet 10 100Mbps auto s...

Page 135: ...DC 600mA Certifications FCC Class B FCC Class C part 15 68 CE Mark Commercial UL Operating Temperature 0 C to 40 C 32 F to 104 F Storage Temperature 20 C to 70 C 4 F to 158 F Operating Humidity 10 to...

Page 136: ...ile computer connected to a network DHCP Dynamic Host Configuration Protocol A protocol designed to automatically assign an IP address to every computer on your network DNS Domain Name System Server A...

Page 137: ...nly required when using a cable or DSL modem ISP Internet Service Provider A business that allows individuals or businesses to connect to the Internet LAN Local Area Network A group of computers and d...

Page 138: ...Protocol Internet Protocol The standard protocol for data transmission over the Internet WAN Wide Area Network A network that connects computers located in separate areas i e different buildings citie...

Page 139: ...134 Actiontec DSL Modem User Manual This page left intentionally blank...

Page 140: ...ed in the In column a user outside the Router s network cannot access a computer on the network via the http service in this case no computers on the network can be used as a Web server i e to host a...

Page 141: ...s T 120 1503 yes yes SSH 22 no yes imap 143 yes yes https 443 yes yes secure imap 993 yes yes secure pop3 995 yes yes Low Security Level Service Port In Out http 80 no yes dns 53 yes yes ftp 21 no yes...

Page 142: ...9 000 111 ftp File Transfer Protocol A protocol used to transfer files over the Internet telnet An Internet communications protocol enabling one computer to function as a terminal working from another...

Page 143: ...l for sending audio and video over the Internet T 120 A standard protocol for multimedia teleconferencing over the Internet SSH Secure Shell A method for the secure transfer of files from another comp...

Page 144: ...Note When installing any software consult the user manual and help files supplied with the software for detailed information Actiontec provides the following information as a guideline only Classic To...

Page 145: ...figure drop down list 6 Ensure the Use 802 3 option is not checked 7 Disregard any addresses in the IP Address text boxes They will be reacquired when the first connection is made 8 Click Options and...

Page 146: ...141 Appendix G Non Windows Setup OS X 1 From the Apple Menu select System Preferences 2 When the System Preferences window appears click Network...

Page 147: ...ect TCP IP and from the Configure drop down list select Using DHCP 5 Click Apply Now and close the System Preferences application The TCP IP settings are configured Next go to Connecting to the ISP be...

Page 148: ...143 Appendix G Non Windows Setup 2 The Main Menu screen appears Select Setup Configuration 3 In the Set Up Configuration screen select Non Windows Setup from the menu on the left side...

Page 149: ...ic Using the Internet Service Provider ISP Worksheet provided by the ISP enter the information in the appropriate text boxes If no worksheet has been provided contact the ISP 5 Click Save and Restart...

Page 150: ...b browser then click Help Basic Setup Support Getting Online If you are not able to access the Internet check the DSL light on the front of the Modem If it is solid green call your ISP immediately If...

Page 151: ...ailable from Actiontec free of charge if the wired or wireless equipment was purchased from Actiontec Contact Actiontec at 1 888 436 0657 for installation and configuration support Networking LAN Supp...

Page 152: ...nced features s Port Forwarding Static NAT s DMZ Hosting s Static Routing s NAT Routes s MAC Address Cloning s RIP Dynamic Routing s Third party wireless equipment configuration This service does not...

Page 153: ...148 Actiontec DSL Modem User Manual This page left intentionally blank...

Page 154: ...by turning the equipment off and on the user is encouraged to try to correct the interference by implementing one or more of the following measures s Reorient or relocate the receiving antenna s Incr...

Page 155: ...ments the antenna used for this transmitter must be installed to provide a separation distance of at least 20 cm from all persons and must not be co located or operating in conjunction with any other...

Page 156: ...ronics warrants the media con taining software against failure during the warranty period The only updates that will be provided are at the sole discretion of Actiontec Electronics and will only be av...

Page 157: ...or replaced item will be shipped to Customer at Actiontec Electronics expense not later than thirty 30 days after Actiontec Electronics receives the defective product Return the product to In the Unit...

Page 158: ...VISED OF THE POSSIBILITY OF SUCH DAMAGES AND LIMITS ITS LIABILITY TO REPAIR REPLACEMENT OR REFUND OF THE PURCHASE PRICE PAID AT ACTIONTEC ELECTRONICS OPTION THIS DISCLAIMER OF LIABILITY FOR DAMAGES WI...

Page 159: ...overning Law This Limited Warranty shall be governed by the laws of the State of California U S A excluding its conflicts of laws and principles and excluding the United Nations Convention on Contract...

Reviews: