5
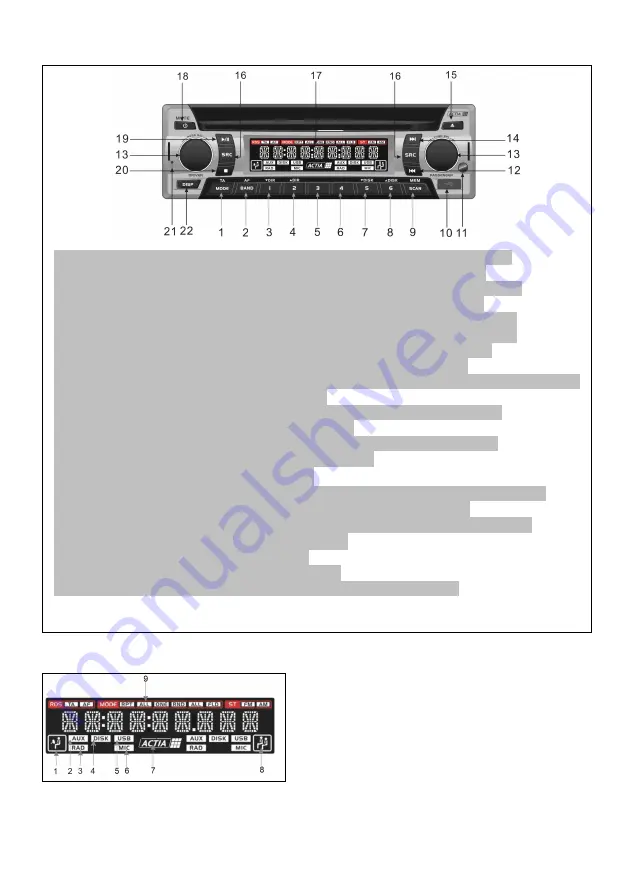
Locations of Parts (Main unit)
Locations of Parts (LCD Display)
1 Driver ICON Indicate DRIVER as selected area
2 AUX ICON Indicate the selection of AUX
3 RAD ICON
Indicate the selection of RADIO
4 DISK ICON Indicate the selection of DISK
5 USB ICON Indicate the selection of USB
6 MIC ICON Indicate the selection of Microphone
7 ACTIA LOGO
Displays
animation
when
loading the disc
8 Passenger ICON
Indicate PASSENGER as selected area
9 MODE ICON
Indicate the playback selected MODE (repeat /random)
1
TA / MODE
Select the play MODE and Activate TA function for RDS
2
AF / BAND Select the frequency band and Activate AF for RDS
3
1/
DIR
Memorize a new station and Select lower directory
4
2/
DIR
Memorize a new station and Select upper directory
5
3 Memorize a new station and select the memorize station
6
4 Memorize a new station and select the memorize station
7
5/
DISK
Memorize a new station / Arrow Down during menu
8
6/
DISK
Memorize a new station / Arrow Up during menu
9
SCAN /MEM
Scan & Auto-memorization for radio station and Preview music file
10
USB PORT Insert the USB pen drive
11
Remote Sensor Receive the infra-red signal from the remote controller
12
Fast advance/Next track/file
13
PUSH SEL Adjust volume and setup audio (Passenger or Driver)
14
Fast rearward/Previous track/file
15
0
Eject/Reinsert the disk
16
SRC
Select the audio source for the respective side (PSG or DRV)
17
LCD Display Display info about the current state of equipment
18
POWER/MUTE Turn the power on/off when held for 2s; Mute when pushed
19
B
Play/pause the reproduction
20
Stop the reproduction
21
RESET Reset the unit by hardware
22
DISP Change the info that displayed on LCD/Monitor


