background image

www.acti.com


Hardware Manual 


21 

Access the Camera 

Configure the IP Addresses 

In order to be able to communicate with the camera from your PC, both the camera and the PC 

have to be within the same network segment.  In most cases, it means that they both should 

have very similar IP addresses, where only the last number of the IP address is different from 

each  other.  There  are  2  different  approaches  to  IP  Address  management  in  Local  Area 

Networks 

– by DHCP Server or Manually. 


Using DHCP Server to Assign IP Addresses 

If you have connected the computer and the camera into the network that has a DHCP server 

running, then you do not need to configure the IP addresses at all 

– both the camera and the 

PC  would  request  a  unique  IP  address  from  DHCP  server  automatically.  In  such  case,  the 

camera will  immediately be ready for the  access from the  PC. The  user,  however, might not 

know the IP address of the camera yet. It is necessary to know the IP address of the camera in 

other to be able to access it by using a Web browser. 

If  you  work  with  our  cameras  regularly,  then 

there  is  even  a  better  way  to  discover  the 

cameras in the network


– by using 

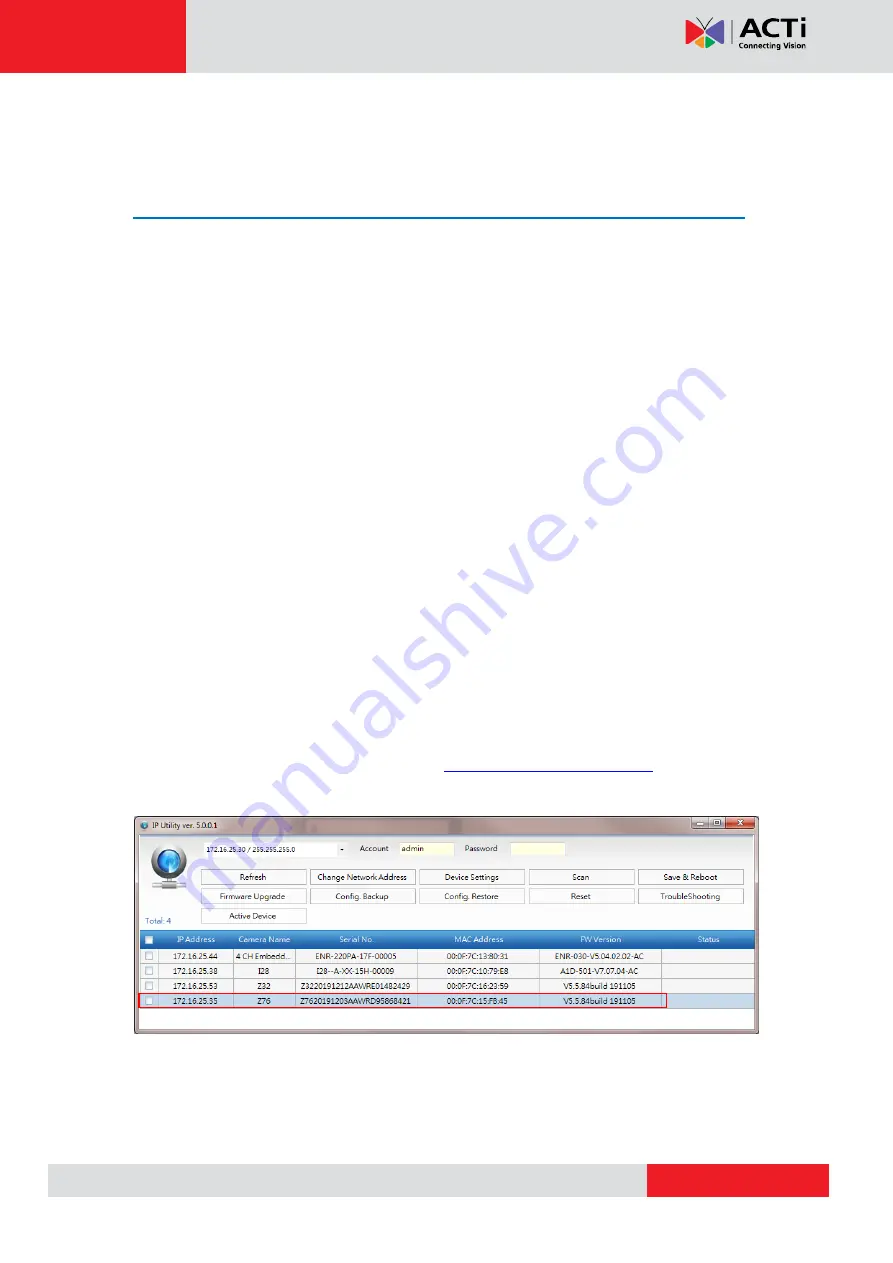
IP Utility

. The IP Utility is a light software tool that can not 

only  discover  the  cameras,  but  also  list  lots  of  valuable  information,  such  as  IP  and  MAC 

addresses, serial numbers, firmware versions, etc, and allows quick configuration of multiple 

devices at the same time. 

The IP Utility can be downloaded for free from 

http://www.acti.com/IP_Utility


With just one click, you can launch the IP Utility and there will be an instant report as follows: 


You  can  quickly  see  the  camera  model  in  the  list.  Double-click  on  the  IP  address  to 

automatically  launch  the default browser of the PC  with the  IP address of the target camera 

filled in the address bar of the browser already. 

Summary of Contents for Z76

Page 1: ...Dome Camera Hardware Manual Z76 2020 05 18...

Page 2: ...6 Introduction 9 List of Models 9 Package Contents 10 Physical Description 11 Installation Procedures 12 Waterproof the RJ 45 Connector 18 Using the Cable Gland 18 Access the Camera 21 Configure the...

Page 3: ...g or removing covers may expose you to dangerous voltage or other hazards Refer all servicing to qualified service personnel Trademarks ACTi and ACTi logo are registered trademarks of ACTi Corporation...

Page 4: ...n reception which can be determined by turning the equipment off and on the user is encouraged to try to correct the interference by one or more of the following measures Reorient or relocate the rece...

Page 5: ...rchase of equivalent new equipment or dispose of it at designated collection points For more information see www recyclethis info 2006 66 EC battery directive This product contains a battery that cann...

Page 6: ...not hold the tail cable by hand for weight bearing Otherwise the cable connector of the camera could be loosened Do not cut the tail cable Exposed tail cables may cause short circuit and damage the c...

Page 7: ...glected Warnings For device with this sticker this device is intended for installation in a restricted access location access can only be gained by service persons or by users who have been instructed...

Page 8: ...amp locations and do not expose it to high electromagnetic radiation To avoid heat accumulation good ventilation is required for operating environment Keep the camera away from liquid while in use Whi...

Page 9: ...acti com Hardware Manual 9 Introduction List of Models This hardware manual contains the following models Z76 2MP Outdoor Zoom Dome with D N Adaptive IR Basic WDR Superior Low Light Sensitivity Fixed...

Page 10: ...emplate Quick Guide Warranty Card IMPORTANT When the camera is taken out from the box the lens cover is covered by a thin film DO NOT remove this film It is used to protect the lens cover from scratch...

Page 11: ...Item Description 1 DC 12V Power Input Jack This connector is used to connect to a DC 12V power adapter if a non PoE network connection will be used 2 Ethernet Port Connects to a network using an Ether...

Page 12: ...on are for reference only actual lens and cables may vary 1 Locate the positions of the holes paste the drill template stickers on the ceiling and drill according to the images below A Cables Going Th...

Page 13: ...Manual 13 3 Twist the cosmetic ring of the camera 4 Route the cables through the ceiling A or along the ceiling B If the cable will be routed along the wall then cut off the camera tab to where the ca...

Page 14: ...www acti com Hardware Manual 14 5 Secure the ground screw 6 Connect the cables See for the detailed description on how to waterproof the Ethernet cable...

Page 15: ...ted to the DC 12V power connect the power cable and wrap the cable with waterproof tape NOTE If the DC12V connector will not be used wrap it also in waterproof tape to avoid short circuiting the conne...

Page 16: ...to see the viewing angle see Access the Camera on page 21 Then adjust the camera tilt and rotation as needed 10 To pan the camera loosen the set screw using the bundled wrench Then rotate the camera b...

Page 17: ...www acti com Hardware Manual 17 12 Attach the cosmetic ring to complete the installation...

Page 18: ...able gland to protect the Ethernet connection and use a waterproof tape to protect other cable connections DISCLAIMER ACTi will not be responsible for camera damage caused by water entering the cable...

Page 19: ...Hardware Manual 19 3 Insert the clamping nut into the Ethernet cable 4 Insert the sealing insert through the Ethernet cable 5 Insert the cable through the gland body 6 Push the sealing insert into th...

Page 20: ...the camera connector 8 Attach the gland body to the camera connector 9 Attach the clamping nut to the gland body to complete the cable solution NOTE Make sure the clamping nut is tightly attached to...

Page 21: ...ly be ready for the access from the PC The user however might not know the IP address of the camera yet It is necessary to know the IP address of the camera in other to be able to access it by using a...

Page 22: ...etwork and it does not detect any DHCP services it will automatically assign itself a default IP 192 168 0 100 Whereas the default port number would be 80 In order to access that camera the IP address...

Page 23: ...P Utility With the procedure shown above all the cameras will have unique IP addresses starting from 192 168 0 101 In case there are 20 cameras selected the last one of the cameras would have the IP 1...

Page 24: ...d party utilities are required to be installed in such case The following examples in this manual are based on Internet Explorer browser in order to cover all functions of the camera Assuming that the...

Page 25: ...www acti com Hardware Manual 25 Then use this newly setup admin account Password to login to the web interface...

Page 26: ...Copyright 2020 ACTi Corporation All Rights Reserved 7F No 1 Alley 20 Lane 407 Sec 2 Ti Ding Blvd Neihu District Taipei Taiwan 114 R O C TEL 886 2 2656 2588 FAX 886 2 2656 2599 Email sales acti com...

Reviews: