background image


1-9

camera will get the power from the first power input plugged into 

it. 


5.


Screw Holes


These screw holes are used to fasten the CAM-7200 series. 


6.


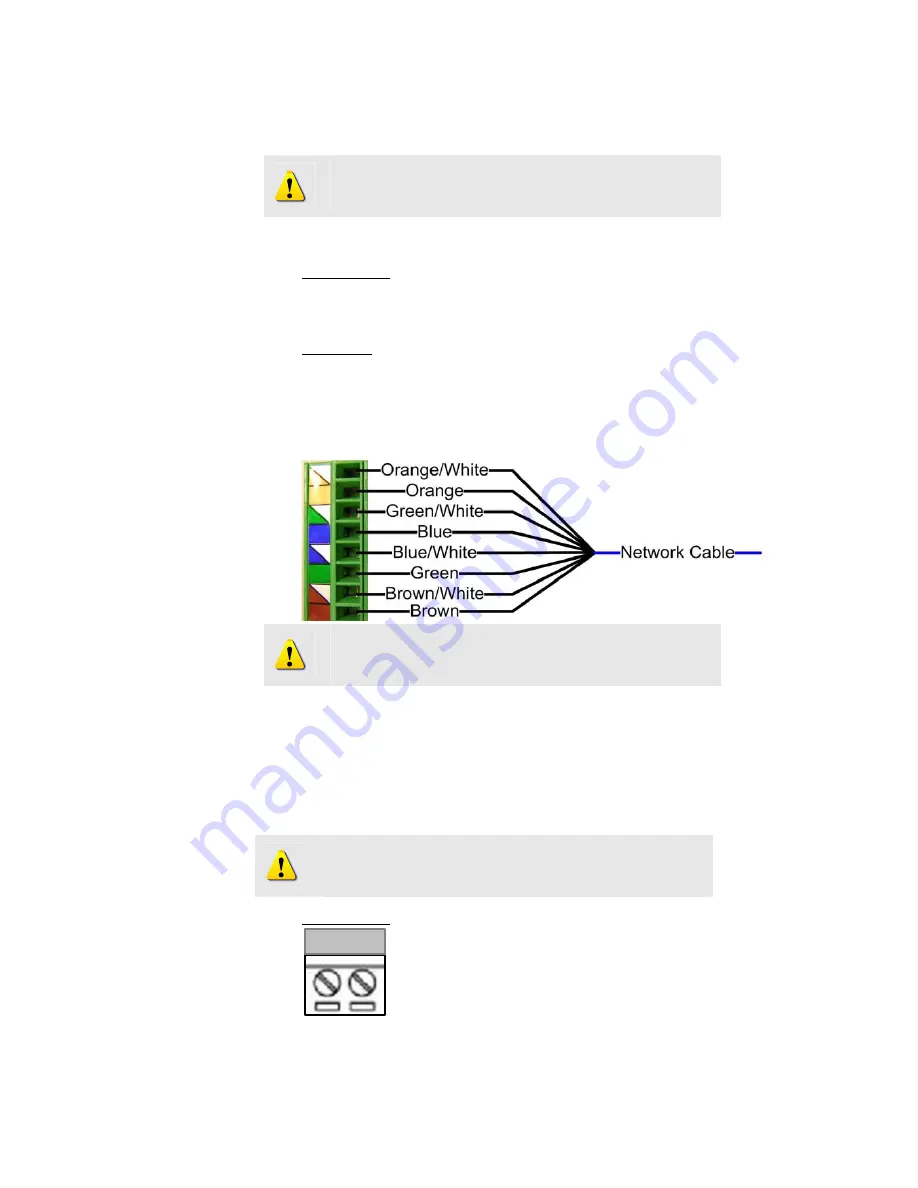
LAN port


The IP Camera connects to the LAN (local area network) via a 

standard terminal block. Supporting NWAY, this IP camera can 

auto detect the speed of local network segment 

(10Base-T/100Base-TX Ethernet).   


With PoE built-in product, you can power the IP camera via 

WAN port, LAN port or DC input. You can power the IP camera 

with multiple power inputs at the same time. If you do, the IP 

camera will get the power from the first power input plugged into 

it. 


7.


Audio Input


GND  MIC


NOTE:

 You may find a support package for help you 

getting familiar with PoE. Please visit our web site, and 
get the support document TS-00040. 


NOTE:

 Please be careful while you do cabling 

arrangement for network cable. It might cause the 
network to fail (some lines of cable might be broken).   


NOTE:

 You may find a support package for help you 

getting familiar with PoE. Please visit our web site, and 
get the support document TS-00040. 

Summary of Contents for CAM-7200 series

Page 1: ...IP Indoor Fixed Dome with DC 12V PoE CAM 7200 series Ver 070309 Hardware User s Manual...

Page 2: ...product yourself as opening or removing covers may expose you to dangerous voltage or other hazards Refer all servicing to qualified service personnel Trademarks All names used in this manual for har...

Page 3: ...in accordance with the instruction manual may cause harmful interference to radio communications Operation of this equipment in a residential area is likely to cause harmful interference in which case...

Page 4: ..._________________________ 2 13 2 1 5 Select a cable exit and cut _____________________________________________ 2 13 2 1 6 Fasten the dome bottom back __________________________________________ 2 14 2...

Page 5: ...t the camera______________________________________________ 3 21 3 1 Adjust zoom and focus __________________________________________ 3 21 3 2 Adjust CCD functions______________________________________...

Page 6: ...1 1 1 INTRODUCTION 1 1 Package Contents CAM 7200 series Power Adaptor Option DC12V PoE Product CD Accessory Warranty Card 1...

Page 7: ...olution z QoS Enabled Video Streaming For real time video streaming requirements the CAM 7200 series implemented the 802 1pQ features inside the SoC as the streaming engine to make sure the video stre...

Page 8: ...ion delivers better sensitivity and responds faster than software motion detection z Bundle Powerful Surveillance Software To extend the capabilities of the CAM 7200 series a powerful surveillance pro...

Page 9: ...nk or laundry tub in a wet basement or near a swimming pool and the like z Don t use accessories not recommended by the manufacturer z Only install this device and the power supply in a dry place prot...

Page 10: ...ontrols may result in damage and will often require extensive work by a qualified technician to restore the video product to its normal operation z Safety Check Upon completion of any service or repai...

Page 11: ...1 6 1 4 Physical Description...

Page 12: ...1 7 1 DI O z DI To Trigger Logic Level 0 0 0 4V Normal Logic Level 1 3 3 30V PIN NAME DESCRIPTION 1 GND Ground Pin 2 DI Digital Input 3 GND Ground Pin 4 DO Digital Output...

Page 13: ...cal network segment 10Base T 100Base TX Ethernet The WAN port is for FTTH and can connect to an xDSL or cable modem The Network connector is Terminal block instead of RJ 45 port please based on the la...

Page 14: ...port or DC input You can power the IP camera with multiple power inputs at the same time If you do the IP camera will get the power from the first power input plugged into it 7 Audio Input GND MIC NOT...

Page 15: ...Exit These cable exits are used for cables to go through Please cut it with tools 10 Zoom Lever Move this lever to adjust the optical zoom After adjusting rotate it clockwise to fix it 11 Focus Lever...

Page 16: ...11 z Back Light Compensation ON OFF Switchable z Flickless ON OFF Switchable z Automatic Gain Control ON OFF Switchable 13 Video DC level Adjustment Rotate it adjust the overall lighting for this came...

Page 17: ...0 series 2 1 Connect the IP Indoor Fixed Dome 2 1 1 Remove the cover Please remove the dome cover first 2 1 2 Open the dome bottom Release these 3 screws to open the dome bottom 2 1 3 Insert the cable...

Page 18: ...to connectors Please follow the instruction at Chapter 2 for how to connect to each connector 2 1 5 Select a cable exit and cut There are three cable exits for cable to run out the CAM 7200 series Ple...

Page 19: ...2 14 2 1 6 Fasten the dome bottom back Reverse what you do in 2 1 2 to fasten the dome bottom...

Page 20: ...ed Dome Surface 2 2 1 Place the camera on the surface and aim to your shooting direction Please aim the arrow here to your shooting direction 2 2 2 Fasten the camera with 2 screws Please aim the arrow...

Page 21: ...2 16 2 3 Mount the IP Indoor Fixed Dome Flush 2 3 1 Flush Bracket Contents 1 Flush Bracket 2 Flush Ring 3 Accessory 2 3 2 Assembly the Flush Ring Please refer to the picture to assembly the flush ring...

Page 22: ...2 17 2 3 3 Fasten Dome to Flush Bracket Please refer to the picture to assembly the flush ring 2 3 4 Cut a hole on the ceiling The hole for flush bracket should be 173mm...

Page 23: ...to rotate the screws counterclockwise to release the clip After you insert the Flush Bracket rotate the screws clockwise to fasten the Flush Bracket to the ceiling 2 3 6 Fix the Flush ring Insert the...

Page 24: ...2 19...

Page 25: ...he IP Indoor Fixed Dome Wall 2 4 1 Wall Mount Bracket contents 1 Wall Bracket 2 Accessory 2 4 2 Mount Bracket on the wall Mount the bracket on the wall using the screw sets provided 2 4 3 Mount Camera...

Page 26: ...ase adjust the camera direction first Then Move the focus and the zoom lever at the Chapter 1 to adjust the zoom and the focus Fix the zoom and focus after adjusting 3 2 Adjust CCD functions Refer to...

Reviews: