


28
(SLP) transactions. The various types of transactions allow for Salaried Exempt and Salaried
Non-Exempt employees to use the software.
A normal transaction is created when an employee clocks IN or OUT using the Add Employee
Transaction feature. An INSERTED transaction is a PUNCH or MISCELLANEOUS entry
inserted by an Administrator using the Punch Editor feature. A TIMESLIP transaction is created
when an employee submits a transaction using the Submit Employee Time slip feature (Salaried
Employees Only).
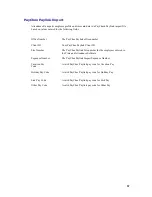
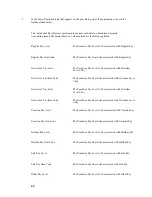
An INSERTED transaction can be identified in the Punch Editor window by the text (
INS
) to the
left of the transaction. It appears the same on the Time Card Report. A TIMESLIP transaction
can be identified in the Punch Editor window by the text (
SLP
) to the left of the transaction as
well as the Time Card Report. A normal punch using the Add Employee Transaction feature can
be identified in the Punch Editor window by the text (
CLK
).
An administrator can also DELETE transactions. When deleting a normal or TIMESLIP
transaction, the Punch Editor does not actually delete the transaction from the database. The
transaction will no longer appear in the Punch Editor window, but will appear on reports. The
transaction will be marked as DELETED. DELETED transactions appear on a Time Card Report
in a separate section entitled Deleted Transactions. They are ignored in calculating the employee's
total time accumulation.
An employee's total time accumulation is automatically updated when
transactions are added or deleted.
Punch Editing How-To’s:
•
Inserting an Employee Punch
•
Deleting an Employee Punch
•
Viewing the details of transactions and how the software calculates the totals
•
Editing the Total Time Accumulations
•
Printing the Time Card
I
I
n
n
s
s
e
e
r
r
t
t
i
i
n
n
g
g
a
a
n
n
E
E
m
m
p
p
l
l
o
o
y
y
e
e
e
e
P
P
u
u
n
n
c
c
h
h
To Insert an Employee Punch:
1. From the main window of Attendance Rx, click the Punch Editing icon or from the View menu select
Punch Editing.
2. Select an employee from the drop-down menu.