background image

WR-G+           


 54M Wireless Router User Guide 


 - 

56

 - 

Appendix A: FAQ 

1.  How do I configure the router to access Internet by ADSL users? 

1)  First, configure the ADSL modem configured in RFC1483 bridge model. 
2)  Connect the Ethernet cable from your ADSL modem to the WAN port on the 

router. The telephone cord plugs into the Line port of the ADSL modem. 

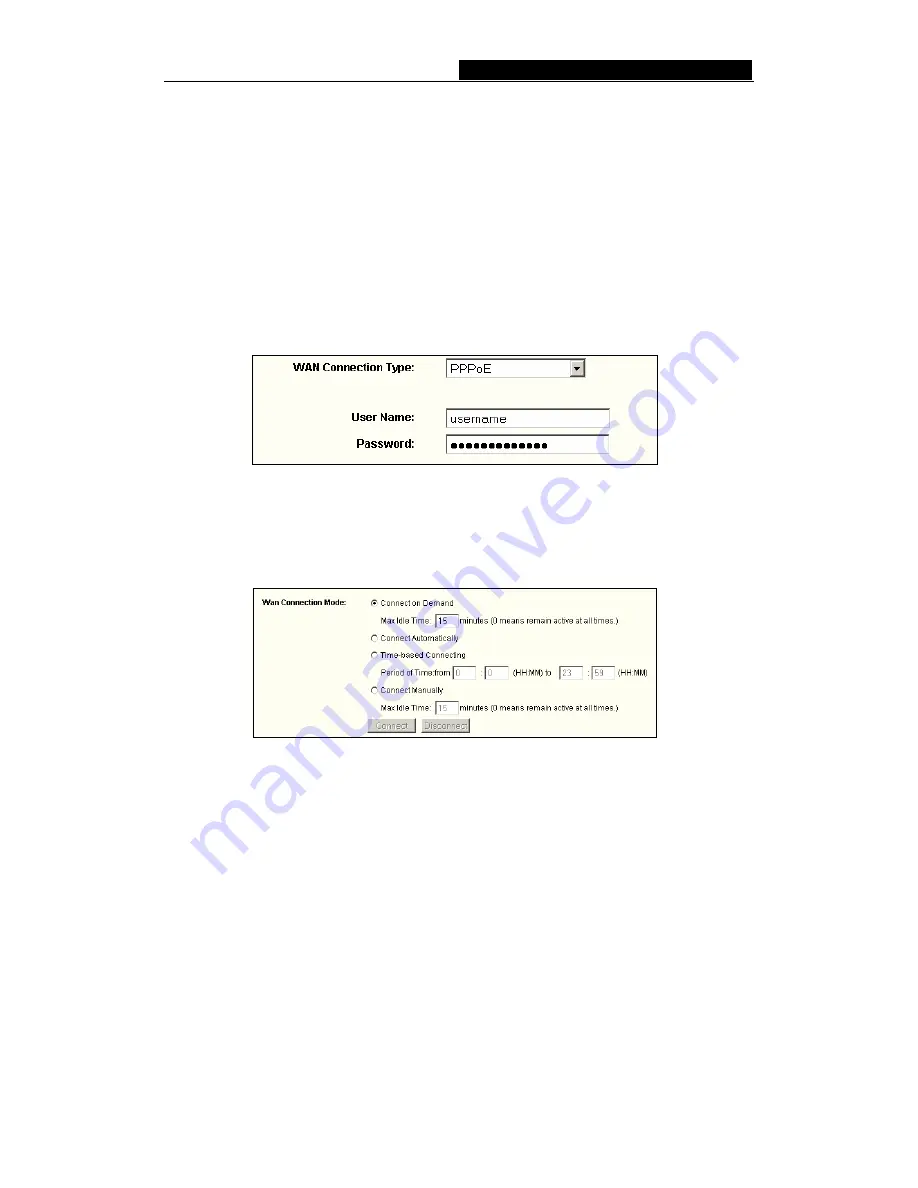
3)  Login to the router, click the “Network” menu on the left of your browser, and 

click "WAN" submenu. On the WAN page, select “PPPoE” for WAN Connection 
Type. Type user name in the “User Name” field and password in the “Password” 
field, finish by clicking “Connect”. 


Figure A-1  PPPoE Connection Type 

4)  If your ADSL lease is in “pay-according-time” mode, select “Connect on 

Demand” or “Connect Manually” for Internet connection mode. Type an 
appropriate number for “Max Idle Time” to avoid wasting paid time. Otherwise, 
you can select “Auto-connecting” for Internet connection mode. 


Figure A-2  PPPoE Connection Mode 

Note

:  

i. 

Sometimes the connection cannot be disconnected although you specify a 
time to Max Idle Time, since some applications is visiting the Internet 
continually in the background. 

ii. 

If you are a Cable user, please configure the router following the above 
steps. 

2.  How do I configure the router to access Internet by Ethernet users? 

1)  Login to the router, click the “Network” menu on the left of your browser, and 

click "WAN" submenu. On the WAN page, select “Dynamic IP” for "WAN 
Connection Type", finish by clicking “Save”. 

2)  Some ISPs require that you register the MAC Address of your adapter, which is 

connected to your cable or DSL modem during installation. If your ISP requires 
MAC register, login to the router and click the "Network" menu link on the left of 

Summary of Contents for WR-G+

Page 1: ...ircuit different from that to which the receiver is connected Consult the dealer or an experienced radio TV technician for help This device complies with part 15 of the FCC Rules Operation is subject...

Page 2: ...ion Guide 9 4 1 TCP IP configuration 9 4 2 Quick Installation Guide 10 Chapter 5 Configuring the Router 14 5 1 login 14 5 2 Status 14 5 3 Quick Setup 15 5 4 Network 15 5 4 1 LAN 15 5 4 2 WAN 16 5 4 3...

Page 3: ...y net DDNS 49 5 10 3 Comexe cn DDNS 49 5 11 System Tools 50 5 11 1 Time 50 5 11 2 Firmware 51 5 11 3 Factory Defaults 52 5 11 4 Backup and Restore 52 5 11 5 Reboot 53 5 11 6 Password 53 5 11 7 Log 54...

Page 4: ...One AC power Adapter for WR G 54Mbps Wireless Router Quick Installation Guide One Resource CD for WR G 54Mbps Wireless Router including This Guide Other Helpful Information Note If any of the listed...

Page 5: ...on range is extended to 4 9 times It is an easy web based setup for installation and management Even though you may not be familiar with the router this guide will make configuring the router easy Bef...

Page 6: ...4 9 times It is compatible with all IEEE 802 11g and IEEE 802 11b products The WR G 54Mbps Wireless Router provides flexible access control so that parents or network administrators can establish res...

Page 7: ...d access policies based on time of day for children or staff Provides 64 128 152 bit WEP encryption security and wireless LAN ACL Access Control List Supports Flow Statistics Supports ICMP FLOOD UDP F...

Page 8: ...ght to left AC power socket only use the power adapter supplied with the WR G 54Mbps Wireless Router use of a different adapter may result in product damage Four 10 100Mbps RJ45 LAN ports for connecti...

Page 9: ...WR G 54M Wireless Router User Guide 6 Figure 2 2 Rear Panel sketch...

Page 10: ...he router you should connect your PC to the Internet through your broadband service successfully If there is any problem please contact your ISP After that please install the router according to the f...

Page 11: ...WR G 54M Wireless Router User Guide 8 Figure 3 1 Hardware Installation of the WR G 54Mbps Wireless Router...

Page 12: ...et up the TCP IP Protocol for your PC If you need instructions as to how to do this please refer to Appendix B Configuring the PC 2 Configure the network parameters The IP address is 192 168 1 xxx xxx...

Page 13: ...Is the TCP IP configuration for your PC correct Note If the router s IP address is 192 168 1 1 your PC s IP address must be within the range of 192 168 1 2 192 168 1 254 the gateway must be 192 168 1...

Page 14: ...s LAN Settings in the screen that appears cancel the Using Proxy checkbox and click OK to finish it If the User Name and Password are correct you can configure the router using the web browser Please...

Page 15: ...will appear shown in figure 4 8 Figure 4 8 Quick Setup Static IP Note The IP parameters should have been provided by your ISP IP Address This is the WAN IP address as seen by external users on the In...

Page 16: ...router can be used It may be illegal to use the wireless function of the router in a region other than one of those specified in this field Channel The current channel in use This field determines whi...

Page 17: ...displays the router s current status and configuration All information is read only 1 LAN This field displays the current settings or information for the LAN including the MAC address IP address and...

Page 18: ...4 Network Figure 5 2 the Network menu There are three submenus under the Network menu shown in figure 5 2 LAN WAN and MAC Clone Click any of them and you will be able to configure the corresponding fu...

Page 19: ...in the same subnet the Virtual Server and DMZ Host will change accordingly at the same time 5 4 2 WAN You can configure the WAN port parameters on this page First please choose the WAN Connection Typ...

Page 20: ...our ISP connection If your ISP gives you one or two DNS addresses select Use These DNS Servers and enter the primary and secondary addresses into the correct fields Otherwise the DNS servers will be a...

Page 21: ...TU Size The normal MTU Maximum Transmission Unit value for most Ethernet networks is 1500 Bytes For some ISPs you may need to modify the MTU But this is rarely required and should not be done unless y...

Page 22: ...nect based on time Enter the start time in HH MM format for connecting and end time in HH MM format for disconnecting in the Period of Time fields Note Only when you have configured the system time on...

Page 23: ...ess specified by ISP check box and enter the IP Address in dotted decimal notation which your ISP provided Detect Online Interval The default value is 0 you can input the value between 0 and 120 The r...

Page 24: ...Click Logout to end 802 1X authentication Host Name This field is required to be filled by some service provider 5 If you choose 802 1X Static IP you should enter the follow parameters figure 5 9 Fig...

Page 25: ...ou can configure the router to disconnect from your Internet connection after a specified period of inactivity Max Idle Time If your Internet connection has been terminated due to inactivity Connect o...

Page 26: ...y a time to Max Idle Time since some applications are visiting the Internet continually in the background Click the Connect button to connect immediately Click the Disconnect button to disconnect imme...

Page 27: ...nfigure the router to make it connect or disconnect manually After a specified period of inactivity Max Idle Time the router will disconnect from your Internet connection and you will not be able to r...

Page 28: ...fy a time to Max Idle Time since some applications are visiting the Internet continually in the background Connect Automatically Connect automatically after the router is disconnected To use this opti...

Page 29: ...address will fill in the WAN MAC Address field Click Restore Factory MAC to restore the MAC address of WAN port to the factory default value Click the Save button to save your settings Note 1 Only the...

Page 30: ...illegal to use the wireless function of the router in a region other than one of those specified in this field If your country or region is not listed please contact your local government agency for...

Page 31: ...A WPA2 authentication type based on Radius Server Authentication Options You can select one of the following authentication options When you select WEP for authentication type you can select the follo...

Page 32: ...rase You can enter a WPA or WPA2 passphrase between 8 and 63 characters long Group Key Update Period Specify the group key update interval in seconds The value can be either 0 seconds or from 30 secon...

Page 33: ...tations can access the router or not If you desire that the unspecified wireless stations can access the router please select the radio button Allow the stations not specified by any enabled entries i...

Page 34: ...e router and the wireless station C with MAC address 00 0A EB 00 07 8A be able to access the router when its WEP key is 2F34D20BE2E 54B326C5476586A while all other wireless stations cannot access the...

Page 35: ...he router 5 5 3 Wireless Statistics This page shows MAC Address Current Status Received Packets and Sent Packets for each connected wireless station Figure 5 18 The router attached wireless stations M...

Page 36: ...DHCP server within your network or else you must manually configure the computer Start IP Address This field specifies the first of the addresses in the IP address pool 192 168 1 100 is the default s...

Page 37: ...at the router has allocated to the DHCP client Lease Time The time of the DHCP client leased Before the time is up DHCP client will request to renew the lease automatically You cannot change any of th...

Page 38: ...make all entries disabled Click the Delete All button to delete all entries Click the Next button to go to the next page and Click the Previous button to return the previous page Note The function won...

Page 39: ...server entry 1 Click the Add New button pop up figure 5 26 2 Select the service you want to use from the Common Service Port list If the Common Service Port list does not have the service that you wan...

Page 40: ...ggering on this page shown in figure 5 27 Figure 5 27 Port Triggering Once configured operation is as follows 1 A local host makes an outgoing connection using a destination port number defined in the...

Page 41: ...Enable checkbox to enable 7 Click the Save button to save the new rule Figure 5 28 Add or Modify a Triggering Entry There are many popular applications in the Popular Application list You can select i...

Page 42: ...IP Address field 3 Click the Save button Note After you set the DMZ host the firewall related to the host will not work 5 7 4 UPnP The Universal Plug and Play UPnP feature allows the devices such as...

Page 43: ...g Domain Filtering MAC Filtering Remote Management and Advanced Security Click any of them and you will be able to configure the corresponding function The detailed explanations for each submenu are p...

Page 44: ...default setting Disabled To set up an IP Address Filtering entry click Enable Firewall and Enable IP Address Filtering on the Firewall page and click the Add New button The page Add or Modify an IP A...

Page 45: ...f you want to delete the entry click the Delete 2 Modify the information 3 Click the Save button Click the Enable All button to make all entries enabled Click the Disabled All button to make all entri...

Page 46: ...803 1705 than the entry will take effect from 08 03 to 17 05 2 Domain Name Type the domain or key word as desired in the field A blank in the domain field means all websites on the Internet For exampl...

Page 47: ...ing have been selected on the Firewall page To Add a MAC Address filtering entry clicking the Add New button The page Add or Modify a MAC Address Filtering entry will appear shown in figure 5 38 Figur...

Page 48: ...filtering list on this page 5 8 5 Remote Management You can configure the Remote Management function on this page shown in figure 5 39 This feature allows you to manage your Router from a remote loca...

Page 49: ...l value indicates the time section of the packets statistic The result of the statistic used for analysis by SYN Flood UDP Flood and ICMP Flood DoS protection Enable or Disable the DoS protection func...

Page 50: ...S Host Table button to display the DoS host table by blocking The page will appear that shown in figure 5 41 Figure 5 41 Thwarted DoS Host Table This page shows Host IP Address and Host MAC Address fo...

Page 51: ...entry you want to modify If you want to delete the entry click the Delete 2 Modify the information 3 Click the Save button Click the Enable All button to make all entries enabled Click the Disabled A...

Page 52: ...the DDNS service 5 10 2 Oray net DDNS If your selected dynamic DNS Service Provider is www oray net the page will appear as shown in figure 5 45 Figure 5 45 Oray net DDNS Settings To set up for DDNS...

Page 53: ...The status of the DDNS service connection is displayed here Click Logout to logout of the DDNS service 5 11 System Tools Figure 5 47 The System Tools menu There are eight submenus under the System Too...

Page 54: ...saving time please follow the steps below 1 Select using daylight saving time 2 Enter daylight saving beginning time and end time in the right blanks 3 Click Save Note 1 This setting will be used for...

Page 55: ...rrent hardware version The hardware version of the upgrade file must accord with the current hardware version Note 1 Do not turn off the router or press the Reset button while the firmware is being up...

Page 56: ...e router Some settings of the router will take effect only after rebooting which include Change LAN IP Address System will reboot automatically MAC Clone system will reboot automatically DHCP service...

Page 57: ...5 11 8 Statistics The Statistics page shown in figure 5 55 displays the network traffic of each PC in LAN including total traffic and traffic of the last Packets Statistic interval seconds Figure 5 55...

Page 58: ...eived and transmitted in the last Packets Statistic interval seconds ICMP Tx The total amount of the ICMP packets transmitted to WAN in the last Packets Statistic interval seconds UDP Tx The total amo...

Page 59: ...ion mode Type an appropriate number for Max Idle Time to avoid wasting paid time Otherwise you can select Auto connecting for Internet connection mode Figure A 2 PPPoE Connection Mode Note i Sometimes...

Page 60: ...Server or DMZ Host 3 How to configure Virtual Server Login to the router click the Forwarding menu on the left of your browser and click Virtual Servers submenu On the Virtual Server page click Add Ne...

Page 61: ...such as 88 into the Web Management Port field Click Save and reboot the router Figure A 7 Remote Management Note If the above configuration takes effect to configure to the router by typing http 192...

Page 62: ...1 Make sure the Wireless Router Radio is enabled 2 Make sure that the wireless stations SSID accord with the router s SSID 3 Make sure the wireless stations have right KEY for encryption when the rout...

Page 63: ...Control Panel 2 Double click the Network icon click on the Configuration tab in the appearing Network window 3 Click on the Add button Select Protocol and then click Add Figure B 1 Add Network Protoc...

Page 64: ...The following TCP IP Properties window will display and the IP Address tab is open on this window by default 4 Now you have two ways to configure the TCP IP protocol below Assigned by DHCP Sever a Sel...

Page 65: ...tab as shown in the following figure Figure B 6 DNS Configuration tab Setting IP address manually a Select Specify an IP address on IP Address tab as shown in the following figure If the router s LAN...

Page 66: ...ateway tab and click on the Add button as shown in the figure Figure B 8 Gateway tab c On the DNS Configuration tab click Enable DNS radio and type your computer name in to the Host field and a Domain...

Page 67: ...WR G 54M 54M Wireless Router User Guide 64 Add button Shown below Figure B 9 DNS Configuration tab Now all the configurations are finished it will take effect after reboot...

Page 68: ...I MDIX Cabling Type 10BASE T UTP category 3 4 5 cable maximum 100m EIA TIA 568 100 STP maximum 100m 100BASE TX UTP category 5 5e cable maximum 100m EIA TIA 568 100 STP maximum 100m Radio Data Rate 54...

Page 69: ...working at 54 Mbps using direct sequence spread spectrum DSSS technology using OFDM modulation and operating in the unlicensed radio spectrum at 2 4GHz and backward compatibility with IEEE 802 11b dev...

Page 70: ...ices must be configured with the same SSID This is typically the configuration parameter for a wireless PC card It corresponds to the ESSID in the wireless Access Point and to the wireless network nam...

Reviews: