background image

IRIS 3000® DIGITAL VIDEO PHONE USER MANUAL

25

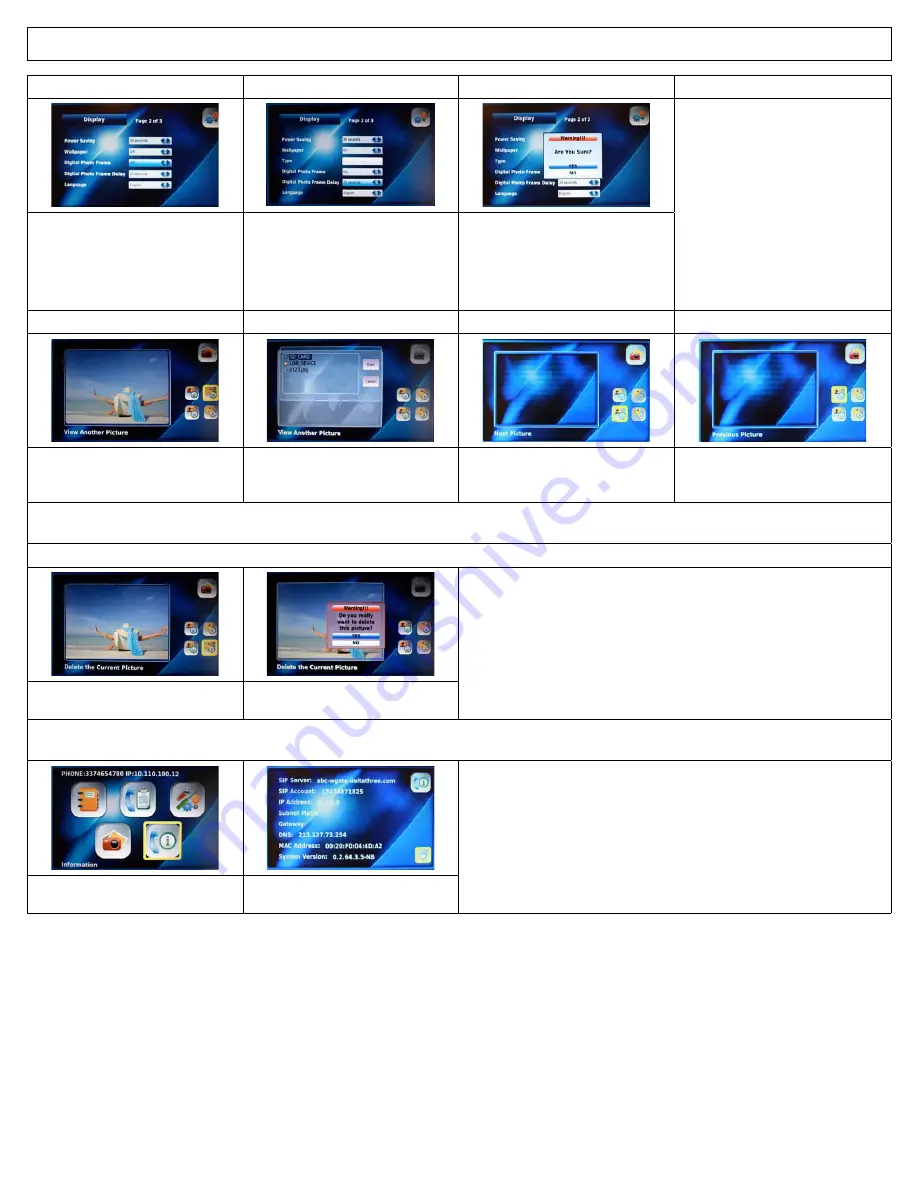
Digital Photo Frame On/Off

Digital Photo Frame Delay

Note:  If you are displaying large 

photos (more than 3 mega pixels), 

set the delay to 20 seconds to 

allow time for each photo to load.

Select “

On

” if you want to enable the 

Digital Photo Frame option or “

Off

” to 

disable it

Select the amount of delay you wish 

in between each Digital Photo Frame 

from 10-15-20 seconds.  

Note:  If you are 

displaying large photos (more than 3 mega 

pixels), set the delay to 20 seconds to allow 

time for each photo to load

Press the 

BACK 

button when 

finished.  Select “

YES

” to save and 

Press

 OK

View Another Picture

Next Picture

Previous Picture

Select “

View Another Picture

Select the file type you want to  

display and Press 

OK

Select “

Next Picture

” in the window 

to view the next photo and Press 

OK

Select “

Previous Picture

” in the 

window to view the last photo and 

Press 

OK

Note: The digital video phone can only use JPG and PNG image formats.  If the size of your image is greater than 3 megapixels, increase the time 

delay between pictures to 20 seconds in order to give each photo time to load.     

Delete the Current Picture

Select “

Delete the Current 

Picture

” in the window 

Select “

YES

” if you want to delete the 

picture and Press 

OK

4-8. Information 

You can view information about your digital video phone in this section.

Select “

Information

” in the Main 

Menu and Press 

OK

IRIS 3000® Digital Video Phone  

Information

Summary of Contents for IRIS 3000

Page 1: ...IRIS 3000 DIGITAL VIDEO PHONE USER MANUAL IRIS 3000 DIGITAL VIDEO PHONE...

Page 2: ...4 3 1 Entering Numbers 12 4 3 2 Entering Letters 12 4 3 3 Entering Numbers and Letters 12 4 4 Phonebook 12 4 4 1 All Contacts 12 4 4 1 1 Add New Entry 13 4 4 1 2 Make a Call 13 4 4 1 3 Edit Contact 1...

Page 3: ...t occurs due to such mishandling To avoid damage overheating or shock do not install in a humid location Do not install the unit in direct sunlight or near heat sources such as radiators To avoid elec...

Page 4: ...phone on off 2 POWER DC IN Connects to the power adapter 3 USB Universal Serial Bus port used to store data on the digital video phone 4 LAN Local Area Network connection 5 WAN Connects to Internet vi...

Page 5: ...se 9 Enters 10 NUMERIC KEYPAD Enters numbers or letters 11 Enters or rejects incoming call 12 MENU Activates the Main Menu 13 BACK Moves to the previous menu finishes a sequence or deletes characters...

Page 6: ...ll is completed press the HOLD button to reconnect to the original caller To switch between calls press HOLD Call Conference Press HOLD during the initial call the call can be incoming or outgoing Thi...

Page 7: ...e OK button Use the Navigation buttons to select the icon Make A Call Press the OK button Select Call Log and Press OK Select the type of Call Log Menu and Press OK Select the desired number and Press...

Page 8: ...he SPEAKER button NOTE Your call data is stored in the Call Log 3 5 Listening to Your Voice Mail An envelope will appear in the bottom right hand corner of your screen to indicate you have a voice mai...

Page 9: ...o image is displayed on the other party s screen If you want to release privacy mode press the PRIVACY button again 3 7 3 Volume Control To adjust the volume during a call Lowers the volume Raises the...

Page 10: ...al video phone 3 7 7 Call Waiting You will hear a call waiting tone to indicate Incoming Call signal and the Caller ID information will be displayed To accept the incoming call press 1 the current cal...

Page 11: ...such as NTP D S T and G M T In the Upgrade Menu you can set the upgrade server address and the upgrade method The Administrator Menu provides access to more complex settings such as SIP A V Codec set...

Page 12: ...ode to A Press buttons S K Y consecutively 7 7 7 7 5 5 9 9 9 4 3 3 Entering Numbers and Letters Example To enter 123 com You will press the corresponding key until the desired letter appears Press the...

Page 13: ...t All Contacts in the Phonebook Menu and Press OK Select Add New Entry in the All Contacts Menu and Press OK Enter information in Add New Entry window and select Save 4 4 1 2 Make Call You can make a...

Page 14: ...ect Save and Press OK 4 4 1 4 Delete Contact You can delete contact information that you do not need anymore Select Phonebook in the Main Menu and Press OK Select All Contacts in the Phonebook Menu an...

Page 15: ...nu and Press OK Select Search in the Phonebook Menu and Press OK Select Search by number in the Search Menu and Press OK Enter the phone number you wish to find in the Search by number window and Pres...

Page 16: ...isted in Total Calls You can make a call by selecting the desired number Select Call Log from the Main Menu and Press OK Select Total Calls from the Call Log Menu and Press OK Select the number or con...

Page 17: ...a call by the number selected and record the number in Phonebook Select Call Log from the Main Menu and Press OK Select Missed in the Call Log Menu and Press OK Select the number in the Missed Calls w...

Page 18: ...ct Call Log from the Main Menu and Press OK Select the type of call from the Call Log Menu and Press OK Select the desired number from the list to delete Select Delete in the menu and Press OK Select...

Page 19: ...ss OK Select the Net Settings or Interface PLEASE DO NOT ATTEMPT TO ADJUST ITEMS IN THE NETWORK MENUS PLEASE CONTACT IRIS 3000 DIGITAL VIDEO PHONE CUSTOMER SUPPORT FOR ASSISTANCE 1 866 619 6444 4 6 1...

Page 20: ...s the BACK button then Select Yes and Press OK Always press the BACK button to save and exit the menu After each entry you will see a screen asking you to verify your changes Select Yes or No and sele...

Page 21: ...the interval at which the phone will switch to power saving mode from 30 60 90 seconds 4 6 2 Wallpaper The wallpaper is the background displayed on your LCD screen You can choose a different wallpape...

Page 22: ...ke you can adjust the upload bandwidth speed of your video phone Select Settings in the Main Menu and Press OK Select System Settings in the Settings Menu and Press OK Select Display in the System Set...

Page 23: ...w Normal or High Press the BACK button when finished and select YES to save your settings then Press OK 4 6 2 7 Video Codec Video Codec represents the video compression on your phone The IRIS 3000 Dig...

Page 24: ...STANCE 1 866 619 6444 4 7 Digital Photo Frame Your digital video phone provides you with the functionality of displaying digital photos taken on other devices such as cameras camera phones etc Insert...

Page 25: ...w Another Picture Next Picture Previous Picture Select View Another Picture Select the file type you want to display and Press OK Select Next Picture in the window to view the next photo and Press OK...

Page 26: ...wer cycle the digital video phone by turning the phone off and then on again When I receive a call the screen is turned on but there is no ringing sound Verify the ringtone volume level is set higher...

Page 27: ...tal video phone Phone FXS port Verify phone cable from the digital video phone to the alternate phone is securely connected Verify that the alternate phone is set to TONE dialing not PULSE Connect the...

Page 28: ...here is no response During a Call Hold You are in Hold mode Video Audio On Hold The call was put on hold by other phone Privacy On You are in Privacy mode Mute On You are in Mute mode Extension In Use...

Reviews: