background image

IRIS 3000® DIGITAL VIDEO PHONE USER MANUAL

3

Safety Instructions

This guideline is for user safety and prevention of any financial loss in advance.  Read thoroughly before using your digital video phone.

Precautions are categorized in two types and meanings are as follows:

Warning

This is a sign alerting you of possible death or severe injury if the instruction is not followed.

Caution

This is a sign alerting you of possible injury or financial loss if the instruction is not followed.

Caution

When removing the power adapter, turn off the power switch and unplug the power plug.
Unplugging while the power is on may cause breakage of your IRIS 3000® Digital Video Phone.  Do not install the IRIS 3000® 

Digital Video Phone in an unsafe place or on an unstable surface.
The digital video phone may not operate properly, or may not work at all.  Use a soft fabric when cleaning the LCD or camera.
Do not use strong chemical solutions or abrasive materials to clean your IRIS 3000® Digital Video Phone as they can damage 

the equipment, especially the LCD or camera.
Install your IRIS 3000® Digital Video Phone close to the most accessible electrical outlet.

Warning

Do not install the unit in a location where it can be affected by dust or gas.  Do not disassemble or modify the IRIS 3000® Digital 

Video Phone or power adapter. The warranty will not cover any defect that occurs due to such mishandling.  To avoid damage, 

overheating or   shock, do not install in a humid location.
Do not install the unit in direct sunlight or near heat sources, such as radiators.  To avoid electric shock, do not touch the power 

adapter during thunder and lightning.  To prevent damage, keep the unit safe from sudden shock.  Do not apply excessive 

force, especially to the LCD screen or camera.

Sudden changes of temperature may cause damage to the unit.   Disconnect the power cable or unplug the power adapter when the 

unit is not in use for an extended period of time.  Only use the power adapter supplied with the IRIS 3000® Digital Video Phone. 

1. INSTALLING THE IRIS 3000® DIGITAL VIDEO PHONE

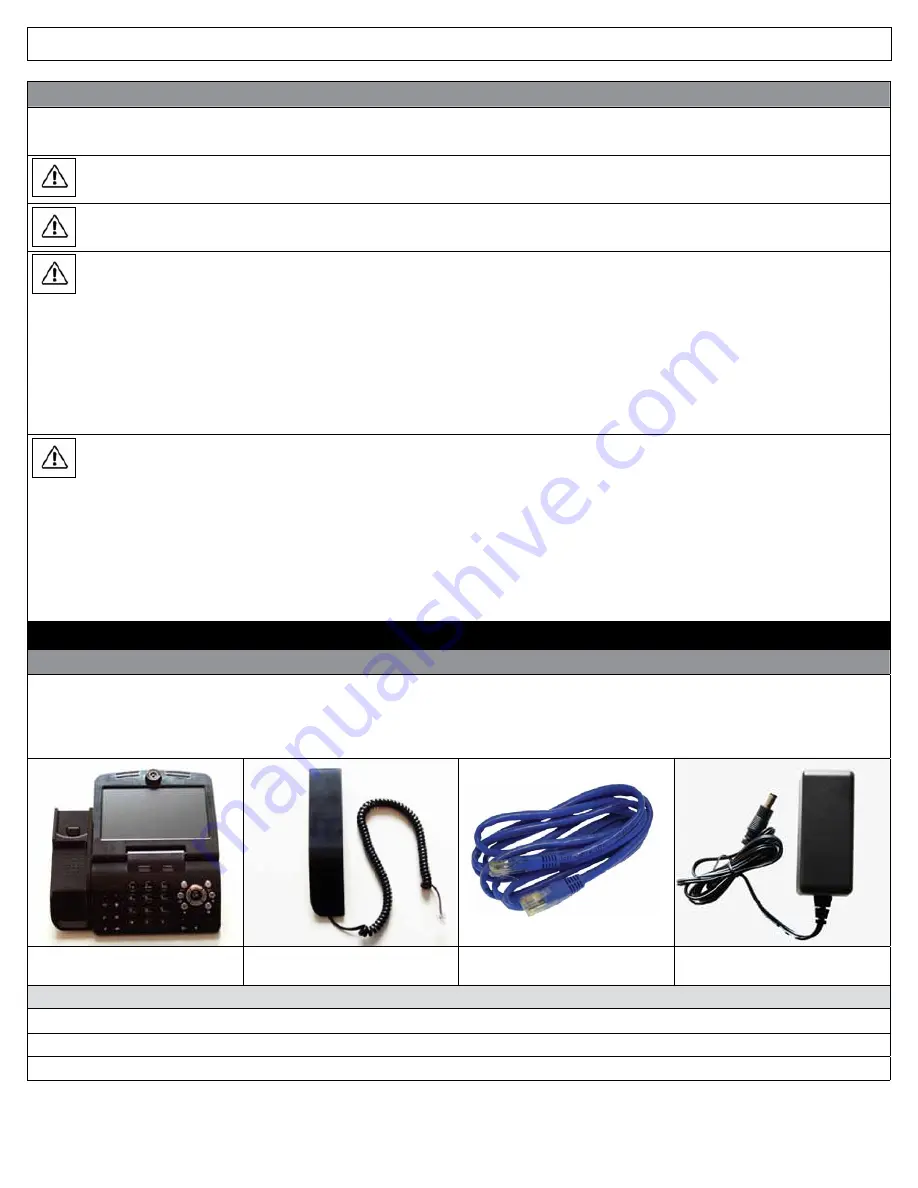
1.1  IRIS 3000® Digital Video Phone Components

The following items should be included with your IRIS 3000® Digital Video Phone. If an item is missing, please contact IRIS 3000® Digital 

Phone Service Customer Support –1-866-619-6444.

*Warning: 

Use the power adapter that comes with your IRIS 3000® Digital Video Phone. Use of any other power adapter, other than one 

provided by IRIS 3000® Digital Phone Service, may result in corruption of your IRIS 3000® Digital Video Phone or even fire.

Main Body of IRIS 3000® Digital 

Video Phone

Handset

Ethernet Cable (RJ-45)

Power Adapter

Before you get started:

Wired Internet service with 256 kbps upload speed or higher is required to use IRIS 3000® Digital Video Phone Service
The IRIS 3000® Digital Video Phone only works with IRIS 3000® Digital Phone Service
Recommended Set-up: Router with Ethernet cable

 (LINKSYS WRT 160N Recommended)

Summary of Contents for IRIS 3000

Page 1: ...IRIS 3000 DIGITAL VIDEO PHONE USER MANUAL IRIS 3000 DIGITAL VIDEO PHONE...

Page 2: ...4 3 1 Entering Numbers 12 4 3 2 Entering Letters 12 4 3 3 Entering Numbers and Letters 12 4 4 Phonebook 12 4 4 1 All Contacts 12 4 4 1 1 Add New Entry 13 4 4 1 2 Make a Call 13 4 4 1 3 Edit Contact 1...

Page 3: ...t occurs due to such mishandling To avoid damage overheating or shock do not install in a humid location Do not install the unit in direct sunlight or near heat sources such as radiators To avoid elec...

Page 4: ...phone on off 2 POWER DC IN Connects to the power adapter 3 USB Universal Serial Bus port used to store data on the digital video phone 4 LAN Local Area Network connection 5 WAN Connects to Internet vi...

Page 5: ...se 9 Enters 10 NUMERIC KEYPAD Enters numbers or letters 11 Enters or rejects incoming call 12 MENU Activates the Main Menu 13 BACK Moves to the previous menu finishes a sequence or deletes characters...

Page 6: ...ll is completed press the HOLD button to reconnect to the original caller To switch between calls press HOLD Call Conference Press HOLD during the initial call the call can be incoming or outgoing Thi...

Page 7: ...e OK button Use the Navigation buttons to select the icon Make A Call Press the OK button Select Call Log and Press OK Select the type of Call Log Menu and Press OK Select the desired number and Press...

Page 8: ...he SPEAKER button NOTE Your call data is stored in the Call Log 3 5 Listening to Your Voice Mail An envelope will appear in the bottom right hand corner of your screen to indicate you have a voice mai...

Page 9: ...o image is displayed on the other party s screen If you want to release privacy mode press the PRIVACY button again 3 7 3 Volume Control To adjust the volume during a call Lowers the volume Raises the...

Page 10: ...al video phone 3 7 7 Call Waiting You will hear a call waiting tone to indicate Incoming Call signal and the Caller ID information will be displayed To accept the incoming call press 1 the current cal...

Page 11: ...such as NTP D S T and G M T In the Upgrade Menu you can set the upgrade server address and the upgrade method The Administrator Menu provides access to more complex settings such as SIP A V Codec set...

Page 12: ...ode to A Press buttons S K Y consecutively 7 7 7 7 5 5 9 9 9 4 3 3 Entering Numbers and Letters Example To enter 123 com You will press the corresponding key until the desired letter appears Press the...

Page 13: ...t All Contacts in the Phonebook Menu and Press OK Select Add New Entry in the All Contacts Menu and Press OK Enter information in Add New Entry window and select Save 4 4 1 2 Make Call You can make a...

Page 14: ...ect Save and Press OK 4 4 1 4 Delete Contact You can delete contact information that you do not need anymore Select Phonebook in the Main Menu and Press OK Select All Contacts in the Phonebook Menu an...

Page 15: ...nu and Press OK Select Search in the Phonebook Menu and Press OK Select Search by number in the Search Menu and Press OK Enter the phone number you wish to find in the Search by number window and Pres...

Page 16: ...isted in Total Calls You can make a call by selecting the desired number Select Call Log from the Main Menu and Press OK Select Total Calls from the Call Log Menu and Press OK Select the number or con...

Page 17: ...a call by the number selected and record the number in Phonebook Select Call Log from the Main Menu and Press OK Select Missed in the Call Log Menu and Press OK Select the number in the Missed Calls w...

Page 18: ...ct Call Log from the Main Menu and Press OK Select the type of call from the Call Log Menu and Press OK Select the desired number from the list to delete Select Delete in the menu and Press OK Select...

Page 19: ...ss OK Select the Net Settings or Interface PLEASE DO NOT ATTEMPT TO ADJUST ITEMS IN THE NETWORK MENUS PLEASE CONTACT IRIS 3000 DIGITAL VIDEO PHONE CUSTOMER SUPPORT FOR ASSISTANCE 1 866 619 6444 4 6 1...

Page 20: ...s the BACK button then Select Yes and Press OK Always press the BACK button to save and exit the menu After each entry you will see a screen asking you to verify your changes Select Yes or No and sele...

Page 21: ...the interval at which the phone will switch to power saving mode from 30 60 90 seconds 4 6 2 Wallpaper The wallpaper is the background displayed on your LCD screen You can choose a different wallpape...

Page 22: ...ke you can adjust the upload bandwidth speed of your video phone Select Settings in the Main Menu and Press OK Select System Settings in the Settings Menu and Press OK Select Display in the System Set...

Page 23: ...w Normal or High Press the BACK button when finished and select YES to save your settings then Press OK 4 6 2 7 Video Codec Video Codec represents the video compression on your phone The IRIS 3000 Dig...

Page 24: ...STANCE 1 866 619 6444 4 7 Digital Photo Frame Your digital video phone provides you with the functionality of displaying digital photos taken on other devices such as cameras camera phones etc Insert...

Page 25: ...w Another Picture Next Picture Previous Picture Select View Another Picture Select the file type you want to display and Press OK Select Next Picture in the window to view the next photo and Press OK...

Page 26: ...wer cycle the digital video phone by turning the phone off and then on again When I receive a call the screen is turned on but there is no ringing sound Verify the ringtone volume level is set higher...

Page 27: ...tal video phone Phone FXS port Verify phone cable from the digital video phone to the alternate phone is securely connected Verify that the alternate phone is set to TONE dialing not PULSE Connect the...

Page 28: ...here is no response During a Call Hold You are in Hold mode Video Audio On Hold The call was put on hold by other phone Privacy On You are in Privacy mode Mute On You are in Mute mode Extension In Use...

Reviews: