


Remote Functions
5
REC VOL
GUI SWITCH
CUE/
Z
PQRS
.
1
2
8
12
13
14
15
3
4
6
7
9
11
10
16
19
20
21
17
5
22
23
25
26
27
28
29
30
32
31
33
34
35
36
37
38
24
18
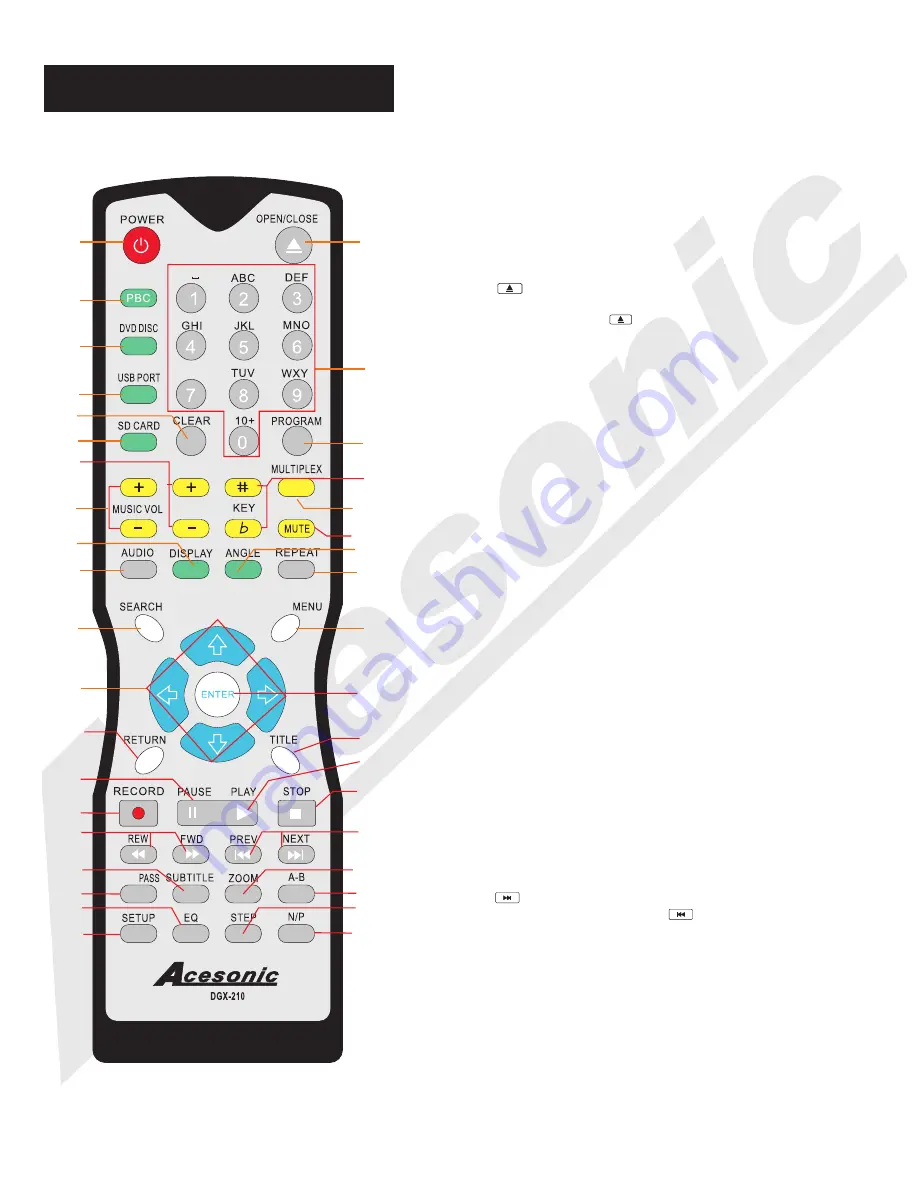
18. CUE /PASS -
Cue:
Switching the mode between
Karaoke and DVD. In Karaoke mode, player will be paused
after one track has finished playing. In DVD mode, all tracks
will be played continually. * Karaoke mode= Cue on, DVD
mode= Cue off.
Pass:
When playing the DVD disc, users can press the PASS
button to skip the menu and play the track or movie directly.
19. SETUP BUTTON-
Press the button to SETUP
menu.
20. EQUALIZER BUTTON -
Select from 7 types of
equalizers or define your personal one.
21. ENTER BUTTON -
Used to confirm entry or
selection.
22.
OPEN/CLOSE BUTTON -
Used to open and close
tray door. When it is open, The disc will come out and
indicator is on, press
again, indicator is off.
23. NUMERIC KEYS 0-9 -
Used to input selections for
track selection or programming purposes. In the PBC
function, the number keys are additionally used for the
selection of menu items.
24. PROGRAM BUTTON -
To program tracks
,
press
STOP then press PROGRAM. Enter your tracks selection
and press PROGRAM again to accept. Press the PLAY to
start programmed tracks.
25. SHARP BUTTON (#) -
Raises the key by a half tone
.
NATURAL BUTTON (b) -
Return to original key tone.
26. MPX -
Switch between the left mono , the right mono
or stereo sounds. Use to turn vocal on/off on multiplex
CD+G or VCD disc.
27. MUTE BUTTON
- Turn the sound On or Off.
28. ANGLE BUTTON
-
When playing DVD, select view
for multi-angle.
31. TITLE BUTTON -
DVD’s have an indication number
which makes it easy to locate chapters.
* You can search by title using alphanumeric keys in USB/SD
mode. See more on page 15.
30. NUMBER/MENU BUTTON -
Press MENU once to
return to the root menu for DVD’s.
* You can search by song-number using numbers keys in
USB/SD mode. See more on page 15.
32. PLAY BUTTON
-
Press to begin playback or to
close disc tray and begin playing automatically.
33. STOP BUTTON -
Press to STOP playback.
34.
SKIP FORWARD BUTTON
-
Press to go to the
beginning of the next track.
SKIP BACKWARD
BUTTON -
Press to go to the beginning of the current or
previous track.
35. ZOOM BUTTON
-
Used to enlarge a section of
video or picture corrently being viewed.
36. A-B BUTTON
-
A-B REPEAT allows you to repeat a
segment of a track until stopped. To use this function:
1.Set a starting point A.
2.Set an end point B.
Afterwards, the unit plays from A to B.
3. Press A-B again, till A-B disappears.
37.
STEP -
Press to play the frame step by step. Press
the PLAY button once to return to normal playback.
38.
P/N BUTTON -
PAL/NTSC switch. Press P/N and
within 2 seconds, press ENTER to complete switch.
NUMBER/
29. REPEAT BUTTON
-
Allows you to repeat a track or disc.
1.Repeat a track - Press REPEAT, the screen shows REP ONE,
the unit plays the current track.
2.Repeat all - Press REPEAT, the screen shows REP ALL, the
unit plays all the tracks on the disc.
* See more function in CD+G mode on Page 14
Summary of Contents for DGX-210
Page 21: ...Note 18...


