3 System upgrades
66
Installing a SAS card
1
Observe the pre-installation instructions on page 26.
2
Remove the side panel described on page 28.
3
If necessary, remove any cables that prevent access to the PCI slot.
4
Locate an empty expansion slot that is compatible with the
specification of the card you intend to install.
5
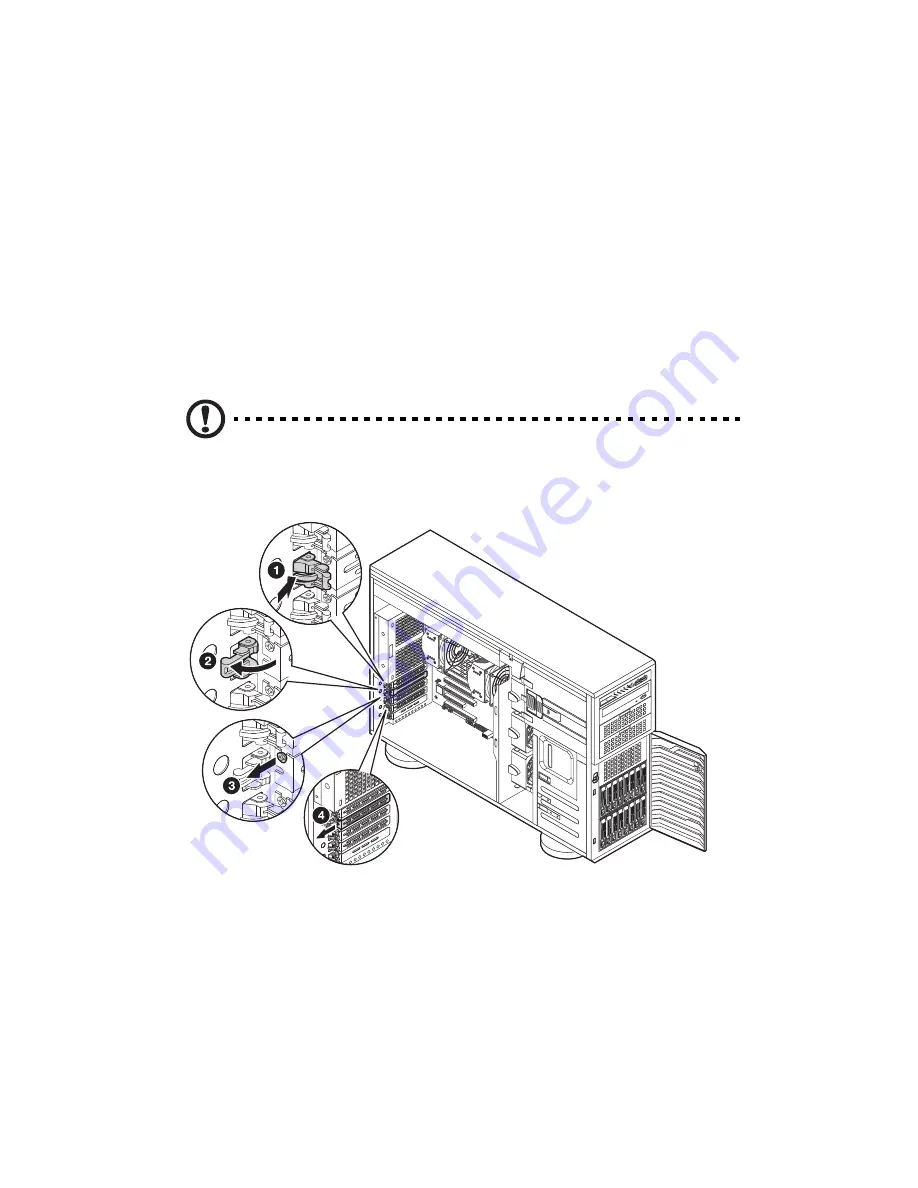
Unclip the restraining latch (
1
) and open in the direction (
2
) shown
below .
6
Remove the screw holding the slot in place (
3
).
7
Slide out the slot shield (
4
).
Caution:
Do not discard the slot cover. If the expansion card is
removed in the future, the slot cover must be reinstalled to maintain
proper system cooling.
8
Remove the expansion card from its protective packaging, handling it
by the edges.
Summary of Contents for AT350 F2 Series
Page 1: ...AT350 F2 Series Service Guide ...
Page 14: ...xiv ...
Page 15: ...1 System tour ...
Page 17: ...3 External and internal structure Front panel With 3 5 inch HDD bays ...
Page 30: ...1 System tour 16 ...
Page 31: ...2 System setup ...
Page 39: ...3 System upgrades ...
Page 82: ...3 System upgrades 68 ...
Page 83: ...4 System BIOS ...
Page 106: ...4 System BIOS 92 Server Management ...
Page 113: ...99 Boot Manager Use this feature to overwrite the original boot sequence ...
Page 116: ...4 System BIOS 102 ...
Page 117: ...5 System troubleshooting ...
Page 128: ...5 System troubleshooting 114 ...
Page 129: ...Appendix A Server management tools ...
Page 135: ...Appendix B Rack mount configuration ...
Page 146: ...Appendix B Rack mount configuration 132 ...
Page 147: ...Appendix C Acer Smart Console ...
Page 164: ...Appendix C Acer Smart Console 150 SSL Certificate Users Port IP Access Control Fan Mode ...
Page 232: ...218 ...


