


3 System upgrades
30
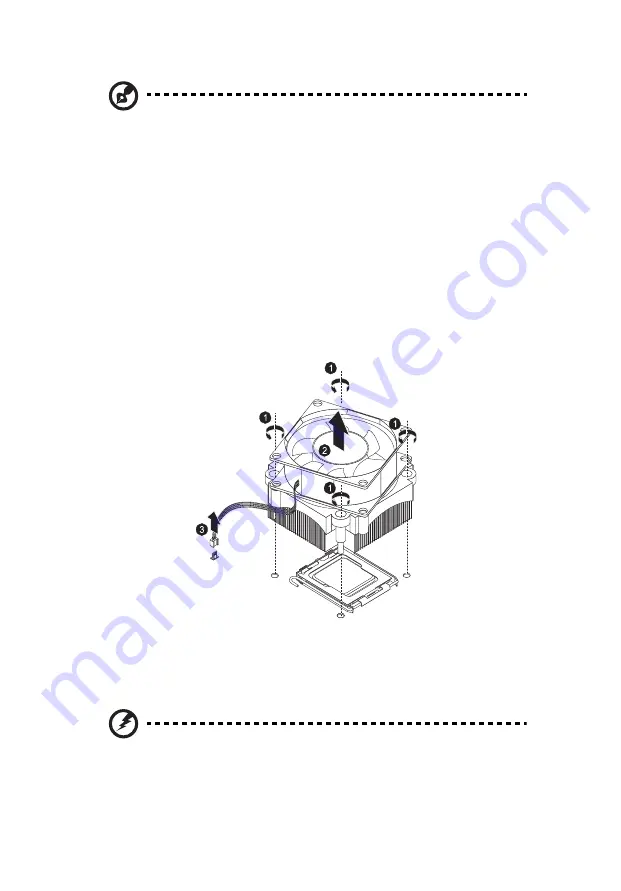
Note: A long-nosed screwdriver is needed to remove/install the
HSF assembly
.
To upgrade the default processor:
1
Perform the pre-installation instructions described on page 22.
2
Remove the side panel described on page 24.
3
Lay the server on its side (components showing).
4
Disconnect the heat sink fan (HSF) cable from its mainboard
connector and remove the HSF assembly.
(1) Use a long-nosed screwdriver to loosen the four HSF mounting
pins.
(2) Once you have loosened all four mounting pins, lift the HSF
away from the mainboard.
(3) Disconnect the heat sink fan cable from the mainboard.
Use an alcohol pad to wipe off the thermal grease from both the
HSF assembly and the processor socket retention plate.
5
Remove the default processor.
Warning! The processor becomes very hot when the system is on.
Allow it to cool off first before handling.
(1) Release then lift up the load lever.
Summary of Contents for AT110 Series
Page 1: ...AT110 Series User Guide ...
Page 14: ...xiv ...
Page 17: ...1 System tour ...
Page 21: ...5 4 HDD carriers 5 Mainboard 6 PCI slot lock 7 System fan No Component ...
Page 29: ...2 System setup ...
Page 36: ...2 System setup 20 ...
Page 37: ...3 System upgrades ...
Page 57: ...4 System BIOS ...
Page 76: ...4 System BIOS 60 window are non configurable ...
Page 81: ...5 System troubleshooting ...
Page 90: ...5 System troubleshooting 74 ...
Page 91: ...Appendix A Server management tools ...
Page 92: ...Appendix A Server management tools 76 ...
Page 96: ...Appendix A Server management tools 80 ...
Page 97: ...Appendix B LSI RAID configuration ...
Page 100: ...Appendix B LSI RAID configuration 84 ...
Page 103: ...87 rear 4 troubleshooting 72 user password 56 ...
Page 104: ...88 ...


