


34
Chapter 2
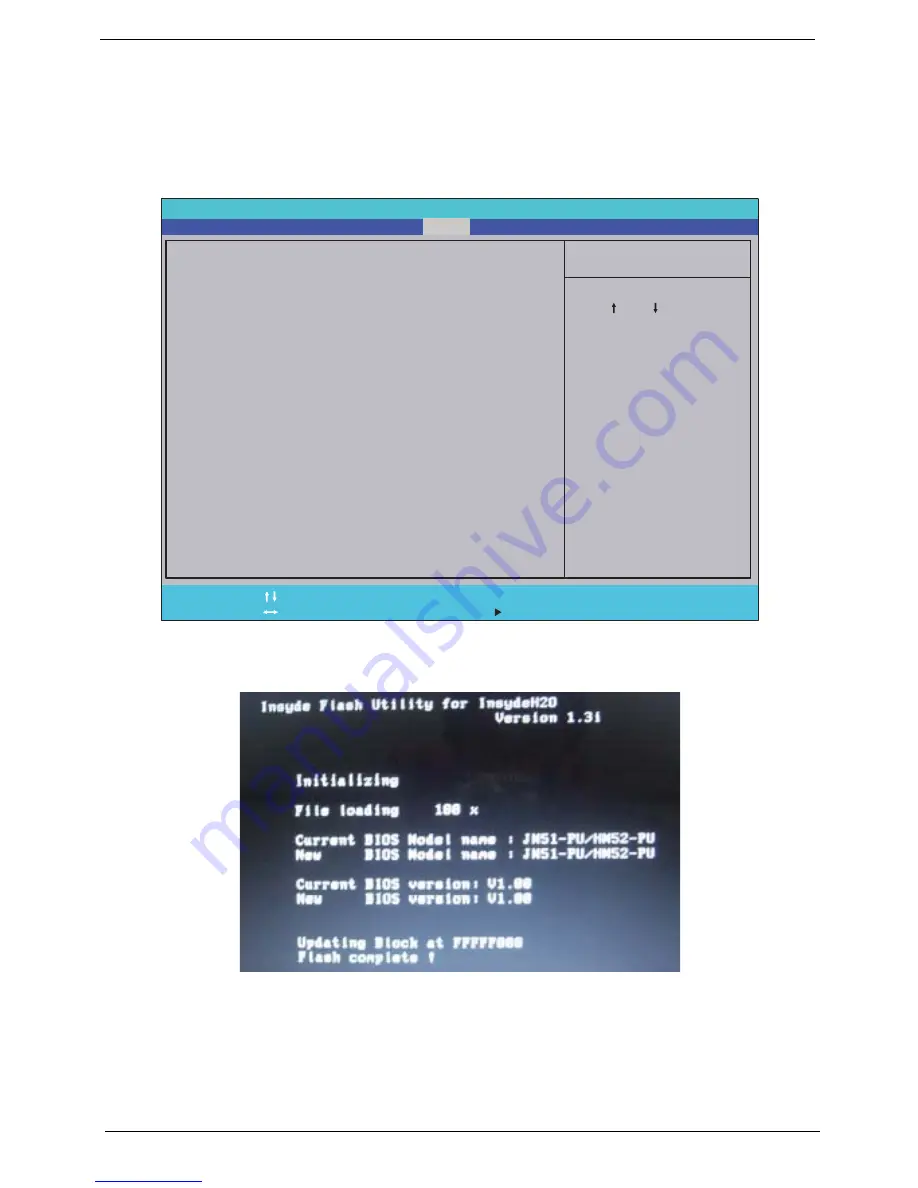
DOS Flash Utility
Perform the following steps to use the DOS Flash Utility:
1.
Press F2 during boot to enter the Setup Menu.
2.
Select
Boot Menu
to modify the boot priority order, for example, if using USB HDD to Update BIOS, move
USB HDD to position 1.
3.
Execute the
FLASH.BAT
batch file to update BIOS in DOS mode.
The flash process begins as shown.
P h o e n i x B I O S S e t u p U t i l i t y
I t e m S p e c i f i c H e l p
U s e < > o r < > t o
s e l e c t a d e v i c e , t h e n
p r e s s < F 6 > t o m o v e i t
u p t h e L i s t , o r < F 5 >
t o m o v e i t d o w n t h e
l i s t . P r e s s < E s c > t o
e s c a p e t h e m e n u .
F 1
E s c
H e l p
E x i t
S e l e c t I t e m
S e l e c t M e n u
C h a n g e Va l u e s
S e l e c t
S u b - M e n u
E n t e r
F 9
F 1 0
S e t u p D e f a u l t s
S a v e a n d E x i t
B o o t p r i o r i t y o r d e r :
1 : I D E 0 : S T 9 6 0 8 2 1 A
2 : I D E 1 : M A T S H I T A D V D
3 : U S B F D D :
4 : N e t w o r k b o o t : R e a l t e k B o o t A g e n t
5 : U S B H D D : x x x x U S B
6 : U S B C D R O M :
B o o t p r i o r i t y o r d e r :
1 : I D E 0 : S T 9 6 0 8 2 1 A
2 : I D E 1 : M A T S H I T A D V D
3 : U S B F D D :
4 : N e t w o r k b o o t : R e a l t e k B o o t A g e n t
5 : U S B H D D : x x x x U S B
6 : U S B C D R O M :
F 5 / F 6
M a i n
B o o t
Exit
Security
Information
Summary of Contents for Aspire Z5751
Page 6: ...VI ...
Page 10: ...X Table of Contents ...
Page 14: ...4 Chapter 1 System Block Diagram ...
Page 34: ...24 Chapter 1 ...
Page 72: ...62 Chapter 3 4 Disconnect the following four cables from the Mainboard A B C D ...
Page 85: ...Chapter 3 75 4 Using both hands lift the Thermal Module clear of the Mainboard ...
Page 87: ...Chapter 3 77 4 Lift the CPU Fan clear of the Mainboard as shown ...
Page 93: ...Chapter 3 83 5 Lift the LCD Panel clear of the module ...
Page 101: ...Chapter 3 91 9 The Antennas and cables appear as shown when correctly installed ...
Page 106: ...96 Chapter 3 2 Replace the four screws and screw caps provided ...
Page 111: ...Chapter 3 101 5 Replace the FFC and press down as indicated to secure it to the Upper Cover ...
Page 122: ...112 Chapter 3 17 Replace the two screws securing the LCD Module to the Lower Cover ...
Page 130: ...120 Chapter 3 ...
Page 154: ...144 Chapter 5 ...
Page 156: ...146 Chapter 6 Aspire 5517 Exploded Diagrams Main Assembly 1 2 3 4 5 ...
Page 169: ...Chapter 6 159 ...
Page 178: ...168 Appendix C ...
Page 182: ...172 ...


