


18
Entering Setup
Power on the computer and the system will start POST (Power On Self Test) process.
When the message of
“Press DEL to enter SETUP”
appears on the screen, press the key
of [Delete] to enter the setup menu.
NOTE:
If the message disappears before you respond and you still wish to enter
Setup, restart the system by turning it OFF and On. You may also restart the
system by simultaneously pressing [Ctrl+ Alt+ Delete].
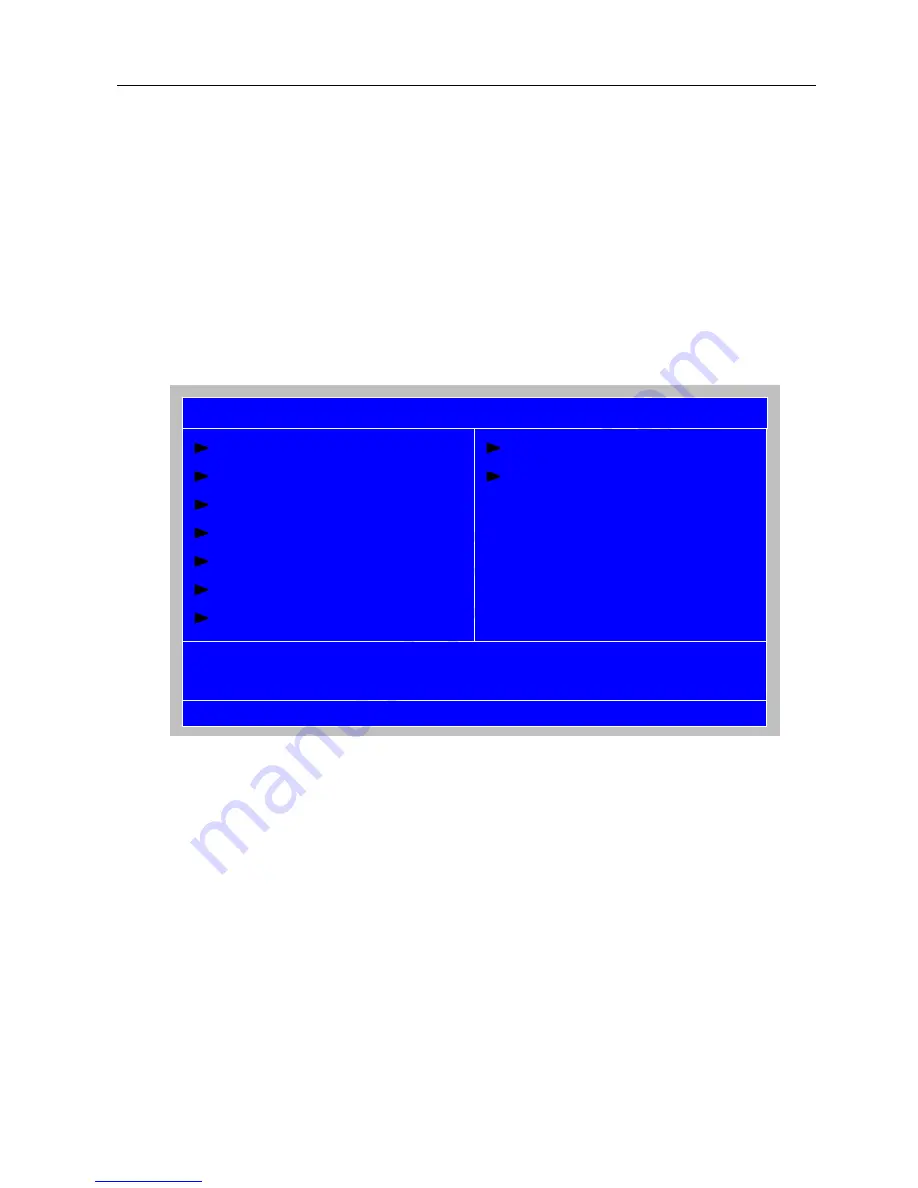
The Setup Utility main menu then appears:
Product Information
Standard CMOS Features
Advance BIOS Features CMOS
Advanced Chipset Features
Integrated Peripherals
Power Management Setup
PC Health Status
Frequency/VoltageControl
Load Default Settings
BIOS Security Features
Save and Exit
Exit without saving
KLIJ
: Move Enter: Select +/-/: Value F10: Save ESC: Exit
F1: General Help F9:
Optimized
Defaults
CMOS Setup Utility-Copyright(C) 1985-2008,American Megatrends, Inc.
Summary of Contents for Aspire M3300
Page 12: ...6 Block Diagram Block Diagram ...
Page 47: ...41 ...
Page 56: ...50 Remove CPU Process 1 Remove CPU according following the pictures ...
Page 58: ...52 ...
Page 59: ...53 ...
Page 61: ...55 ...
Page 62: ...56 ...
Page 64: ...58 Exploded Diagram ...
Page 67: ...62 Keyboard LITE ON SK 9625 USB Standard 104KS Black US with new color AC MT 018 KB USB0B 082 ...
Page 69: ...Picture2 Step 5 Click Next at create a RAID volume window Picture3 ...
Page 71: ...Picture6 Step 8 Select Menber Hard Drive s Picture7 ...
Page 76: ...Picture14 Step 7 Select two HDDs as Source Hard Drive Picture15 ...
Page 80: ...Picture2 Step 7 Picture3 Select RAID0 Stripe at RAID Level ...


